
Social media has modified how we work together on-line and has turn out to be a vital software in our on a regular basis lives. Nevertheless, due to the centralized nature of present social media channels and apps, points resembling knowledge breaches, censorship, ghost banning, and so on., are sadly fairly frequent, negatively affecting customers and content material creators worldwide. Fortuitously, as we’re slowly transitioning from Web2 to Web3, builders have the chance to unravel these centralized social media points by creating decentralized alternate options. Would you wish to construct a decentralized social media app different? If that’s the case, pay shut consideration to the content material herein as we create a social media dapp clone of Twitter. Now, don’t be alarmed; constructing a decentralized Twitter isn’t as difficult because it sounds. Actually, with the most effective Web3 tech stack, you possibly can simply create a social media dapp resembling a Web3 Twitter in lower than 90 minutes!
Within the following sections, you’ll discover ways to make the most of React, Remix, and Moralis to construct decentralized purposes (dapps) effortlessly. React will allow you to make use of your JavaScript proficiency and canopy the frontend. With Remix, you’ll simply compile and deploy a sensible contract to assist your social media dapp. Moreover, with Moralis (a.ok.a. “Firebase for crypto“), you’ll tie all of it collectively. With this final Web3 backend platform, you’ll simply implement all important Web3 options, beginning with Web3 authentication. Due to the Moralis SDK, it is possible for you to to index the blockchain and deal with off-chain knowledge and on-chain knowledge. As such, be certain to create your free Moralis account to make use of this highly effective toolset. Nevertheless, earlier than we present you find out how to construct your personal occasion of our social media dapp, let’s do a fast demonstration of our Web3 Twitter clone.
Demo of Our Social Media Dapp
Similar to most dapps, our social media dapp begins with Web3 login:

Wanting on the screenshot above, you possibly can see that customers get to finish their Web3 authentication utilizing Web3 wallets. As soon as they click on on “Join Pockets”, customers can select amongst a number of choices:
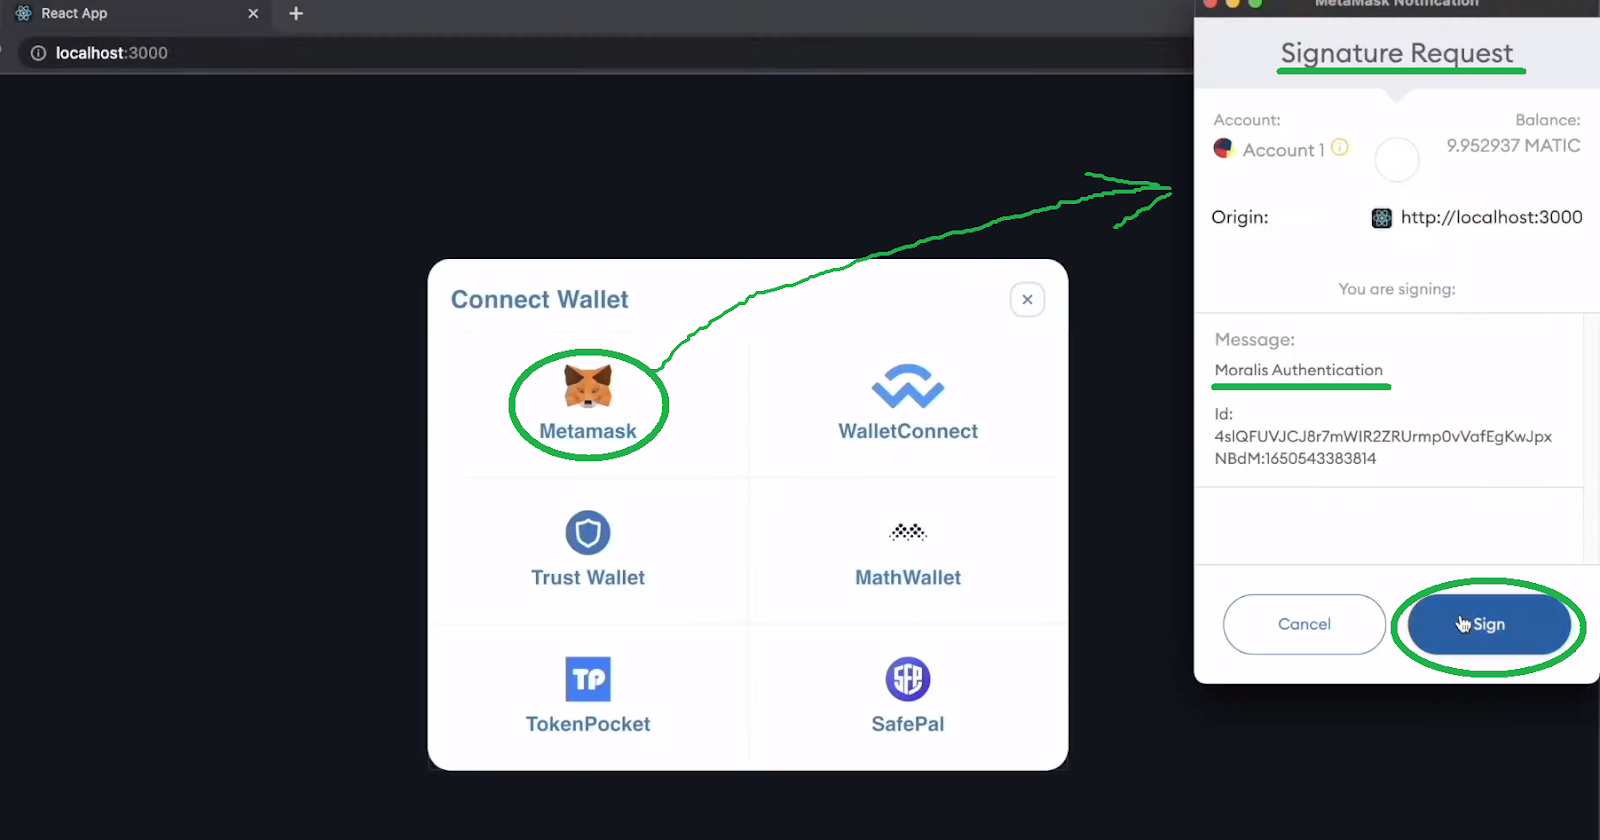
Nevertheless, on this demonstration, we’ll take into account an instance consumer who decides to authenticate with MetaMask. He begins by clicking on the MetaMask icon, which triggers this crypto pockets’s extension to pop up. The latter requests a digital signature (affirmation). Therefore, the consumer must click on on “Signal” to enter our social media dapp’s homepage:
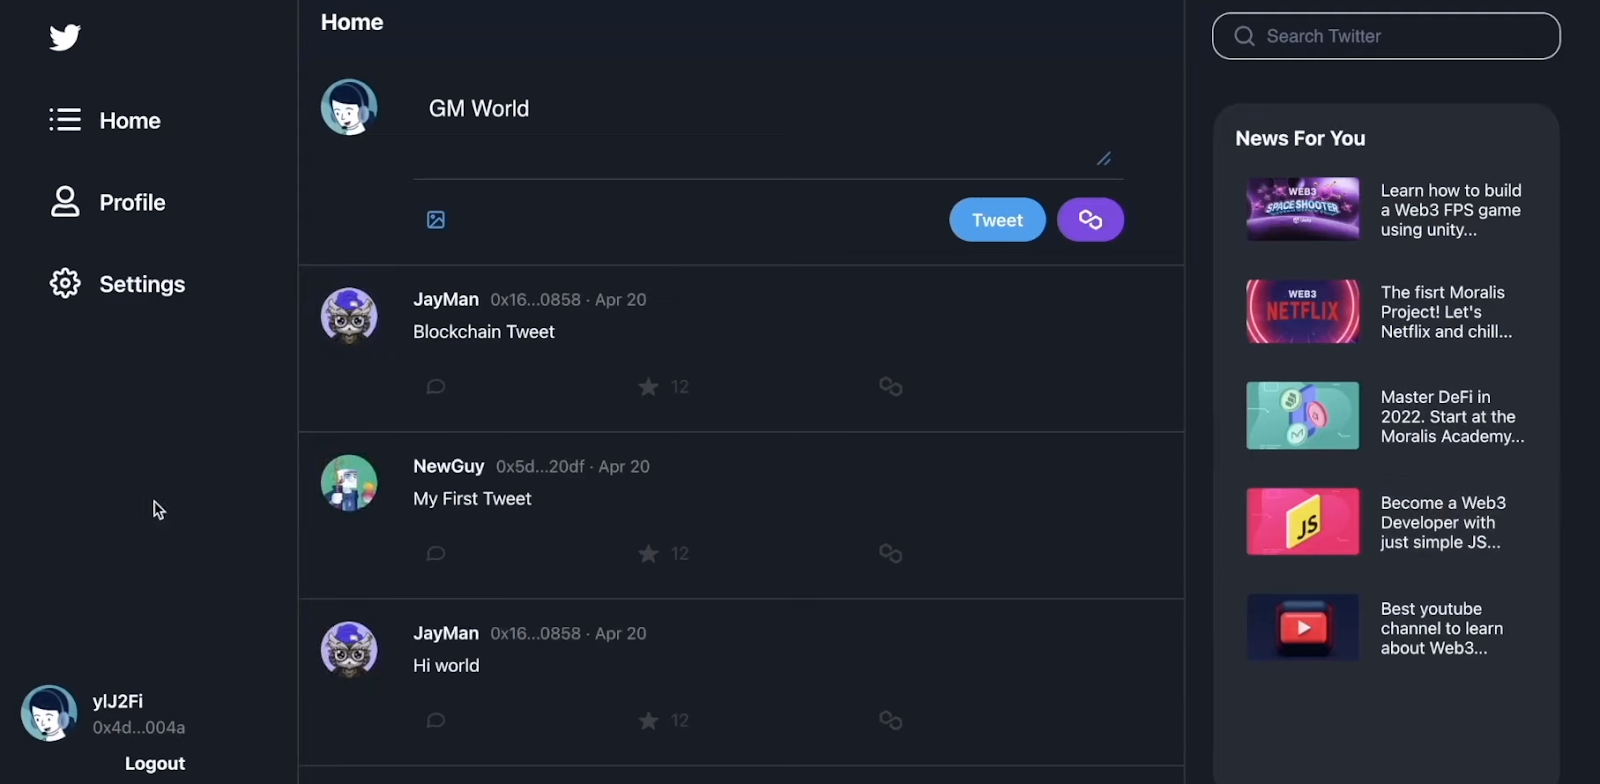
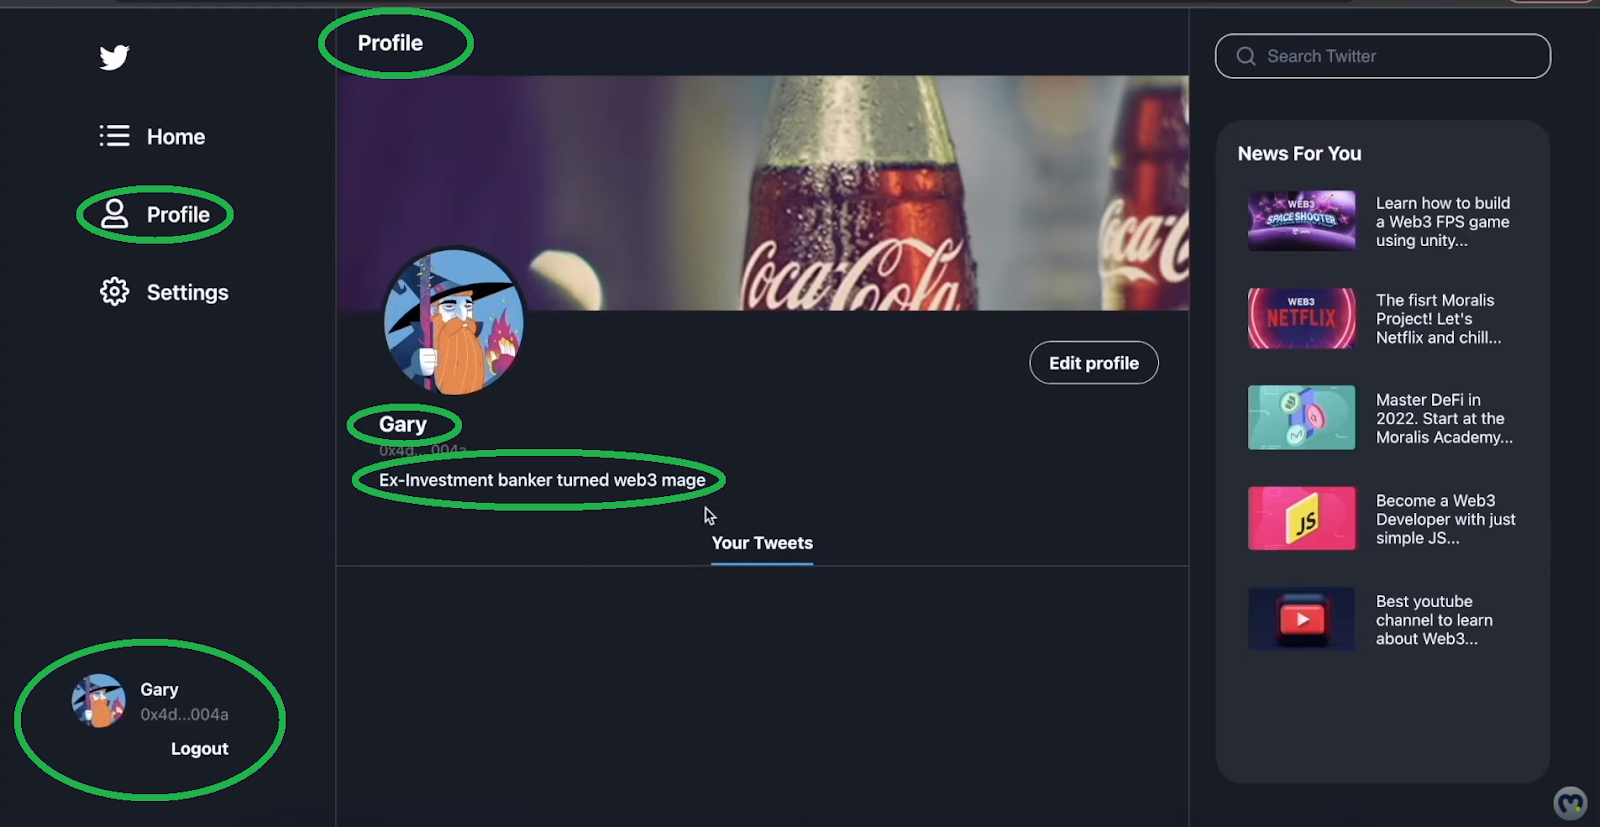
In our instance, this consumer has logged in for the primary time, and our dapp units the default consumer icon. When the consumer logs in, the consumer can instantly see the tweets feed. By deciding on the “Profile” tab, he can personalize his account through the “Edit profile” button:
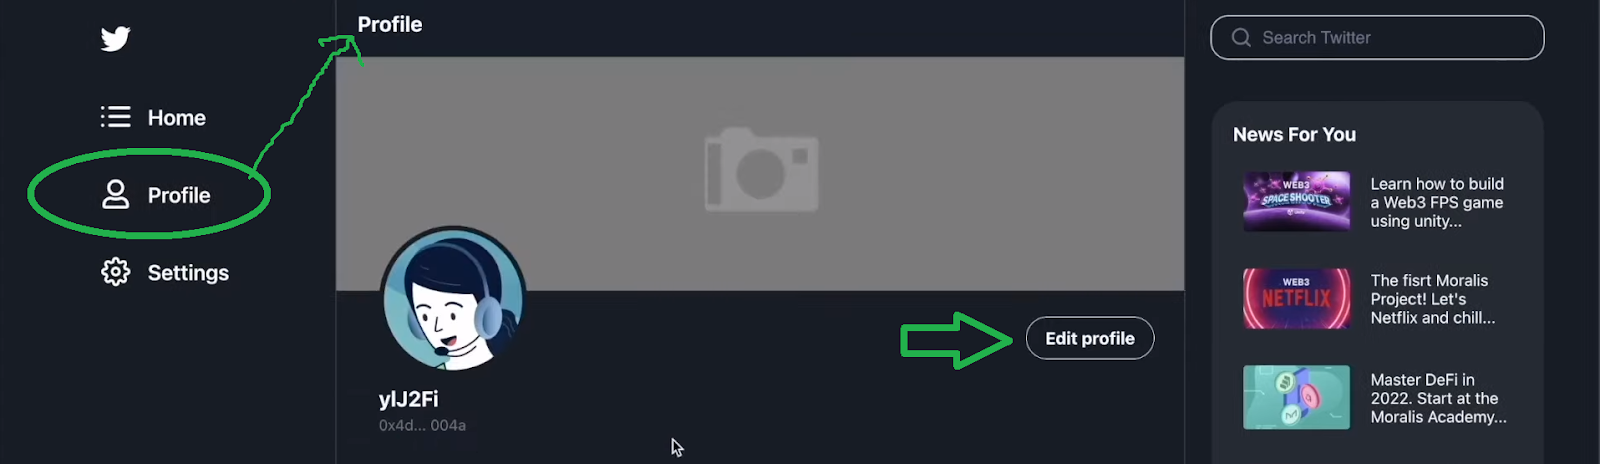
Contained in the profile settings, customers get to enter their names and bio. They’ll additionally use their NFTs (non-fungible tokens) saved within the linked pockets as their profile pictures. Nonetheless, those that want to take action may personalize their banners by importing pictures. To do that, they only must click on on the grey space under the “Profile Banner” part:
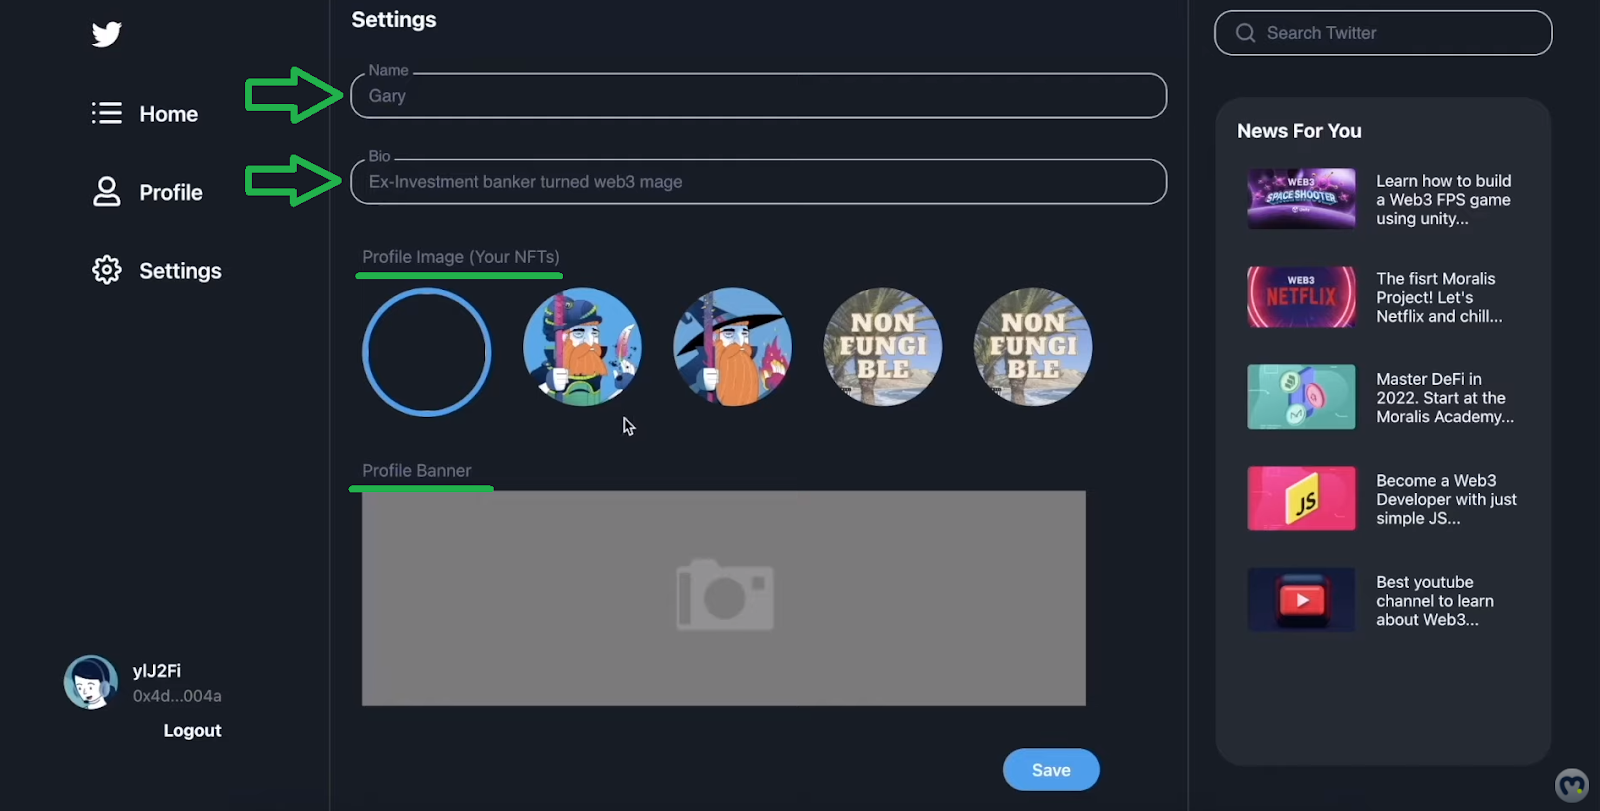
As soon as the customers enter all their particulars, they only must click on on “Save” to finish the personalization of their accounts. These are the consequence for our instance consumer named Gary:
The right way to Tweet with Our Social Media Dapp
Let’s now have a look at how customers get to tweet with our social media dapp. For starters, to entry this function, they should be on the “Dwelling” tab:
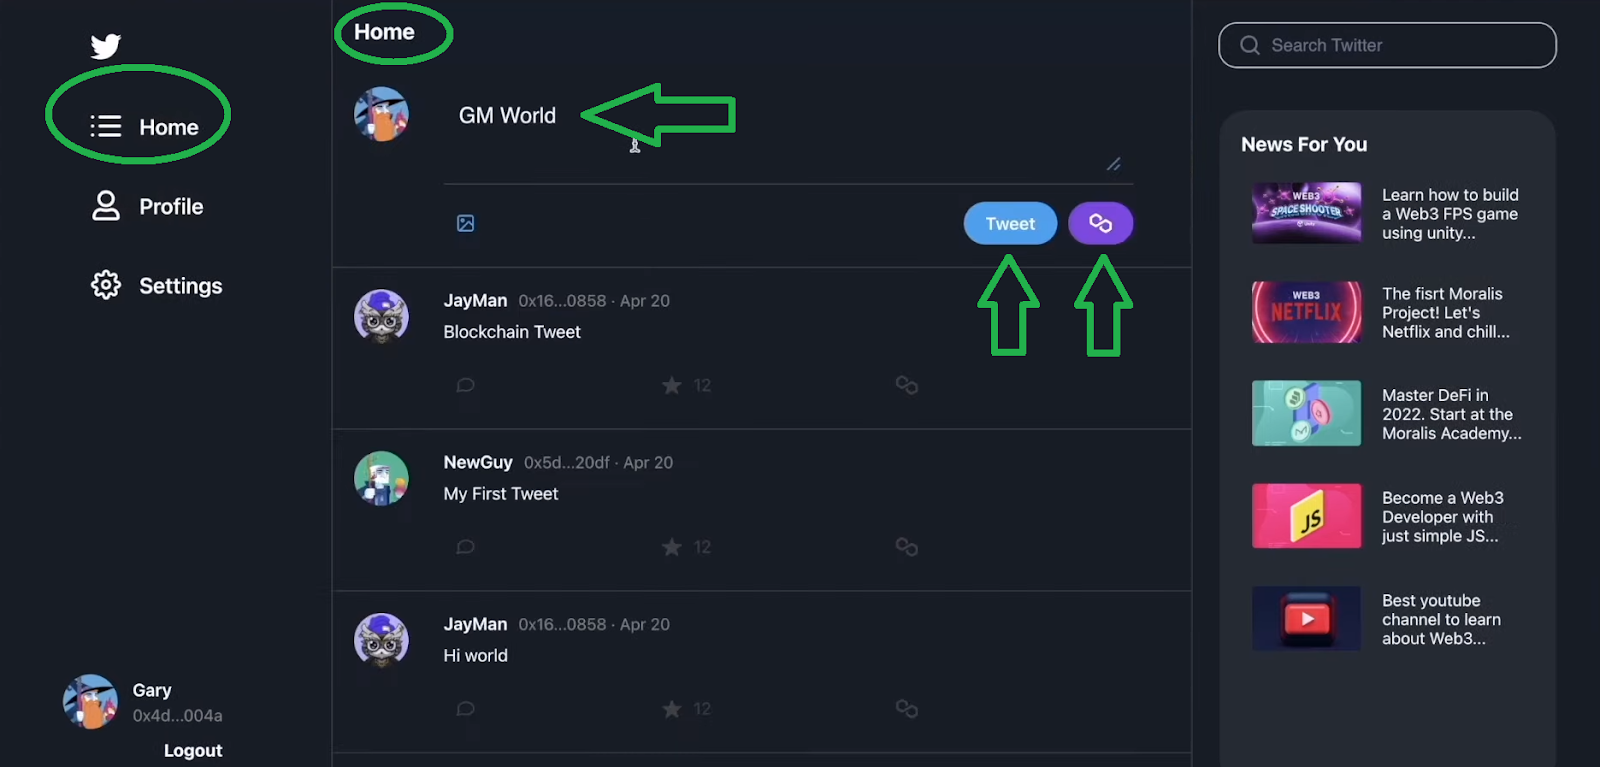
Second, they should click on on the entry subject (the place it says “GM World”) and sort in some textual content. Additionally, they will add a picture to their tweets through the “picture” icon under the textual content on the left-hand facet. As soon as they’ve their textual content (and picture) prepared, our dapp offers them two selections. They’ll do an everyday tweet by clicking on the “Tweet” button. Nevertheless, in the event that they click on on the “Polygon icon” (chain), they get to save lots of their tweet on the blockchain.
Common Tweets Demo
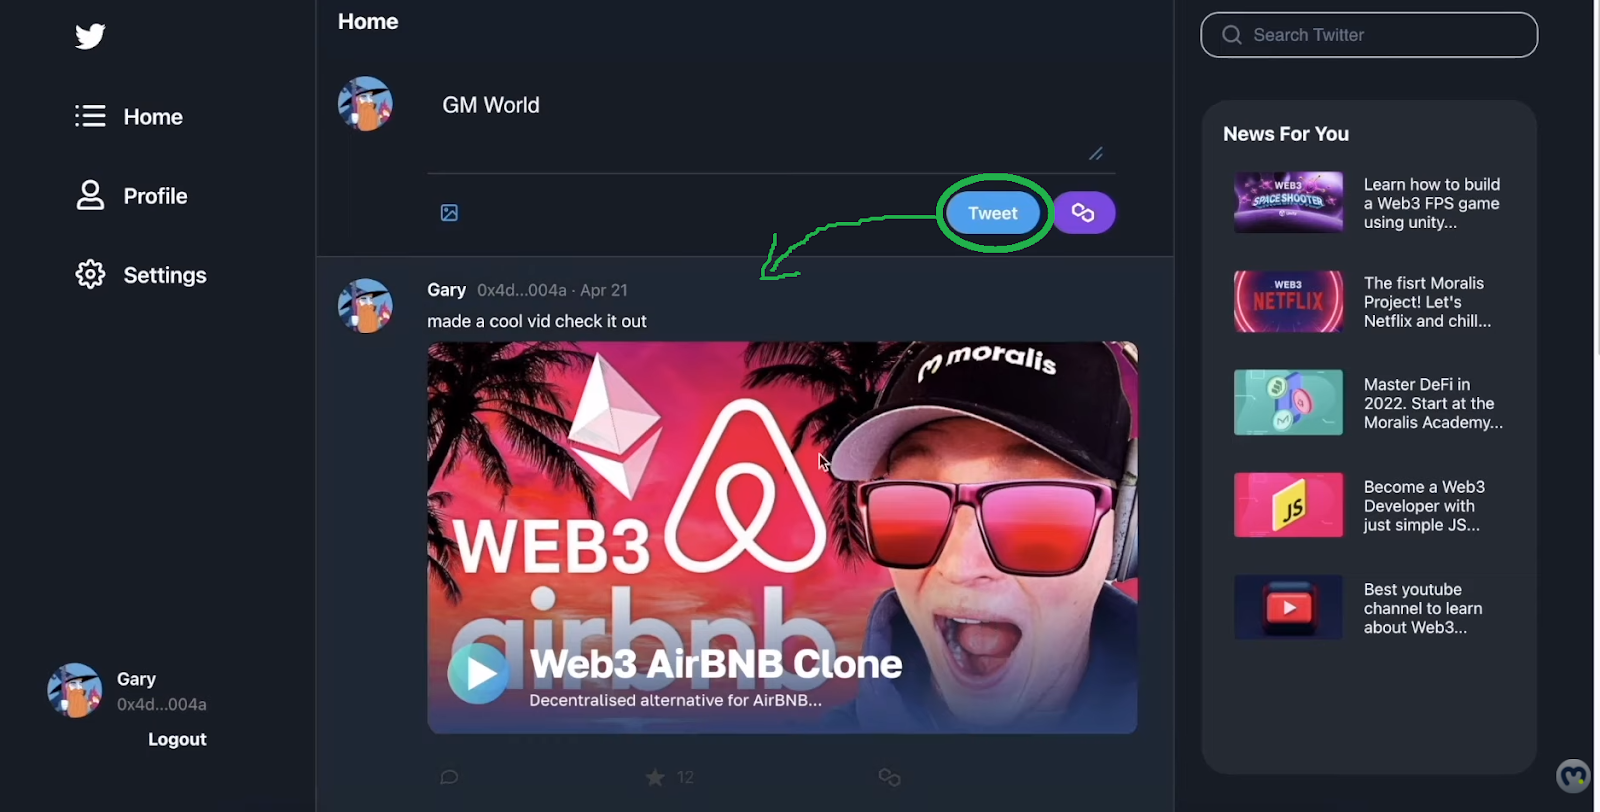
If the consumer clicks on “Tweet”, his new tweet will principally seem nearly immediately within the tweet thread under the entry subject:
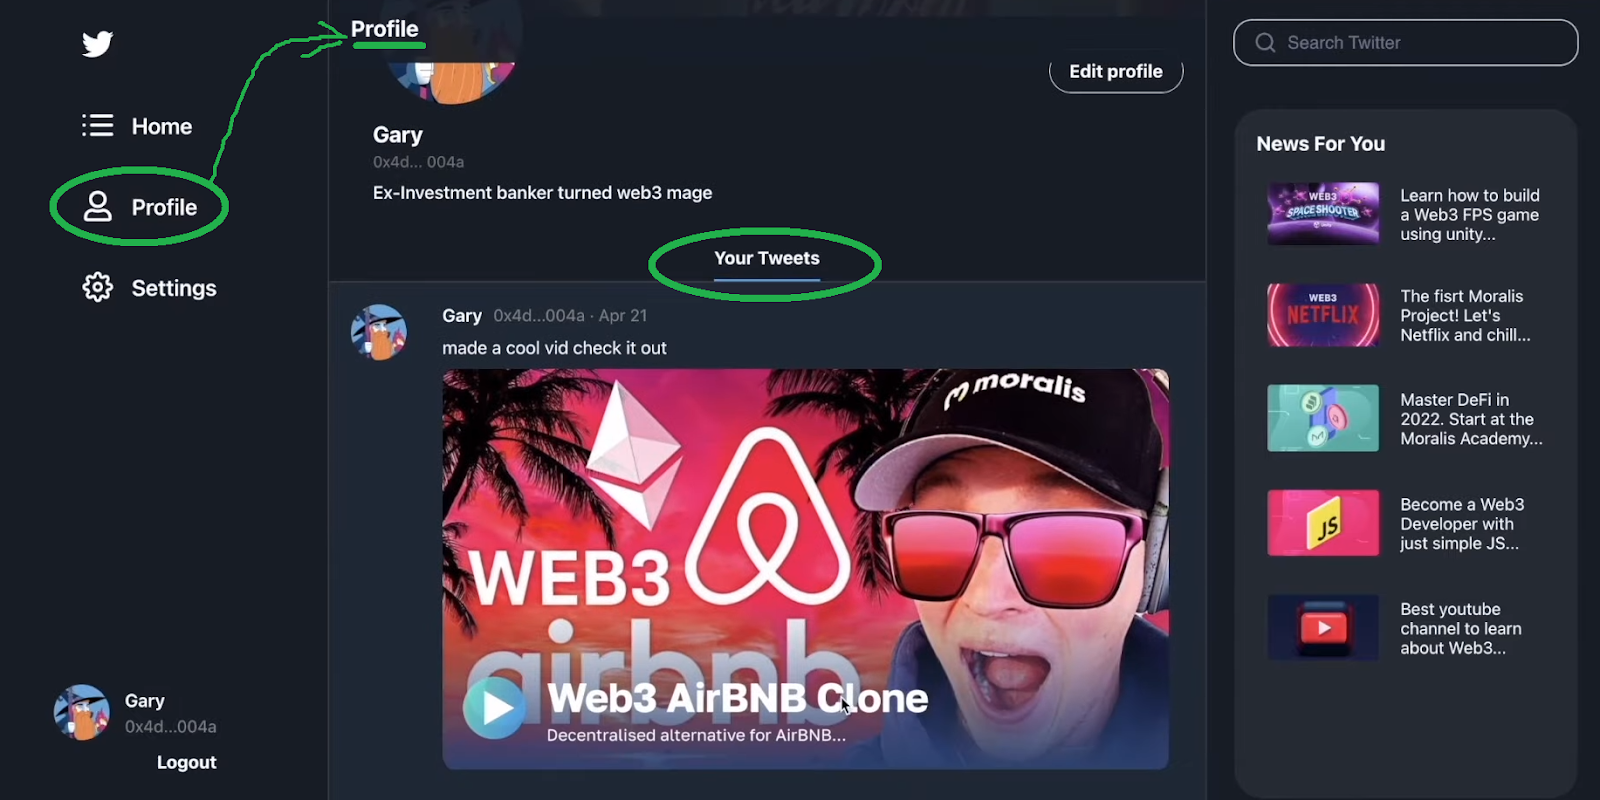
Customers may view their tweets beneath the “Your Tweets” part (inside their profile tab):
On-ChainTweets Demo
Customers who resolve to submit their tweets on the blockchain will click on on the “Polygon icon” button:
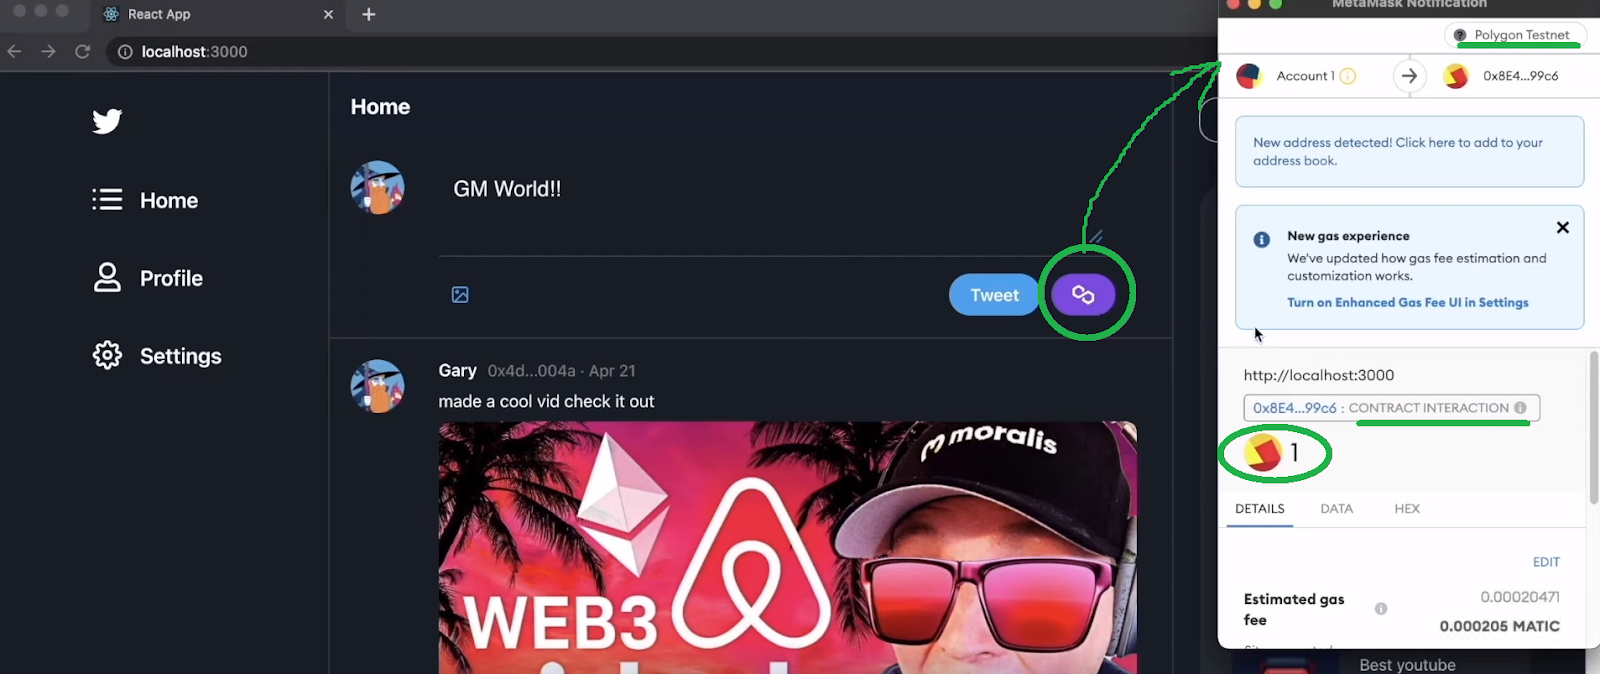
This motion triggers their Web3 pockets, which prompts them to verify the transaction associated to storing their tweet on the blockchain. Accordingly, customers should click on on “Verify” and pay the gasoline payment:
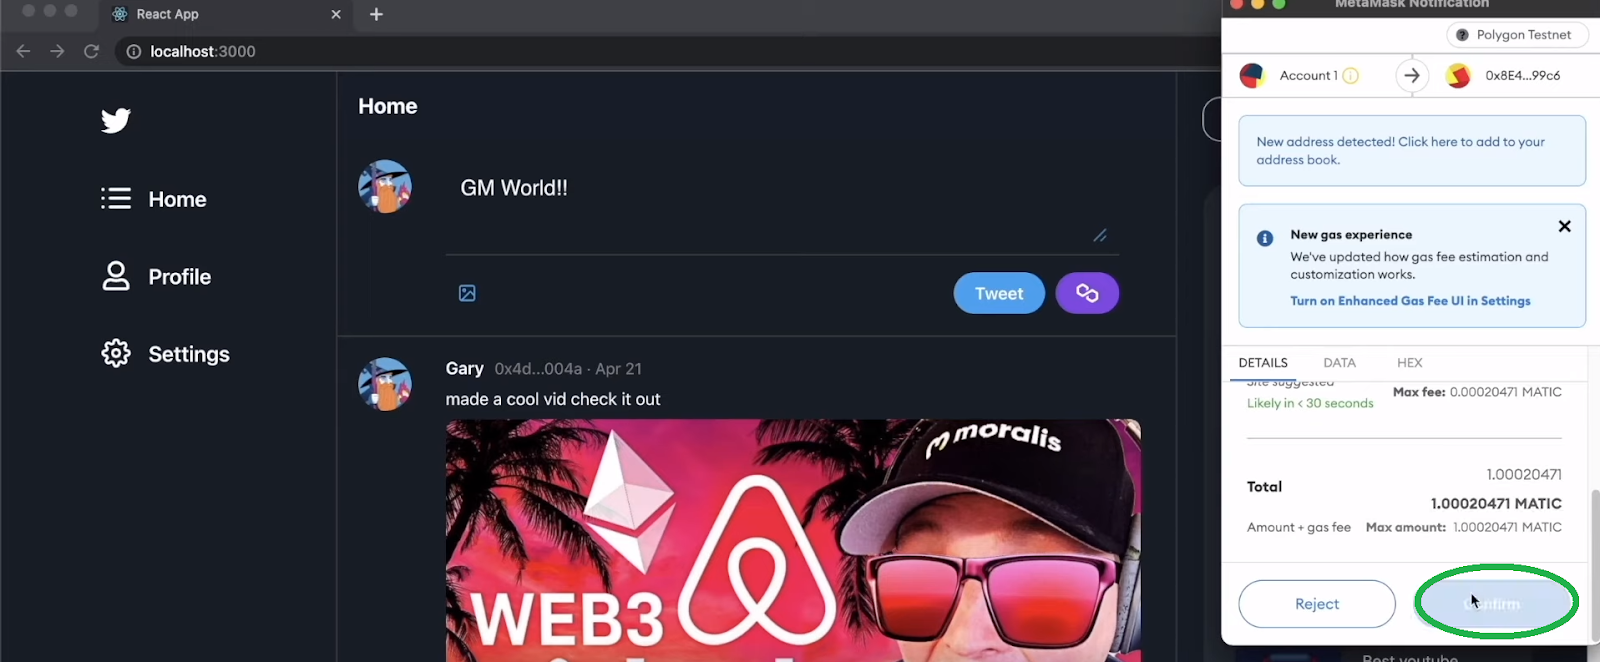
As soon as the above transaction is processed, customers’ on-chain tweets can even seem within the tweet thread:

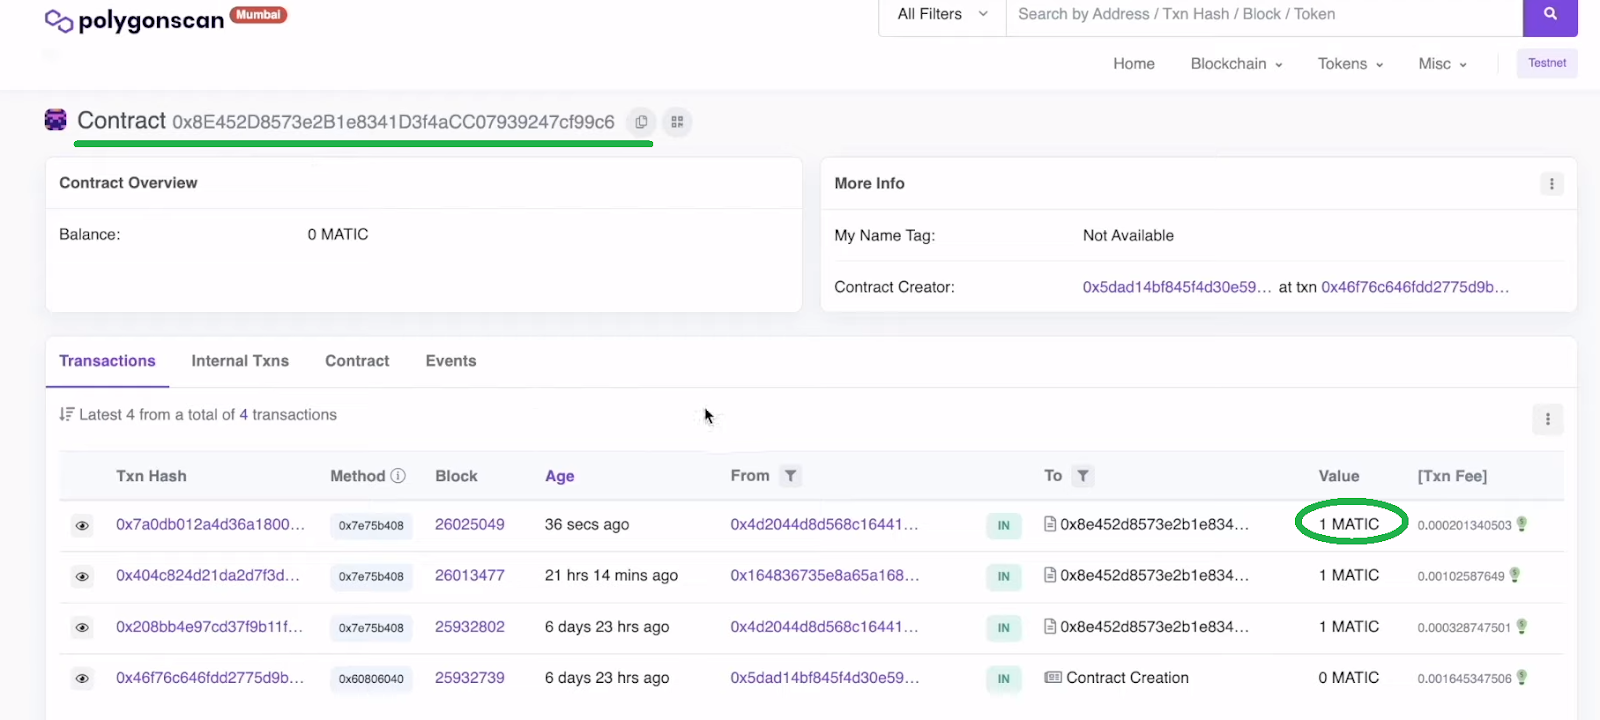
For the reason that above transaction is an on-chain occasion, we are able to use a blockchain explorer (PolygonScan [Mumbai testnet] in our case) to verify that the above tweet actually is saved on the Mumbai chain:
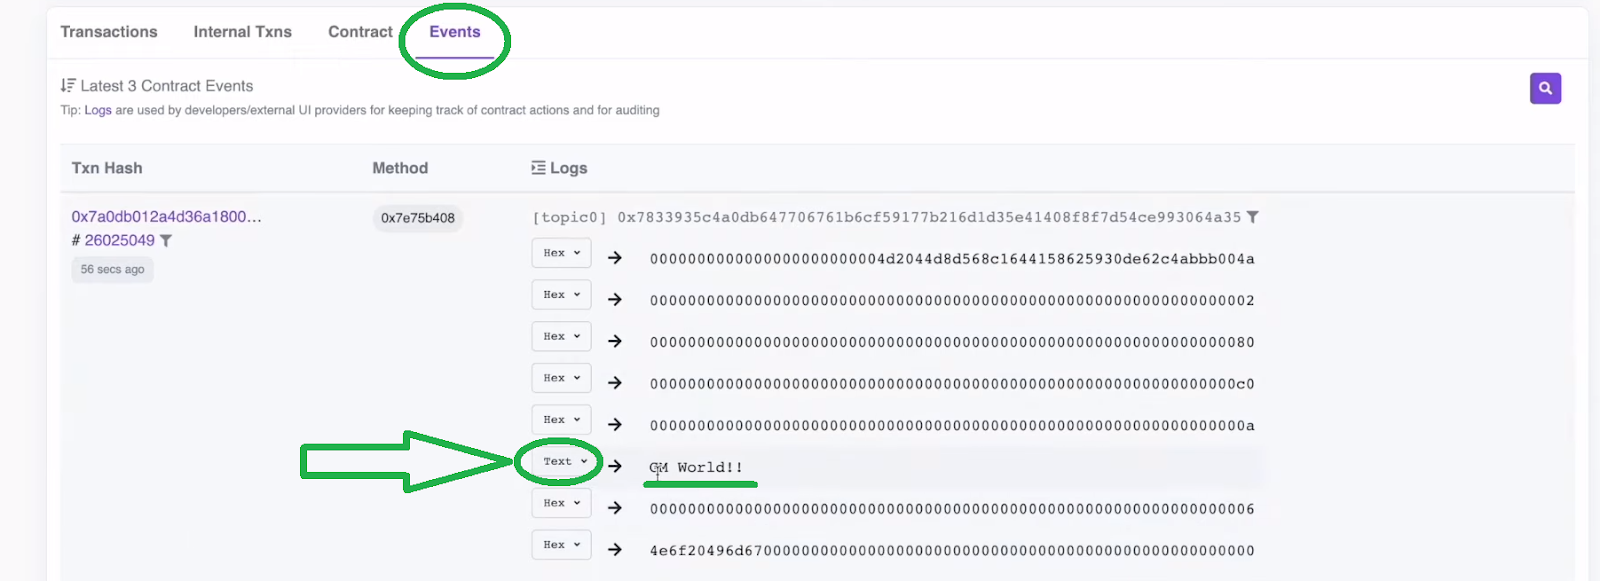
We are able to choose the “Occasions” tab for extra particulars. There, we have to change the instance transaction’s “Hex” into “Textual content” to view the content material of the above instance tweet:
Construct Your Social Media Dapp with React, Remix, and Moralis
If the above demo impressed you, roll up your sleeves and observe our lead. That is the place you’ll discover ways to create a social media dapp. You’ll see find out how to create a social media dapp good contract, arrange the frontend (sidebars, homepage, profile web page, setting web page), and combine the Moralis dashboard. Apart from our steerage, you may as well watch an in depth video tutorial on the finish of this text. That is the video we’ll reference utilizing timestamps all through the next sections.
Moreover, we made the starter code and the ultimate code of this instance undertaking out there on GitHub. We strongly encourage you to clone the starter code and implement the code your self. That’s the trail our tutorial assumes you’ll take. Nevertheless, in case you are in a rush, you may as well clone the ultimate code and use our tutorial as a code walkthrough. Now, with out additional ado, let’s start our journey by inspecting find out how to create a social media dapp good contract.

Social Media Dapp Good Contract
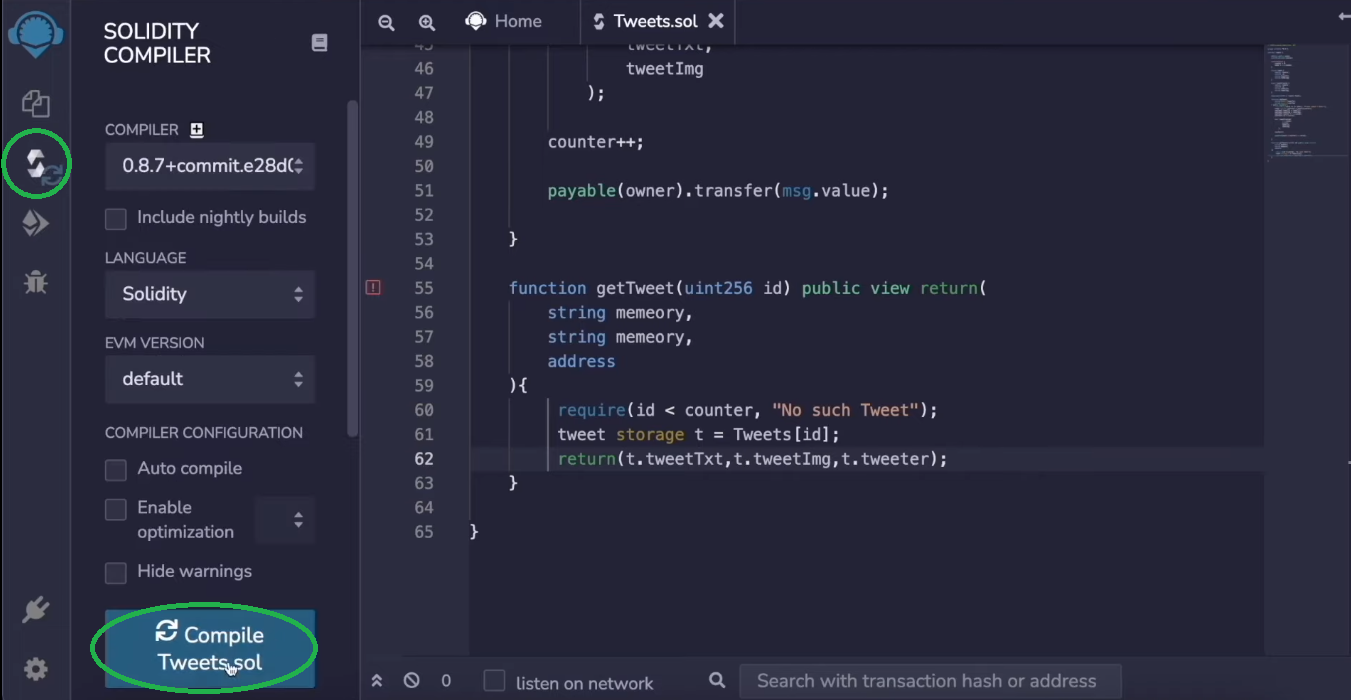
As you could know, there are good contracts behind each on-chain transaction. Since our dapp’s on-chain tweets require on-chain transactions, we want a sensible contract. Thus, let’s create that good contract (video under, beginning at 4:42). Begin by opening Remix. Then create a brand new file and title it “tweets.sol“:

Word: If you’re not all for studying Solidity fundamentals, you possibly can simply copy our good contract’s code and paste it into Remix.
On the prime of your newly created file, you should first enter the “pragma” line. Then, you can begin including your contract particulars. Be sure to make use of the video tutorial under to just remember to enter the strains of code appropriately. With the good contract prepared, it’s good to compile it earlier than you possibly can deploy it. Fortuitously, each of those steps are fairly simple when utilizing Remix (15:51):
When you’ve compiled your good contract, it’s time to deploy it:
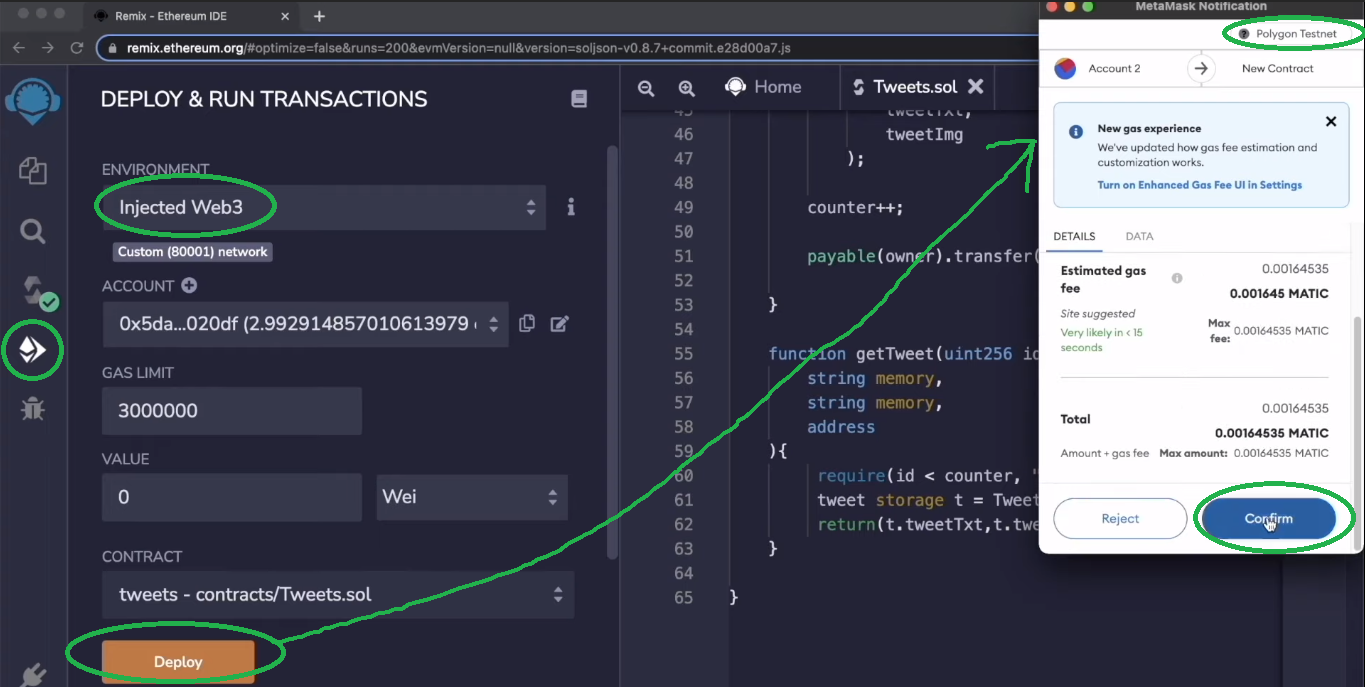
As indicated within the screenshot above, be certain to navigate to the best tab. Then, ensure you choose the “Injected Web3” surroundings and join your MetaMask extension to the Mumbai testnet.
Word: If that is your first time utilizing MetaMask to connect with Mumbai’s testnet, you should first add that community. Additionally, add some “play” MATIC to your pockets utilizing the Mumbai testnet faucet.
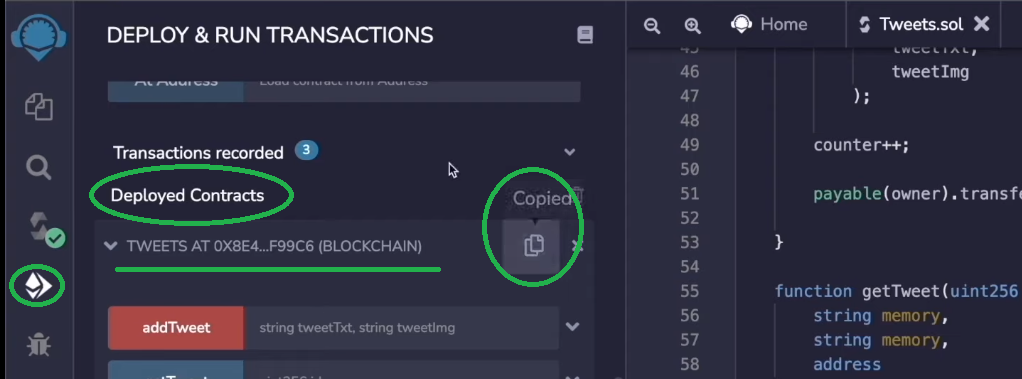
After assembly the entire above stipulations, you possibly can deploy your contract. When you full that course of, you’ll have the ability to see your good contract on PolygonScan. Simply copy the tackle beneath the “Deployed Contracts”:
The Frontend of Our Social Media Dapp
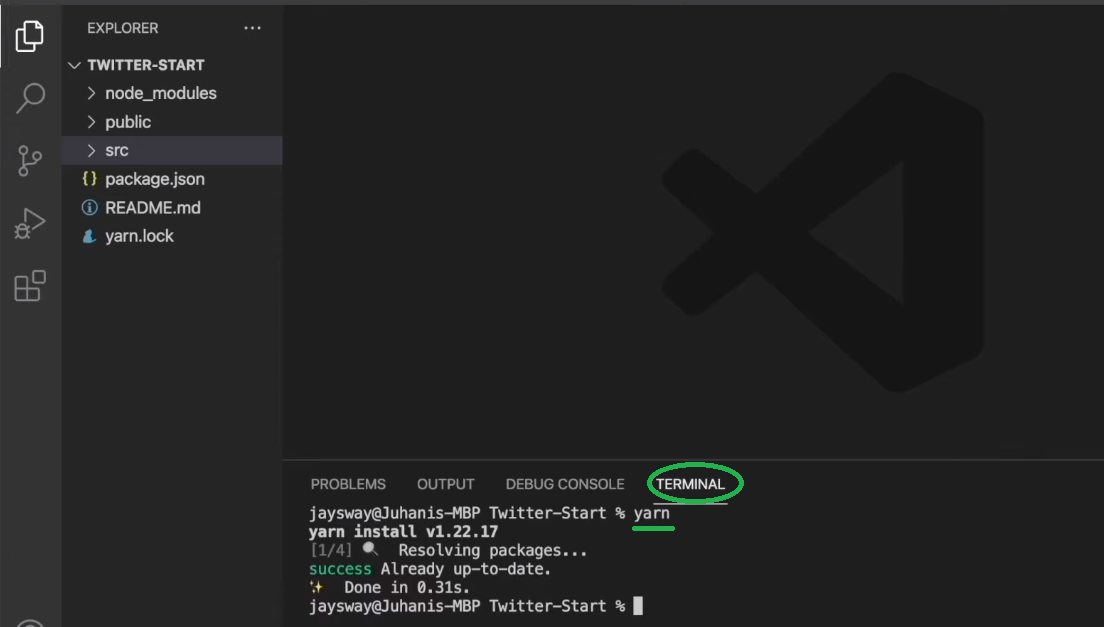
On the subject of the Web3 UI elements, the objective is to make it intuitive for customers. Additional, the Web3 frontend should be fairly just like what customers perceive. That is why you employ the identical instruments as for Web2 when growing. So, in our case, we’ll give attention to utilizing React. As well as, you’ll be taught to make use of Moralis’ web3uikit, which additional simplifies issues. Therefore, be certain to observe the video under, beginning at 20:15, and observe our in-house skilled. You’ll begin by finishing the preliminary setup:
When you clone the code and set up all dependencies, you’ll construct your social media dapp’s sidebars (22:41). That is the place you’ll discover ways to make the most of the “Sidebar” part and save loads of time. Finally, it shouldn’t take you greater than ten minutes to have each sidebars prepared:

Shifting ahead, you’ll begin constructing the “Dwelling.js” file, which will probably be your dapp’s homepage (31:44). That is the place our skilled will present you find out how to exploit web3uikit. This can empower you to effortlessly add the text-entry space, icons, and buttons. As well as, one can find out find out how to incorporate the choice to add pictures seamlessly. When you full the “tweeting” space, you’ll begin constructing your social media dapp’s tweet feed. Subsequent, you’ll add the “Profile” web page (46:41). Lastly, to wrap up the frontend a part of this instance undertaking, you’ll sort out the “Settings” web page (49:53).
The Backend of Our Social Media Dapp
Together with your good contract and frontend in place, it’s time (video under, beginning at 57:29) to handle the Web3 performance. That is the place you should use the facility of Moralis to keep away from coping with the restrictions of RPC nodes. At this level, you in all probability have already got your free Moralis account prepared; therefore, log in. If that’s not the case, use the “create your free Moralis account” acknowledged at first of this information.
Word: Moralis has just lately up to date its UI. Thus, what you at present see inside your Moralis admin panel will probably not match the video tutorial under. So, you’ve two choices. You should use the brand new UI as per the screenshots under. Or, you possibly can change to the legacy UI:

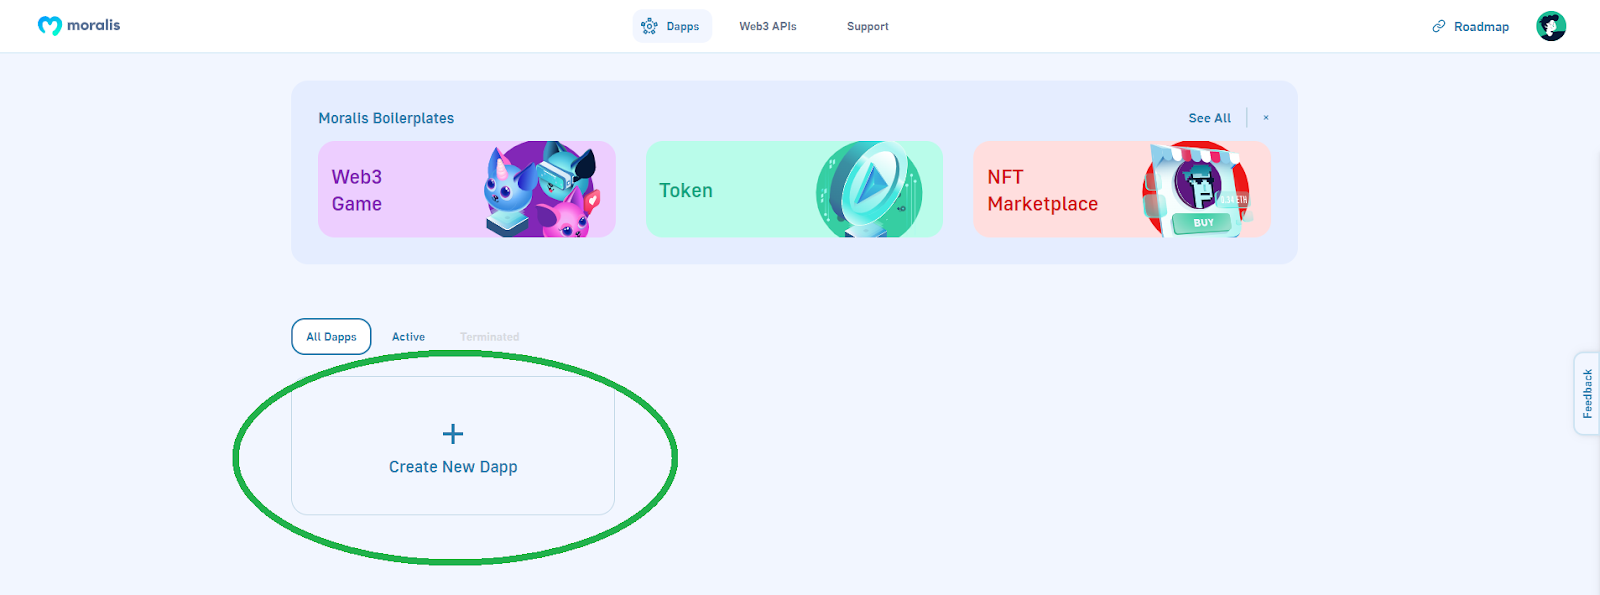
First, you’ll must create a brand new dapp inside your Moralis admin panel (57:46):
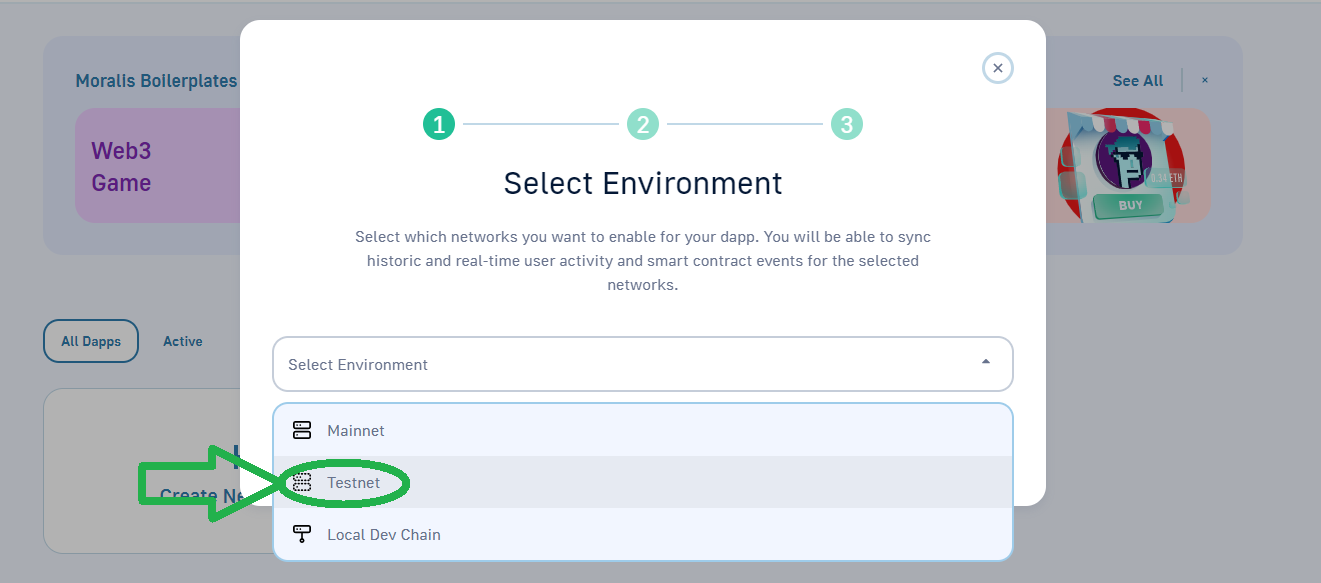
Subsequent, choose your surroundings – when engaged on instance initiatives, the testnet is probably the most appropriate selection:
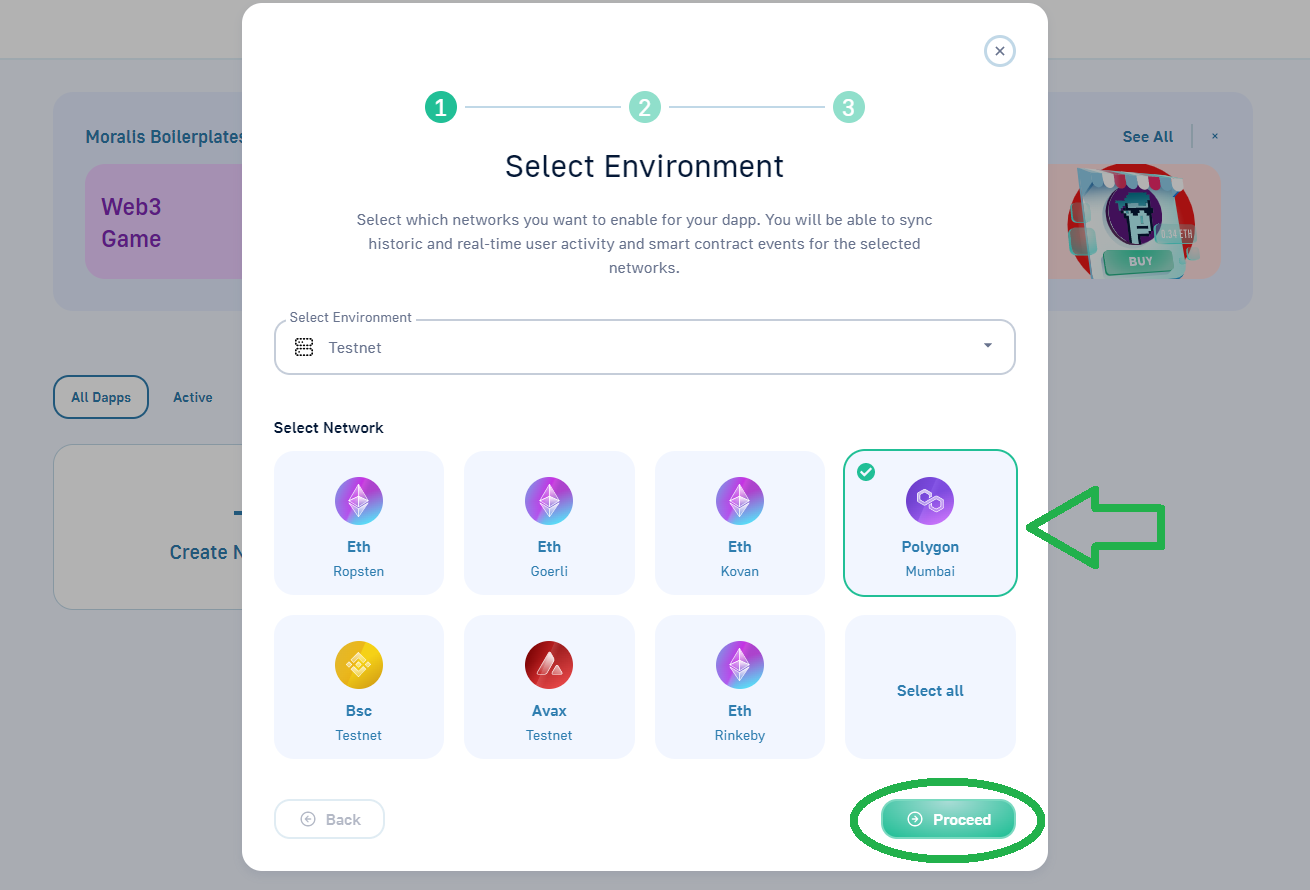
Then, choose “Polygon Mumbai” and click on on “Proceed”:
Then choose town closest to you:

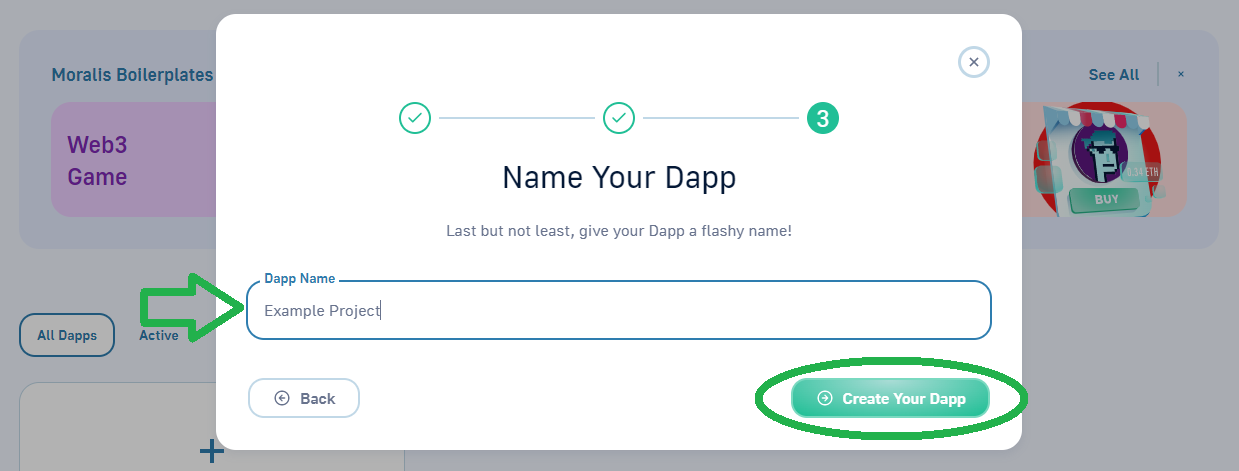
Lastly, title your dapp and full the method by clicking on the “Create Your Dapp” button:
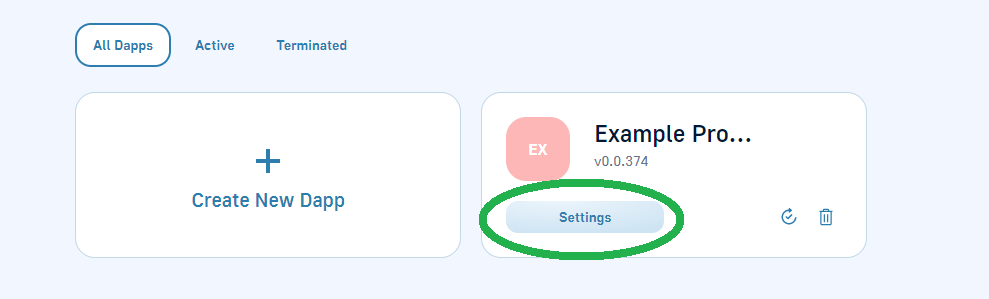
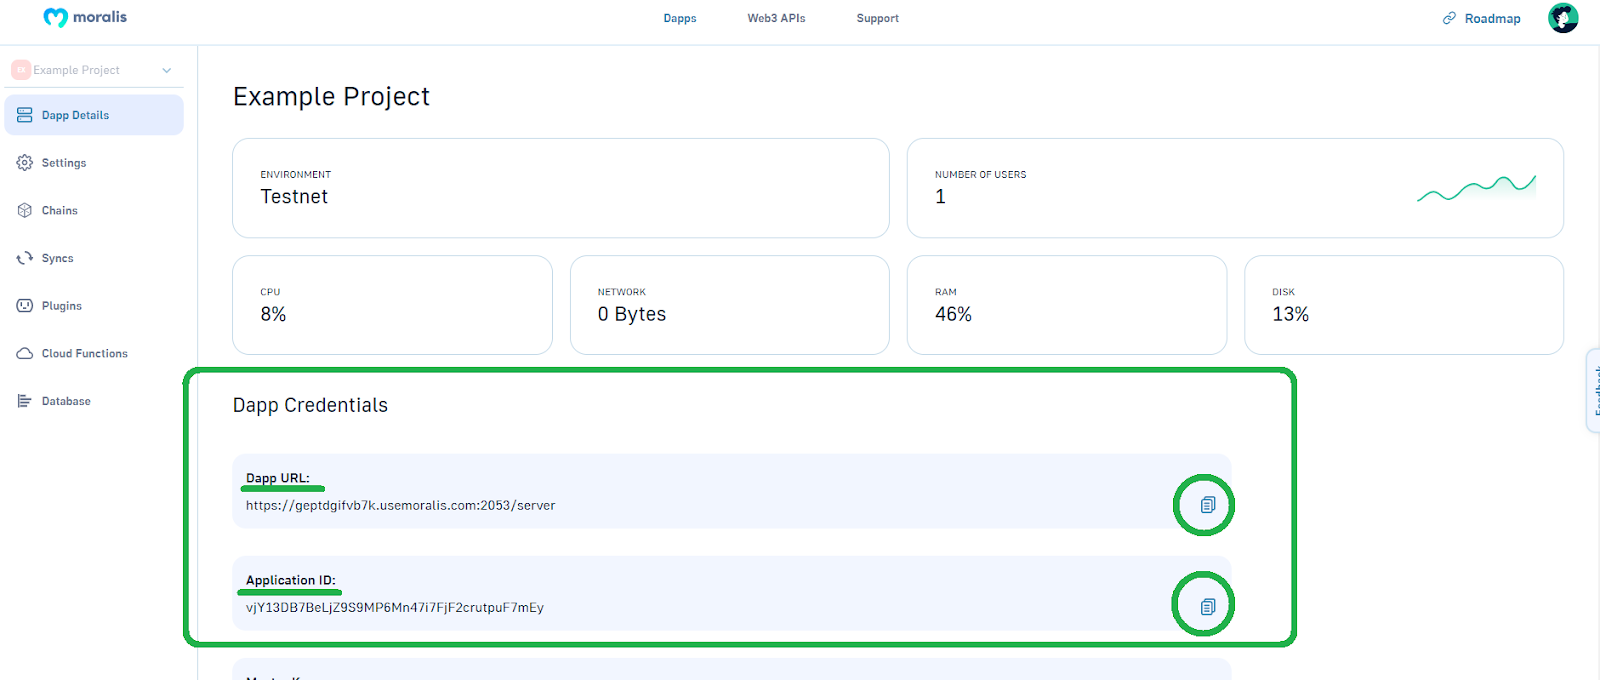
Now that your dapp is up and operating, you possibly can get hold of its particulars (URL and ID):
Subsequent, copy your dapp URL and ID:
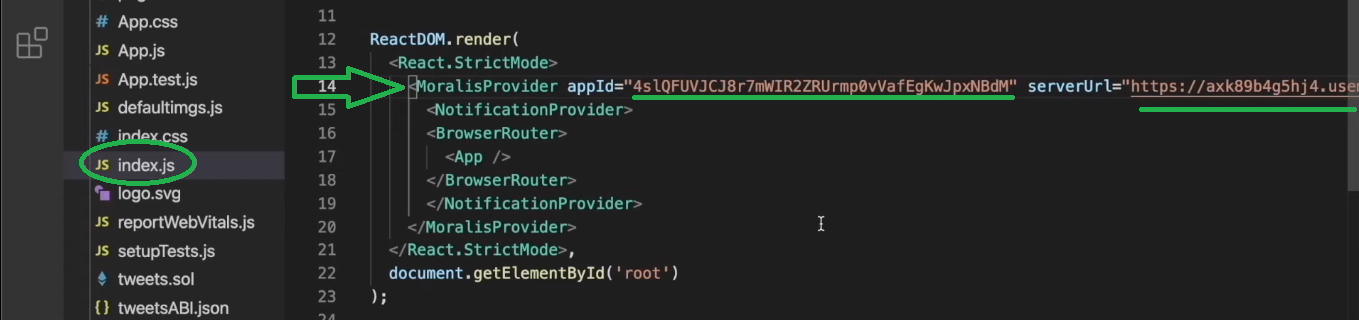
Lastly, paste the above-copied particulars into the “index.js” file:
By finishing the steps above, you now have Web3 performance at your disposal. As such, you possibly can add Web3 authentication to your social media dapp utilizing the “App.js” file. Additionally, due to web3uikit, you’ll have the ability to have a clear and engaging “Join Pockets” button prepared very quickly. Furthermore, you’ll begin to unveil the limitless energy of Moralis’ SDK with the “isAuthenticated” methodology.
On-Chain and Off-Chain Information at Your Disposal
Beginning at 1:00:59, you’ll start using your Moralis database to retailer the on-chain and off-chain knowledge simply. That is the place you entry your dapp’s database with the brand new UI:
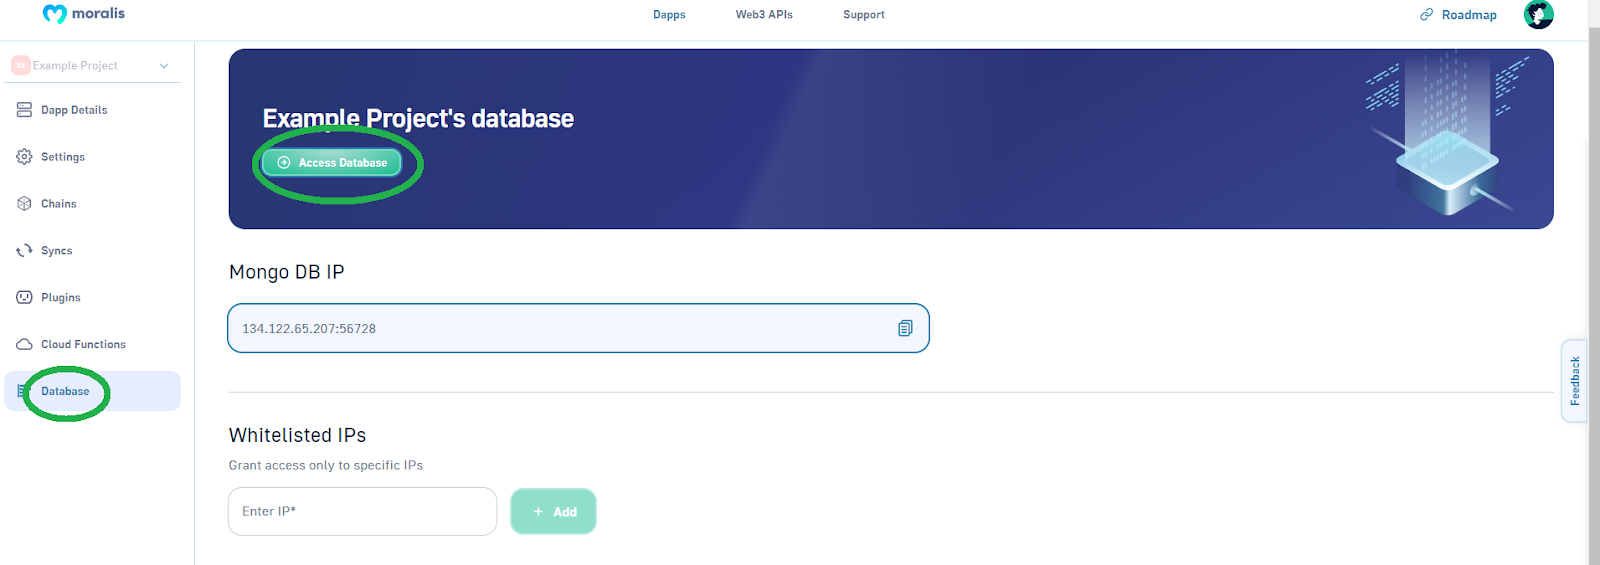
Right here’s the precise database:
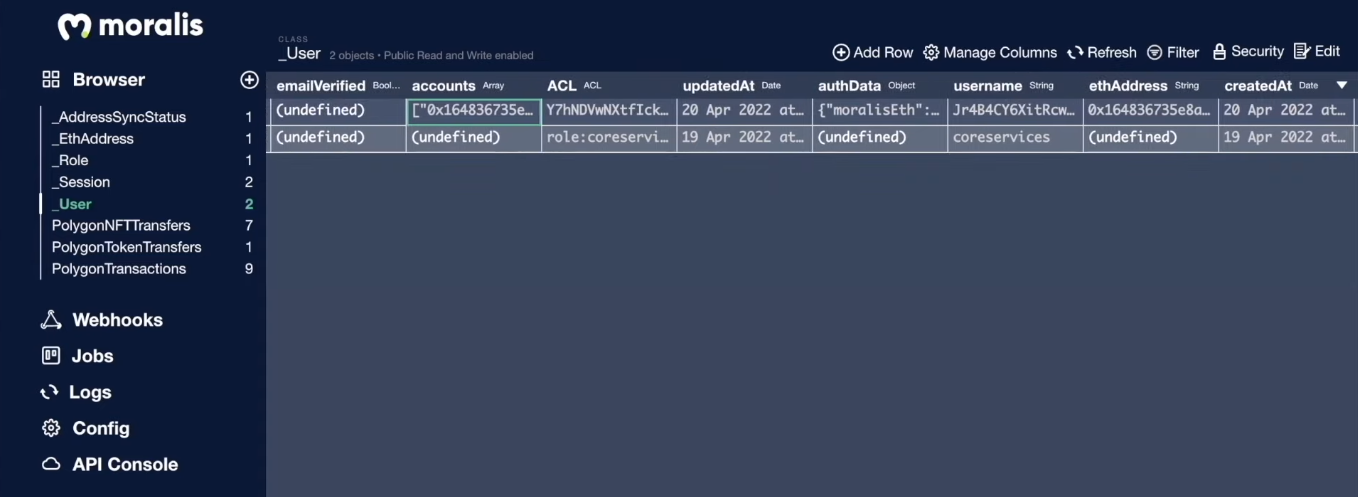
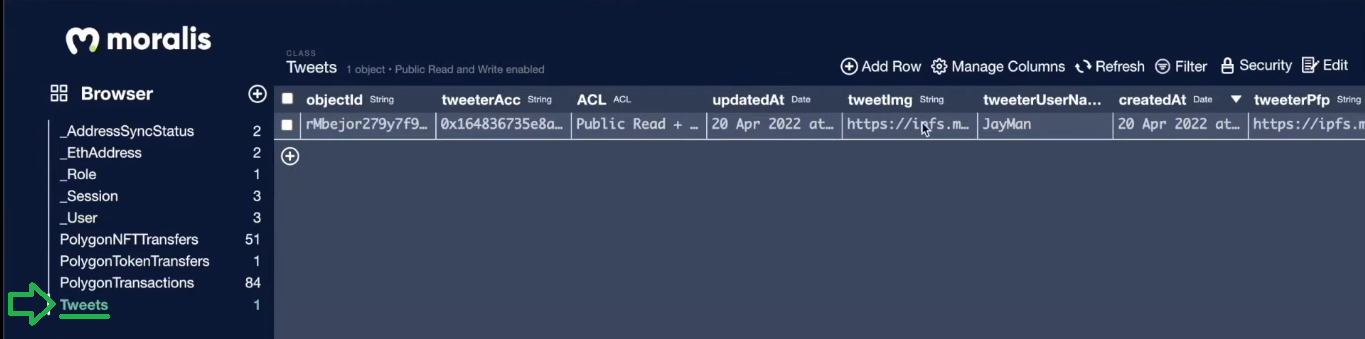
So as to add lessons, it’s good to make the database work correctly to your social media dapp, and also you’ll use “Settings.js”. This file can even allow you to add to IPFS, which is likely one of the neatest methods to save lots of picture information in a decentralized means. Then, your dapp’s customers will have the ability to use this function to tweet pictures. Subsequent, you’ll make the most of “useMoralis” and create the “saveEdits” async operate, which will probably be triggered when customers click on on the “Save” button on their account settings web page. Utilizing “useMoralisWeb3Api”, you’ll create “useEffect” to fetch customers NFTs through “getNFTs”. This can allow customers to set their NFTs as their profile photos. Lastly, you need to give your social media dapp’s customers a strategy to save their tweets on the blockchain (1:12:40). To finish this feat, you’ll once more use your Moralis database – the “Tweets” class:
Right here’s the video we’ve been referencing all through the “Construct Your Social Media Dapp with React, Remix, and Moralis” part:
The right way to Create a Social Media Dapp – Abstract
In the event you’ve adopted our lead, you now have your personal social media dapp up and operating. Hopefully, you cloned our starter code and carried out the mandatory code utilizing the above information. Nevertheless, even in the event you cloned our ultimate code, you continue to wanted to deploy your good contract and join your Moralis account along with your React utility. So, whichever path you really took, you now know find out how to use Remix to compile and deploy good contracts. Extra importantly, you know the way to make use of the Moralis Web3 API and the Moralis database to cowl your Web3 backend wants.
In the event you loved creating this social media dapp, you could be all for our different “clone” initiatives. If that’s the case, you possibly can decide between the next instance initiatives:
Nevertheless, in the event you discover these initiatives too in depth to your style, we encourage you to discover the Moralis weblog and the Moralis YouTube channel. Among the newest matters there cowl the Ethereum Merge, an Ethereum NFT API, a Polygon NFT API, Binance NFT API, Solana NFT API, find out how to get Solana NFT metadata, find out how to mint 1000’s of NFT recreation belongings, importing Web3 Unity metadata, and rather more. Furthermore, in the event you use them correctly, these two shops might help you turn out to be a Web3 developer. Nevertheless, taking a extra skilled strategy could make the journey loads smoother. As such, be certain to think about enrolling in Moralis Academy.


