
2021 was a game-changer for NFTs (non-fungible tokens). Positive, some initiatives had been simply attempting to capitalize on the surging reputation of NFTs. Nevertheless, 2021 noticed NFT utility begin exploring new frontiers. As such, it’s clear to most that NFTs are right here to remain and will reshape numerous industries. Thus, devs already know that NFT on-chain evaluation might be important. And, whereas this would possibly sound very sophisticated, we guarantee you it’s fairly easy. With the appropriate set of instruments, you are able to do NFT on-chain evaluation with only a few strains of code. Then, you possibly can make the most of that ability in all kinds of the way. For example, you possibly can create an NFT whale watcher dapp (decentralized utility), which is precisely what we are going to deal with herein.
Shifting ahead, we are going to present you how you can use Moralis to simply fetch historic and dwell on-chain information for any NFT assortment. Furthermore, you’ll additionally discover ways to simply scan any Web3 pockets tackle associated to these NFT collections. Furthermore, with NFT on-chain evaluation underneath your belt, we’ll present you how you can create a neat Web3 frontend round it. So far as right this moment’s instance challenge goes, we are going to deal with the Moonbirds NFT assortment. Nevertheless, we encourage you to do the identical for a minimum of one different assortment for follow.
As we tackle right this moment’s “NFT on-chain evaluation” feat, we are going to information you thru the next phases:
- Setup Moralis
- Set API price limits
- Implementing NFT on-chain evaluation
- Node JS server setup
- Initialize a React app
- Populate NFT information to the React app
And, we are going to achieve this with the assistance of a video tutorial, which awaits you on the finish of this text.

NFT On-Chain Evaluation in Motion – NFT Whale Watcher Dapp Demo
Nevertheless, earlier than we dig deeper into the primary stage, we wish to do a fast demo of our completed instance dapp. So, right here’s the preliminary display of our instance dapp:
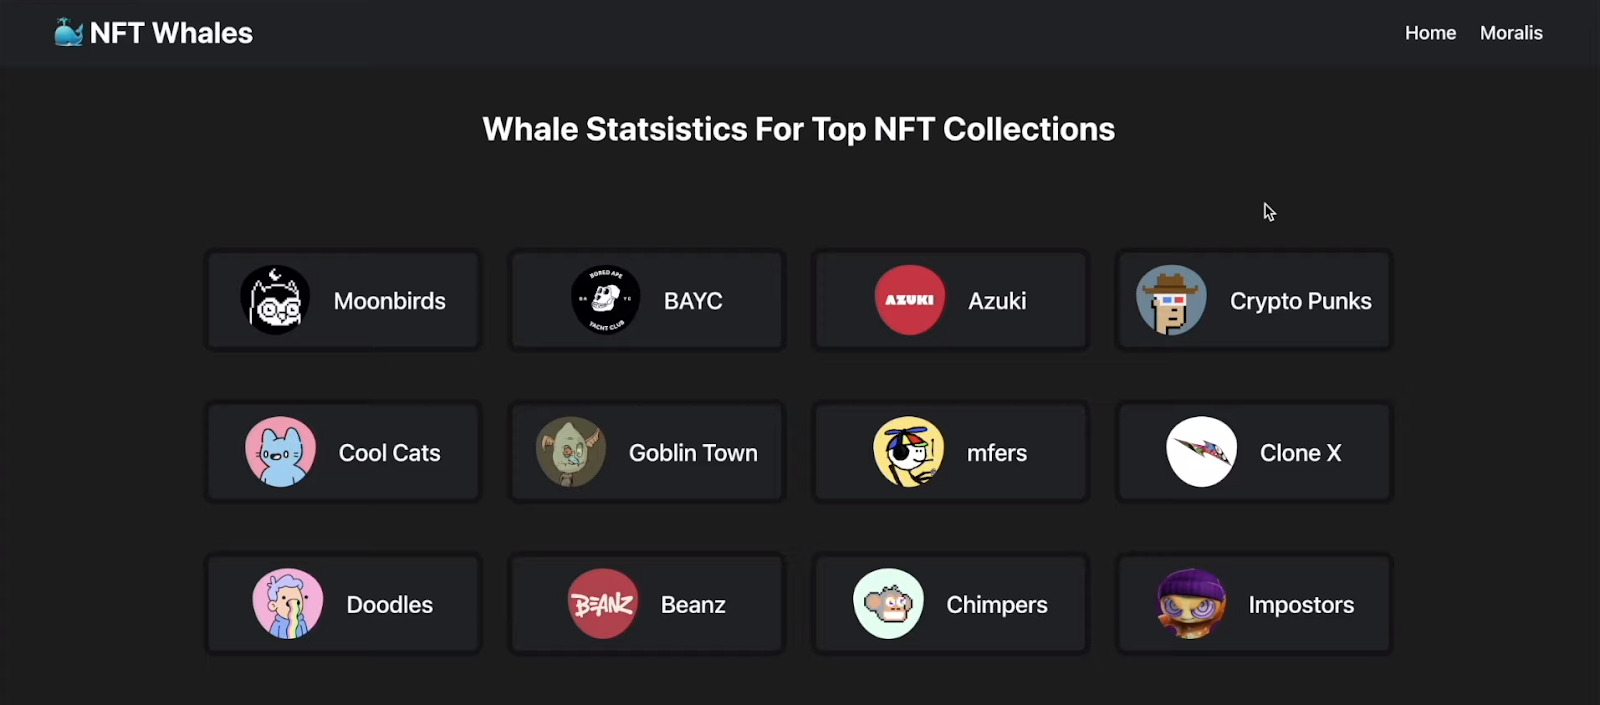
If customers wish to discover any of the above-listed NFT collections, they should click on on it.
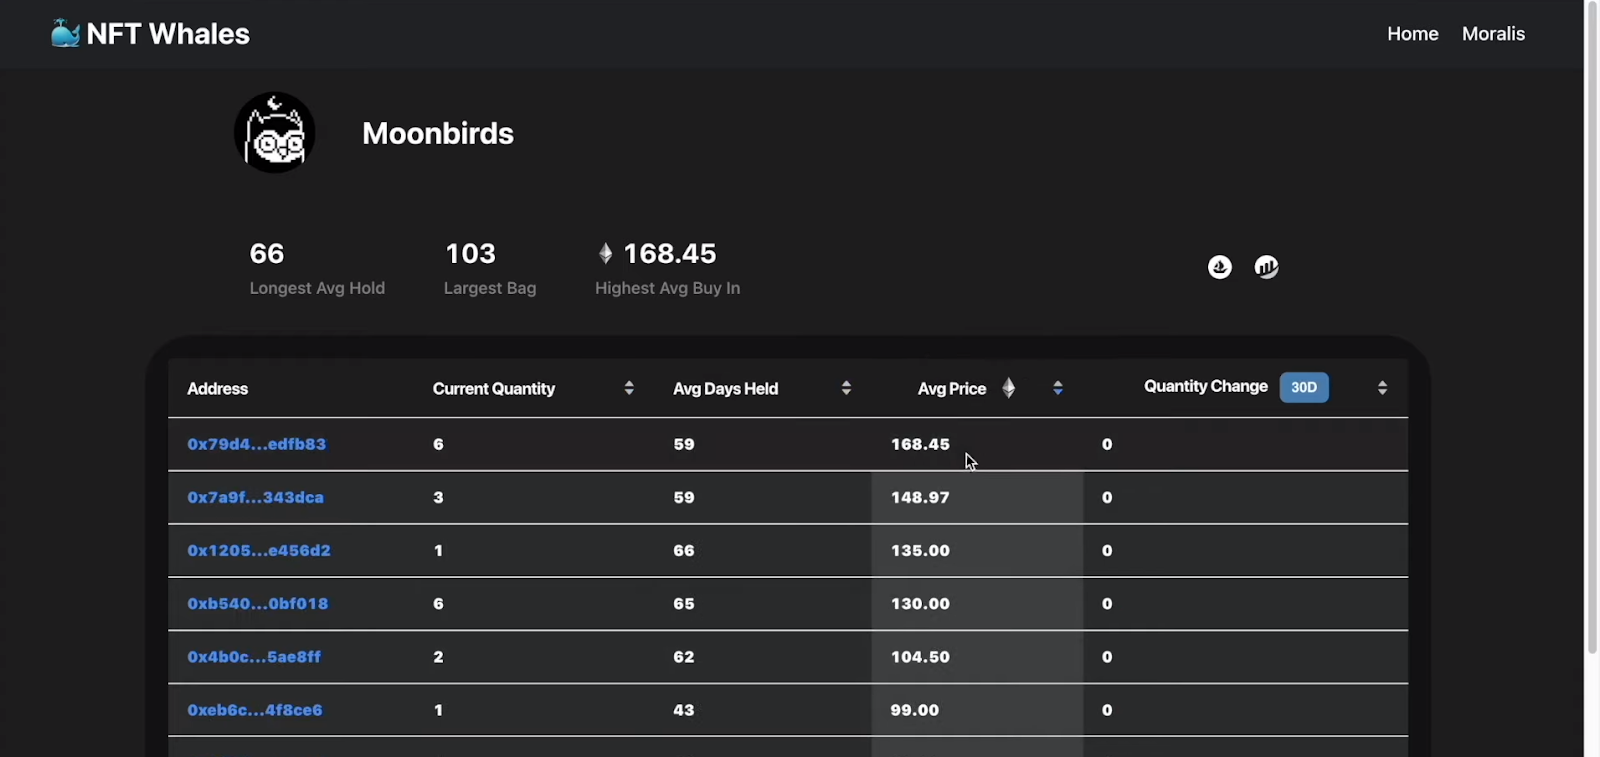
As soon as on the Moonbirds web page, customers can discover NFT on-chain evaluation carried out within the backend. As you possibly can see, we designed our dapp to show some fascinating stats on the prime. These embody the longest common maintain, the biggest bag, and the very best common purchase. Then, there may be the desk containing all the main points. On the far left, there are all addresses proudly owning Moonbirds NFTs. Subsequent, our dapp accommodates the “Present Amount” column, which shows the variety of present Moonbirds NFTs for a corresponding tackle. Then, we’ve got “Avg Days Held”, “Avg Value”, and “Amount Change” columns. The latter additionally provides customers a approach to choose a time interval that pursuits them. Moreover, every column has an choice to rearrange the desk in accordance with the values of that column, both in ascending or descending method.
Furthermore, because the blue coloration signifies, customers can click on the tackle to take a look at NTF on-chain evaluation for a specific tackle:

Inside a specific tackle, the dapp shows that tackle in the identical line because the identify of the gathering however on the other aspect. Subsequent, there’s the “Person Assortment” part, which shows the thumbnails of all NFTs of that assortment for the given tackle. And, on the backside, we once more have an NFT on-chain evaluation desk containing that tackle’ exercise. As such, it clearly signifies the occasion (purchase or promote), token IDs, value of NFTs, date, and “To” and “From” addresses concerned in transactions.
Now that what an incredible dapp, you’ll be constructing, you should be desperate to roll up your sleeves. After all, we wish to make issues as easy for you as attainable, as such, you possibly can clone our starter code from GitHub.

Setup Moralis
Listed below are the steps you’ll want to take to finish the preliminary Moralis setup, which can allow you to make use of the Moralis’ SDK:
- First, create your free Moralis account. Go to Moralis’ dwelling web page and click on the “Begin for Free” button. Nevertheless, in case you have already got an lively account, simply log in to your admin space:

- After accessing your Moralis admin space, you’ll want to create a brand new Moralis dapp:

- Then, choose the setting. For many instance initiatives, you’ll use testnets; nonetheless, right this moment we’re fascinated by dwell NFT initiatives, so go together with “Mainnet”:

- We are going to deal with the Ethereum mainnet. Although, due to Moralis’ cross-chain interoperability, you can choose a number of chains:

- For the area, choose the town closest to your location:

- Lastly, give your dapp a reputation and hit the “Create Your Dapp” button:

As soon as your Moralis dapp is up and operating, you possibly can entry its particulars and all of the performance through the “Settings” button:

Moralis’ Web3 APIs for NFT On.Chain Evaluation
Contained in the settings of your dapp, go to the “Web3 APIs” tab. Then scroll all the way down to the “Token” part. There’ you’ll discover the “/nft/{tackle}/transfers” API:
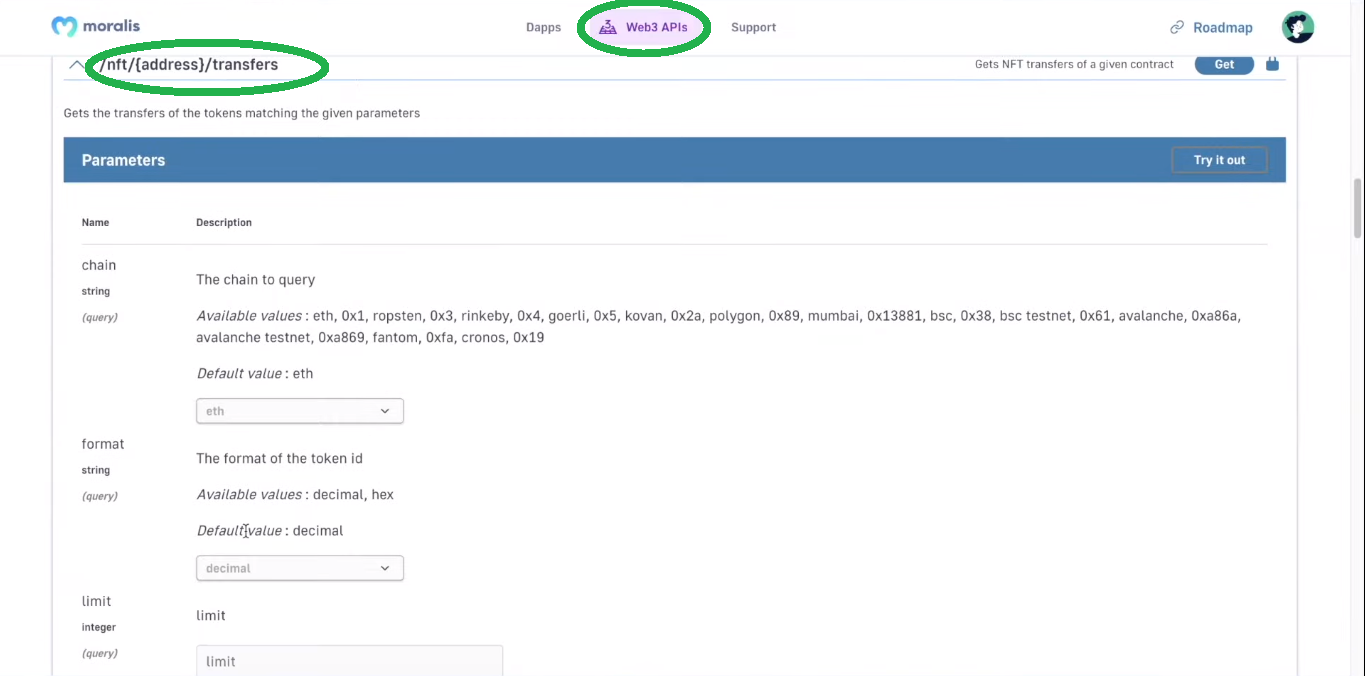
This API will get NFT transfers of a given contract. Furthermore, that is the API we are going to primarily deal with for the aim of right this moment’s NFT on-chain evaluation. Since this API offers us with all the info we want, we will considerably restrict the variety of API calls we have to make.
Moreover, trying on the above screenshot, we will see that the “/nft/{tackle}/transfers” API takes in some parameters:
- The chain we wish to question (Ethereum is the default choice)
- The tackle of the good contract we’re fascinated by
Then, the above API offers us with the leads to the next format:
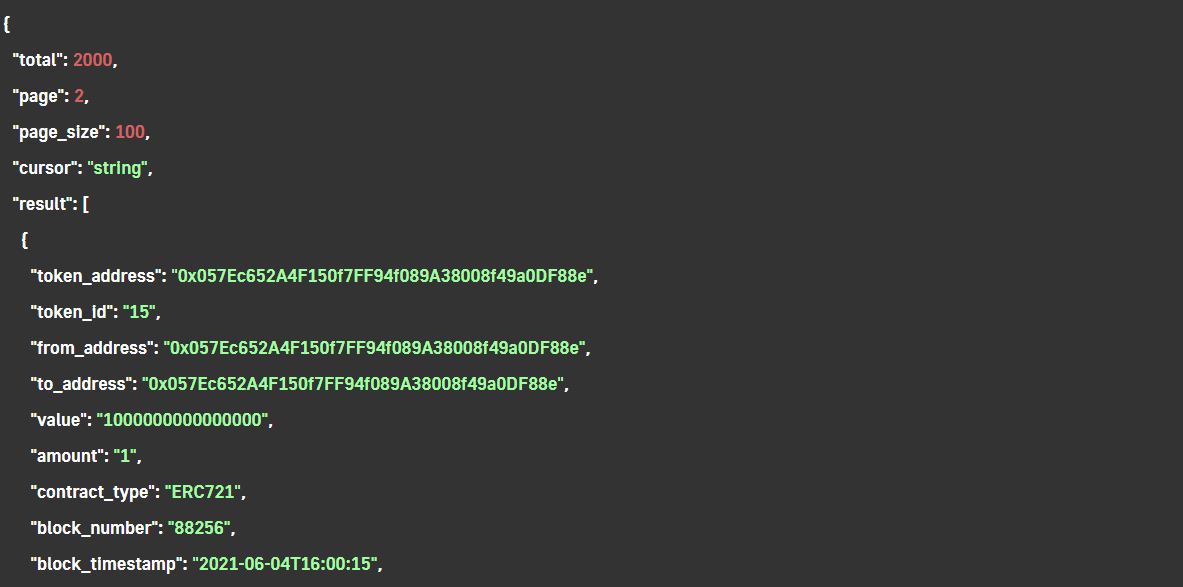
As you possibly can see, it returns 2000 transfers, which is one thing we might want to account for as we transfer ahead. Moreover, you possibly can see all the main points it offers relating to the tokens for that specific contract. Therefore, we will carry out NFT on-chain evaluation primarily based on all this information with some backend post-processing. Really, this single API offers us with all the info we want for our instance dapp (offered within the demo above).
Nevertheless, since many well-liked NFT collections on Ethereum have been round for fairly some time, we should first set API price limits inside our cloud operate.
Set API Fee Limits
Notice: You’ll be able to be taught extra concerning the price limits within the Moralis documentation (Web3 API > Fee restrict).
That is the place we copy the next strains of code into the “cloud.js” file contained in the “cf” folder (video under, beginning at 6:30):
Moralis.settings.setAPIRateLimit({
  nameless:10, authenticated:20, windowMs:60000
})
So, to keep away from limitations, we will add a few zeros to the “nameless” and “authenticated” values. Subsequent, we have to inform our Moralis dapp that we’re utilizing this cloud operate. As such, we have to return to the Moralis admin space and click on the “Settings” button for our “Whale Watcher” dapp. Then, we go to the “Cloud Capabilities” part:
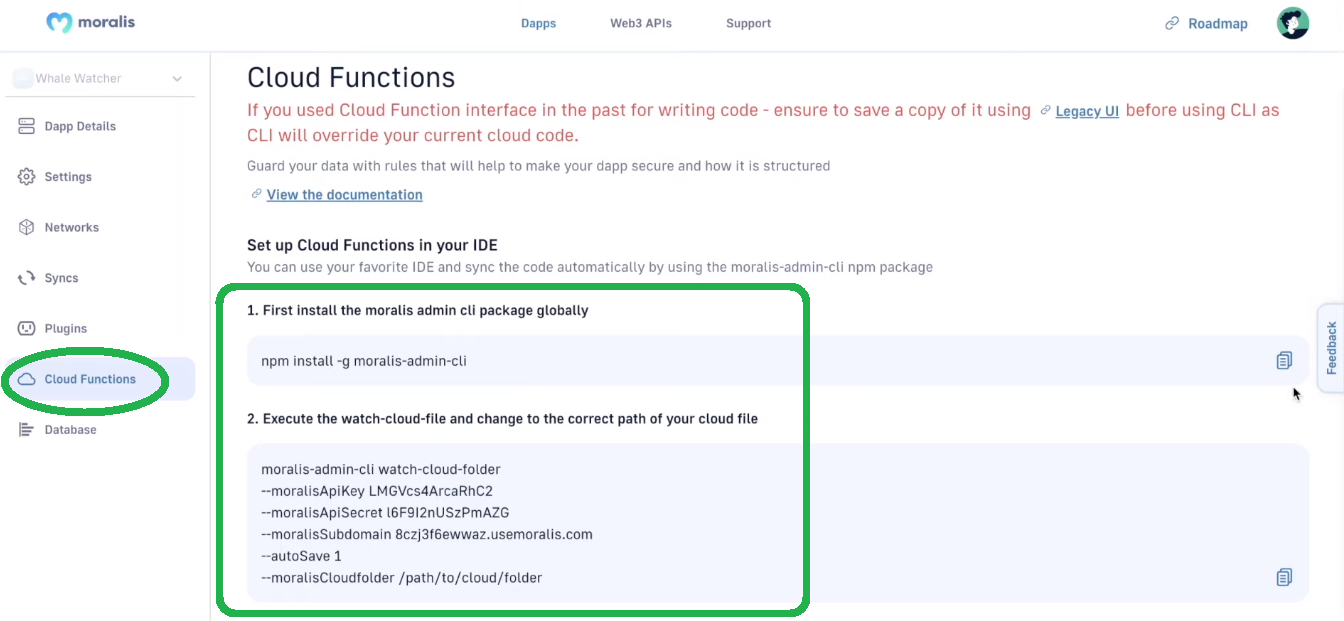
Subsequent, we have to full the 2 steps indicated by the on-page directions. Therefore, we use our terminal window to put in the Moralis admin CLI bundle:

Then, we have to execute the watch-cloud-file and alter the cloud folder into the proper path of our cloud file:

Lastly, the terminal will ask you to pick the mode and server to save lots of your cloud operate to:
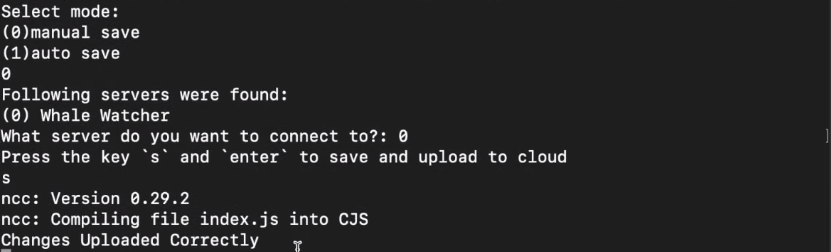
Should you’ve adopted the above steps, you’ve efficiently modified your API price limits.
Implementing NFT On-Chain Evaluation
With the API price limits set correctly, we use our code editor to “cd” into the “stats” folder:

Subsequent, we use the “npm init” command and press “enter” a few occasions, which can end in a brand new “bundle.json” file contained in the “stats” folder. Then, we create the “stats.js” file in the identical folder:

That is the place we are going to implement all of the backend performance relating to the NFT on-chain evaluation. However we should first set up some packages (“npm i moralis” and “npm i fs”) (10:05). With the packages put in, we’ve got every thing prepared to start out writing our script. For an in depth coding tutorial, use the video under, beginning at 10:30.
We are going to first and the above-installed packages:
const Moralis = require("moralis/node");
const fs = require("fs");
Then, we additionally want so as to add our Moralis dapps’ credentials:
const serverUrl ="xxx";
const appId="xxx";
To get these particulars (exchange “xxx”), we use the “Settings” button for our dapp after which copy dapp URL and dapp ID from the “Dapp Particulars” tab:

Furthermore, we additionally have to outline a contract that we wish to focus our NFT on-chain evaluation on. And, as talked about beforehand, we are going to deal with the Moonbirds assortment herein:
const contractAddress = "0x23581767a106ae21c074b2276D25e5C3e136a68b"; //MoonbirdsAfter all, we will change that tackle to deal with another NFT assortment at any time.
The Energy of Moralis – Utilizing the “getContractNFTTransfers” API
With the above strains of code, we even have every thing prepared to make use of the “getAllOwners()” operate (11:39). That is the place we are going to initialize Moralis (“Moralis.begin”) and the cursor. Then, we are going to create the “house owners” object, the response (“res”) variable, and the “accountedTokens” array. Furthermore, we’ll use a “do-while” loop to get by all of the transfers. And, inside this loop, we are going to use the above-presented “getContractNFTTransfers” API.
Moreover, to undergo the API outcomes array, we are going to create a “for” loop contained in the “do-while” loop. That method we are going to undergo all of the objects contained in the outcomes array and examine if a selected token ID has already occurred. Subsequent, beginning at 17:21, you’ll discover ways to stringify the “house owners” object and use the “fs” bundle to put in writing a file containing these strings.
Now, that we’ve set in place the essential code contained in the “stats.js” file, we will run the “getAllOwners()” operate:

As you possibly can see, our code will undergo all 312 pages and save all the info associated to the Moonbirds NFT assortment for us. Consequently, we get the “moonbirdsOwners.json” file contained in the “stats” folder that accommodates all the main points concerning the house owners of those NFTs:

That’s the essence of the NFT on-chain evaluation. Nevertheless, at 20:00 you’ll get to discover ways to add different particulars concerning the NFT assortment in query. Furthermore, you’ll additionally discover ways to gather all of the historic information for the associated addresses. That is the place you can see out concerning the “dateToBlock” API. All-in-all, you’ll find yourself with the “moonBirdsOwners.json” and “moonbirdsHistory.json” information containing all the info you’ll want to construct a neat frontend round it.
Node JS Server Setup
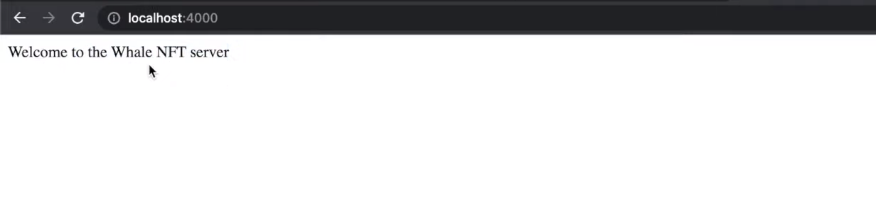
Beginning at 34:42, you’ll discover ways to arrange your Node JS server. Basically, you’ll create your “index.js” file, which can function your backend server. This would be the starting of the frontend a part of this instance dapp:
Moreover, to current the beforehand created JSON information, you’ll create corresponding JS information. Therefore, you’ll add the “moonbirdsOwners.js” and “moonbirdsHistory.js” information to the “server” folder.
Web3 UI: Initialize a React App and Populate NFT Knowledge to the React App
Beginning at 40:25, you’re going to get a fast code walkthrough relating to the UI as offered within the demo. Furthermore, when you cloned our code, you have already got the fundamentals arrange within the “app” folder. Subsequent, you’ll want to put in all of the dependencies and run the appliance. So, due to our boilerplate, you’ll have already got a cool interface prepared. Nevertheless, the gathering pages are nonetheless empty:

Thus, your closing process is to populate the Moonbirds assortment utilizing the next video tutorial (44:02):
NFT On-Chain Evaluation – Find out how to Discover NFT Wallets – Abstract
Utilizing right this moment’s article, you had an opportunity to create your individual NFT whale watcher dapp. As such, you realized how you can do NFT on-chain evaluation effortlessly. Furthermore, for the reason that core of this feat requires backend programming, we predominantly targeted on that side. Nevertheless, due to Moralis, you had been in a position to get hold of all of the on-chain NFT information with a single API. Apart from finishing the preliminary Moralis setup you additionally needed to set API price limits. Then you definately applied NFT information processing. Consequently, you had all of the on-chain information neatly organized in two JSON information. Lastly, you had an opportunity to make use of our boilerplate and create a neat Web3 UI to show that information in a user-friendly method.
Should you preferred this instance challenge, we suggest you go to the Moralis’ weblog and the Moralis’ YouTube channel. Each of those shops supply a ton of helpful content material. From on-point explanations to detailed blockchain improvement tutorials. As such, that is the place you possibly can be taught extra about dapp improvement, Web3 authentication, and how you can turn out to be a blockchain developer. The best factor about Moralis is that it allows you to use your frontend expertise to turn out to be a Web3 developer. Thus, you get to develop killer dapps utilizing your JavaScript proficiency or develop Web3 video games with Unity.
Nevertheless, in case you might be searching for a guided path to going full-time crypto, Moralis Academy is perhaps the place for you. This on-line instructional platform provides a ton {of professional} blockchain improvement programs. Furthermore, it offers you with a customized examine path, skilled mentorship, and one of the crucial advancing communities. As such, it provides a magic sauce to catapult your profession on this disruptive trade!


