
This tutorial will show how one can add an indication in with RainbowKit. As an instance the method, we’ll create a easy software the place customers can register with RainbowKit. As soon as they’ve authenticated themselves, the app will show an tackle, profile ID, and signature. Nonetheless, if you want to examine the code for the app instantly, try the next GitHub repo:
Full RainbowKit Authentication App Documentation – https://github.com/MoralisWeb3/demo-apps/tree/most important/nextjs_moralis_auth
Earlier than shifting ahead, please be aware that the code considerations MetaMask authentication. For that reason, you have to to make a number of tweaks to make it appropriate for RainbowKit. If in case you have questions relating to this course of, comply with alongside as we present you add an indication in with RainbowKit as an alternative.
Web3 authentication is an important a part of constructing dapps (decentralized functions) and Web3 improvement normally. Moreover, it permits customers to authenticate themselves via their Web3 wallets on a number of platforms. Additionally, people should not have to maintain observe of a number of login credentials suggesting that the decentralized net gives a unified identification layer. Some examples of distinguished wallets and options are MetaMask, Coinbase Pockets, RainbowKit, and so forth. This text will deal with the latter as we present you add an indication in with RainbowKit in 5 steps utilizing Moralis!
Earlier than displaying you add an indication in with RainbowKit, we start by exploring RainbowKit. As soon as we grasp the idea, we’ll dive deeper into the method and show the accessibility of Moralis by making a easy authentication software in solely 5 steps. Thus, if you happen to comply with alongside, you’ll be able to including RainbowKit authentication to all future blockchain tasks with ease!
So, if you wish to create refined dapps, join with Moralis instantly!
What’s RainbowKit?
The workforce behind the favored Web3 pockets, Rainbow Pockets, is behind RainbowKit. Moreover, RainbowKit is a React library that provides elements for constructing a join pockets UI (consumer interface) with just some code snippets. As well as, the equipment helps many wallets, together with Coinbase Pockets, WalletConnect, MetaMask, and Rainbow.

If you want to study extra about including register mechanisms for different options, make sure that to take a look at our further information on add Coinbase Pockets login performance to your apps. In any other case, learn on and learn to add an indication in with RainbowKit!
Nonetheless, the equipment supplies a straightforward, quick, and extremely customizable manner for builders so as to add nice pockets authentication experiences to all their Web3 tasks. Additionally, RainbowKit takes care of the difficult stuff behind the scenes. In consequence, builders and their groups can deal with creating nice communities and distinctive merchandise for his or her prospects.
Moreover, RainbowKit gives a collection of options, and listed below are three key advantages:
- Pockets Administration – RainbowKit provides pockets administration out of the field for all of your functions. Furthermore, along with dealing with the connection and disconnection of wallets, the equipment additionally helps a number of swap connection chains, wallets, shows pockets balances, and so forth.
- Customization – RainbowKit is very customizable and allows you to tweak the UI in unison together with your branding. Additionally, the equipment permits deciding on a number of pre-defined colours and radius configurations. Nonetheless, creating absolutely personalized themes for extra superior conditions can also be doable, which incorporates including your individual buttons and eradicating particular options.
- Trade Requirements – To extend interoperability with most merchandise, RainbowKit relies on “ethers” and “wagmi”. Furthermore, these are two of the commonest libraries throughout the area.
Now, with a deeper understanding of RainbowKit, we are able to transfer ahead. So, let’s discover add an indication in with RainbowKit!
Learn how to Add a Signal In with RainbowKit in 5 Steps
As talked about beforehand, this transient information will present you add an indication in with RainbowKit. To show the method, we’ll create a easy Subsequent.js software the place customers can authenticate themselves with RainbowKit. Moreover, following the register and authentication course of, the applying will show the consumer’s tackle, profile ID, and signature. Furthermore, since we’re utilizing Moralis’ Web3 authentication API, we can add this performance utilizing the next 5 steps:
- Putting in Dependencies, Libraries, and RainbowKit
- Wrapping the Software with “WagmiConfig” and “SessionProvider”
- Making a Request Message Endpoint
- Configuring “NextAuth” and Making a Signal In Web page
- Setting Up a Consumer Web page
Following these steps will show the capabilities of Moralis’ Web3 authentication and add safe authentication mechanisms to your Subsequent.js apps. Additionally, as soon as customers authenticate themselves utilizing Web3 wallets and their Web3 id, the next-auth library is chargeable for making a session cookie. This session cookie could have an encrypted JWT inside containing varied data within the customers’ browsers.
Login Web page:

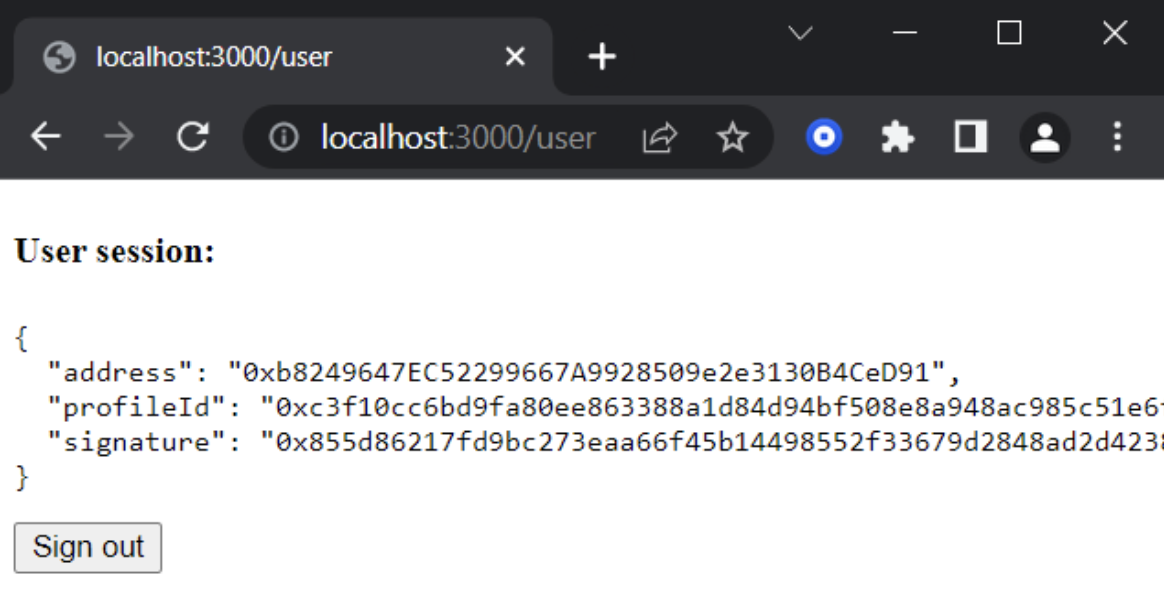
Consumer Web page:

Nonetheless, earlier than we transfer on to step one of this transient information, there are a number of stipulations you should take care of. To start with, you have to a Moralis account. Thus, if in case you have not already, make sure that to enroll with Moralis right away. As well as, you want an IDE (built-in improvement surroundings). In our case, we’re utilizing Visible Studio Code; nonetheless, you might be free to make use of any IDE you might be acquainted with. Lastly, you should create a Subsequent.js software. If in case you have hassle with this, try the “create-next-app” documentation or comply with Moralis’ NextJS dapp information.
With all stipulations finalized, we’ll look nearer at putting in the dependencies, libraries, and RainbowKit!
Step 1 – Putting in Dependencies, Libraries, and RainbowKit
We hope you’re as excited as we’re for the preliminary step! Moreover, step one on this tutorial revolves round putting in dependencies, libraries, and RainbowKit. Initially, we’ll set up Moralis, next-auth, and axios dependencies. Furthermore, to put in these three elements, all you want is the next npm command:
npm set up moralis next-auth axiosSubsequent up, we have to set up a library, which is required so as to add an indication in with RainbowKit. Therefore, we’ll set up the favored wagmi library. Furthermore, you would possibly bear in mind this from earlier than, as RainbowKit was based mostly on this to make sure interoperability throughout massive elements of the Web3 ecosystem. Anyway, to put in the wagmi dependency, you should use the next command:
npm set up wagmi ethersAlong with wagmi, additionally, you will want to put in RainbowKit. This may be achieved via the next code snippet:
npm set up @rainbow-me/rainbowkitLastly, within the ultimate a part of step one, you should add some surroundings variables to your “.env.native” file within the app root. Accordingly, that is what you should add:
APP_DOMAIN=wonderful.finance
MORALIS_API_KEY=xxxx
NEXTAUTH_URL=http://localhost:3000
NEXTAUTH_SECRET=7197b3e8dbee5ea6274cab37245eec212
We’ll briefly cowl the final three variables as they require additional consideration. First, you have to an API key, which you will get by signing up with Moralis. Second, “NEXTAUTH_URL” is at present set to “http://localhost:3000“. That is wonderful through the improvement course of; nonetheless, as soon as you might be executed together with your app, this variable ought to be set to your app’s tackle.
Lastly, the “NEXTAUTH_SECRET” variable is used for encrypting JWT tokens of your app’s customers. It’s doable to place any worth right here; nonetheless, you should use the next web site to generate a becoming worth:
https://generate-secret.now.sh/32
Now, that’s it for step one; let’s progress to the second stage, the place we wrap the applying with “WagmiConfig” and “SessionProvider“!
Step 2 – Wrapping the Software with WagmiConfig and SessionProvider
To provoke the second step, you should create a brand new “pages/_app.jsx” file. Following this, you possibly can wrap your pages with “WagmiConfig” and “SessionProvider“. To take action, you possibly can merely add the next content material to the file you simply created:
import { createClient, configureChains, defaultChains, WagmiConfig } from 'wagmi';
import { publicProvider } from 'wagmi/suppliers/public';
import { SessionProvider } from 'next-auth/react';
import { getDefaultWallets, RainbowKitProvider } from '@rainbow-me/rainbowkit';
import '@rainbow-me/rainbowkit/types.css';

const { supplier, webSocketProvider, chains } = configureChains(defaultChains, [publicProvider()]);

const { connectors } = getDefaultWallets({
    appName: 'My RainbowKit App',
    chains,
});

const consumer = createClient({
    supplier,
    webSocketProvider,
    autoConnect: true,
    // added connectors from rainbowkit
    connectors,
});

// added RainbowKitProvider wrapper
operate MyApp({ Part, pageProps }) {
    return (
        <WagmiConfig consumer={consumer}>
            <SessionProvider session={pageProps.session} refetchInterval={0}>
                <RainbowKitProvider chains={chains}>
                    <Part {...pageProps} />
                </RainbowKitProvider>
            </SessionProvider>
        </WagmiConfig>
    );
}

export default MyApp;
Furthermore, we additionally guarantee to incorporate RainbowKit configurations on this file, which is important if you wish to add an indication in with RainbowKit to all of your functions.
Step 3 – Making a Request Message Endpoint
With our pages wrapped in “WagmiConfig” and “SessionProvider“, you should create a request message endpoint. Moreover, this endpoint will make requests to “Moralis.Auth” and generate a singular message signed on the consumer aspect. Furthermore, so as to add the endpoint, you possibly can go forward and create a brand new API file referred to as “pages/api/auth/request-message.js” and add the next content material:
import Moralis from 'moralis';

const config = {
    area: course of.env.APP_DOMAIN,
    assertion: 'Please signal this message to verify your id.',
    uri: course of.env.NEXTAUTH_URL,
    timeout: 60,
};

export default async operate handler(req, res) {
    const { tackle, chain, community } = req.physique;

    await Moralis.begin({ apiKey: course of.env.MORALIS_API_KEY });

    attempt {
        const message = await Moralis.Auth.requestMessage({
            tackle,
            chain,
            community,
            ...config,
        });

        res.standing(200).json(message);
    } catch (error) {
        res.standing(400).json({ error });
        console.error(error);
    }
}
Now, with a request message endpoint at hand, we are able to transfer ahead. Accordingly, we’ll advance to the fourth step and take a more in-depth take a look at how one can configure “NextAuth” and create an indication in web page on your software.
Step 4 – Configuring NextAuth and Making a Signal In Web page
On this step, you possibly can go forward and create a brand new ”pages/api/auth/[…nextauth].js” file. Moreover, this might be used to configure “NextAuth“. Furthermore, the file ought to appear to be this:
import CredentialsProvider from 'next-auth/suppliers/credentials';
import NextAuth from 'next-auth';
import Moralis from 'moralis';

export default NextAuth({
    suppliers: [
        CredentialsProvider({
            name: 'MoralisAuth',
            credentials: {
                message: {
                    label: 'Message',
                    type: 'text',
                    placeholder: '0x0',
                },
                signature: {
                    label: 'Signature',
                    type: 'text',
                    placeholder: '0x0',
                },
            },
              async authorize(credentials) {
                try {
                  // "message" and "signature" are needed for authorisation
                  // we described them in "credentials" above
                  const { message, signature } = credentials;

                  await Moralis.start({ apiKey: process.env.MORALIS_API_KEY });

                  const { address, profileId } = (
                    await Moralis.Auth.verify({ message, signature, network: 'evm' })
                  ).raw;

                  const user = { address, profileId, signature };
                  // returning the user object and creating  a session
                  return user;
                } catch (e) {
                  console.error(e);
                  return null;
                }
              },
        }),
    ],
    // including consumer information to the consumer session object
    callbacks: {
        async jwt({ token, consumer }) {
            consumer && (token.consumer = consumer);
            return token;
        },
        async session({ session, token }) {
            session.consumer = token.consumer;
            return session;
        },
    },
});
Making a Signal In Web page
Following the “NextAuth” configuration, you need to create a brand new web page file, “pages/signin.jsx”. Furthermore, this file must have the next content material:
import { ConnectButton } from '@rainbow-me/rainbowkit'
import { signIn, useSession } from 'next-auth/react'
import { useAccount, useSignMessage, useNetwork } from 'wagmi'
import { useEffect } from 'react'
import { useRouter } from 'subsequent/router'
import axios from 'axios'

operate SignIn() {
  const { isConnected, tackle } = useAccount()
  const { chain } = useNetwork()
  const { standing } = useSession()
  const { signMessageAsync } = useSignMessage()
  const { push } = useRouter()

  useEffect(() => {
    const handleAuth = async () => {
      const userData = { tackle, chain: chain.id, community: 'evm' }

      const { information } = await axios.publish('/api/auth/request-message', userData, {
        headers: {
          'content-type': 'software/json',
        },
      })

      const message = information.message

      const signature = await signMessageAsync({ message })

      // redirect consumer after success authentication to '/consumer' web page
      const { url } = await signIn('credentials', {
        message,
        signature,
        redirect: false,
        callbackUrl: '/consumer',
      })
      /**
       * as an alternative of utilizing signIn(..., redirect: "/consumer")
       * we get the url from callback and push it to the router to keep away from web page refreshing
       */
      push(url)
    }
    if (standing === 'unauthenticated' && isConnected) {
      handleAuth()
    }
  }, [status, isConnected])

  return (
    <div>
      <h3>Web3 Authentication</h3>
      <ConnectButton />
    </div>
  )
}

export default SignIn
Some key takeaways are that we ensure that the “handleAuth” performance calls the request message endpoint you created within the third step. What’s extra, along with calling the request message, we additionally add the “subsequent.auth” authentication we simply finalized. Lastly, we additionally made certain to incorporate the right RainbowKit configurations. For instance, we made certain so as to add a button from “@rainbow-me/rainbowkit”.
Step 5 – Setting Up a Consumer Web page
On this ultimate step of the tutorial on add an indication in with RainbowKit, you’ll arrange a consumer web page. So, to start, create a “pages/consumer.jsx” file. With the web page at hand, you possibly can proceed by implementing the next content material into the file:
import { getSession, signOut } from 'next-auth/react';

// will get a prop from getServerSideProps
operate Consumer({ consumer }) {
    return (
        <div>
            <h4>Consumer session:</h4>
            <pre>{JSON.stringify(consumer, null, 2)}</pre>
            <button onClick={() => signOut({ redirect: '/signin' })}>Signal out</button>
        </div>
    );
}

export async operate getServerSideProps(context) {
    const session = await getSession(context);

    // redirect if not authenticated
    if (!session) {
        return {
            redirect: {
                vacation spot: '/signin',
                everlasting: false,
            },
        };
    }

    return {
        props: { consumer: session.consumer },
    };
}

export default Consumer;
Congratulations on ending the above tutorial steps! At this level, you’ve put in dependencies and libraries. You will have additionally wrapped the applying and created an endpoint. As well as, you configured “Subsequent.Auth” and arrange a consumer web page. However that have been just some honorable mentions. Additionally, you understand how so as to add an indication in with RainbowKit. Nonetheless, there may be another factor we have to do. So, earlier than concluding the article, we’ll illustrate how one can check your software. In consequence, you possibly can guarantee every thing runs easily. Therefore, comply with alongside within the subsequent part as we show this course of.
Add a Signal In with RainbowKit – Testing the Software
At this level, we’re prepared to check the applying. Accordingly, begin the localhost server utilizing “npm run dev” and open the register web page that we created in step 4 utilizing “http://localhost:3000/signin“. When you launch the applying, you should click on on the “Join Pockets” button:

From there, you should choose a pockets, and since you might be using RainbowKit, you should have a number of choices, together with MetaMask, Rainbow, Coinbase Pockets, and so forth. However, in our case, we’ll select MetaMask. Nonetheless, if both different is chosen, you need to signal a message. Within the following picture, you’ll see an instance of this message:

When you efficiently authenticate, it ought to redirect you to the “/consumer” web page. From there, you possibly can learn the tackle, profile ID, and signature. Moreover, if you find yourself right here after singing the message, you’ll know that you’ve got efficiently added an indication in with RainbowKit!
What’s extra, you too can ensure that no bugs exist by visiting “http://localhost:3000/consumer” straight. Furthermore, if a consumer is authenticated, it ought to show the data relating to the consumer. Additionally, it ought to redirect them again to the unique “/signin” web page if they aren’t authenticated.
Should you get the identical outcomes, you’ll know add an indication in with RainbowKit. So, it’s now as much as you so as to add this performance to all of your future blockchain tasks! Nonetheless, if in case you have any points with the method, look nearer on the GitHub repository to which we linked initially. As well as, you too can try the official RainbowKit authentication documentation.
Did you take pleasure in this information? In that case, we strongly encourage testing our different articles jam-packed with how-to guides. For instance, you possibly can learn to purchase NFTs in-game, and add attributes to NFT metadata!
Add a Signal In with RainbowKit in 5 Steps – Abstract
We initiated this text with a short clarification of RainbowKit and what it entails. Accordingly, you already know RainbowKit is a React library that enables builders to construct nice pockets authentication UIs with just a few code snippets. Furthermore, some distinguished options of RainbowKit are customizability and pockets administration capabilities. Therefore, when working with RainbowKit, you present your app customers with a number of choices to confirm their Web3 id.
Moreover, as soon as we understood the equipment extra deeply, we demonstrated add an indication in with RainbowKit. In doing so, we created a easy authentication software the place customers may register utilizing their Web3 wallets. Furthermore, as we make the most of Moralis, we have been in a position to create the app and add an indication in with RainbowKit in simply 5 easy steps:
- Putting in Dependencies, Libraries, and RainbowKit
- Wrapping the Software with “WagmiConfig” and “SessionProvider”
- Making a Request Message Endpoint
- Configuring “NextAuth” and Making a Signal In Web page
- Setting Up a Consumer Web page

Nonetheless, Web3 authentication is just one of many areas during which Moralis shines. For instance, you too can implement Web3 syncs and Web3 webhooks simply. Moreover, Moralis additionally gives a collection of nice Web3 APIs. Furthermore, if you wish to turn into a blockchain developer, we extremely suggest testing Moralis’ NFT API or Solana API. These instruments help you create dapps and tokens rapidly and simply.
Moreover, if you wish to lengthen your data and study extra about Web3 improvement, go to Moralis’ weblog. There, you’ll discover content material relating to Moralis’ NodeJS SDK for Web3, blockchain syncs, or several types of DAOs. Additionally, you possibly can learn to fetch NFTs, and code a blockchain app in 5 steps! Moreover, Moralis Workshops teaches you clone Web2 functions. Furthermore, the wonderful APIs, SDKs, and content material are a number of causes to enroll with Moralis!


