
This text will show how one can add MetaMask authentication with Django. Additionally, we’ll discover how to take action in solely 5 steps. In doing so, we’ll create a full-stack Django app the place customers can sign up and authenticate themselves with their Web3 pockets. If you don’t want to learn the whole information and as a substitute soar proper into the code, try the next GitHub repo:
Full Add MetaMask Authentication with Django Documentation – https://github.com/MoralisWeb3/demo-apps/tree/most important/django_moralis_auth/web3_auth
Web3 authentication is an important mechanism of the decentralized internet. Moreover, permitting customers to authenticate with their Web3 wallets makes enterprise providers extra accessible. Additionally, it offers a extra compelling consumer expertise. This implies {that a} unified identification layer positively influences companies and their shoppers concurrently. Furthermore, it’s attainable to implement numerous authentication mechanisms, and a well-liked possibility is MetaMask. So, since Web3 authentication is an important performance of Web3 improvement and MetaMask is likely one of the hottest Web3 wallets, this text will deal with that topic. Particularly, we’ll present you find out how to add MetaMask authentication with Django!
Moreover, to allow a extra seamless Web3 authentication circulation, we’ll use the Moralis Auth API. In flip, we are able to create a full-stack Django app the place customers can authenticate with MetaMask in solely 5 easy steps. Nevertheless, if you’re extra snug working with NextJS, try our information on find out how to combine backend Web3 authentication performance! So, if you wish to add authentication mechanisms to your future tasks or just wish to develop into a blockchain developer, enroll with Moralis now. What’s extra, creating an account is freed from cost, and you may start creating your first undertaking instantly!
Though, earlier than transferring on, let’s go over some fundamentals. Therefore, we’ll begin by taking a look at Django. After that, we’ll dive into the code!
What’s Django?
Earlier than we proceed with the tutorial on find out how to add MetaMask authentication with Django, it may be a good suggestion to discover the intricacies of Django. Therefore, we’ll take this part to elucidate what Django is and the way it helps builders construct their tasks markedly faster. So, with out additional ado, let’s reply the query, “what’s Django?”.

Briefly, Django is a high-level internet framework for Python. Moreover, the framework permits builders to construct tasks with clear and pragmatic design. Additionally, Django was constructed by builders for builders. Consequently, the framework takes care of a lot of the heavy lifting related to internet improvement. Accordingly, in case you use the framework, you possibly can deal with writing functions. What’s extra, you possibly can keep away from the necessity to reinvent the wheel.
Furthermore, Django is completely free and open supply, and listed below are some outstanding options of the framework:
- Excessive Safety – Django focuses on reliability by serving to builders maintain a excessive stage of safety when creating web sites or functions. Accordingly, when working with Django, you possibly can keep away from among the frequent safety errors.
- Quick – As builders need tasks to maneuver shortly to market, Django designed its framework to prioritize velocity.
- Scalability – Django offers the chance to scale shortly and flexibly.
With a greater understanding of Django, we are able to transfer on to the primary matter of this text. Accordingly, we’ll illustrate find out how to add MetaMask authentication with Django in solely 5 steps!
Add MetaMask Authentication with Django in 5 Steps with Moralis
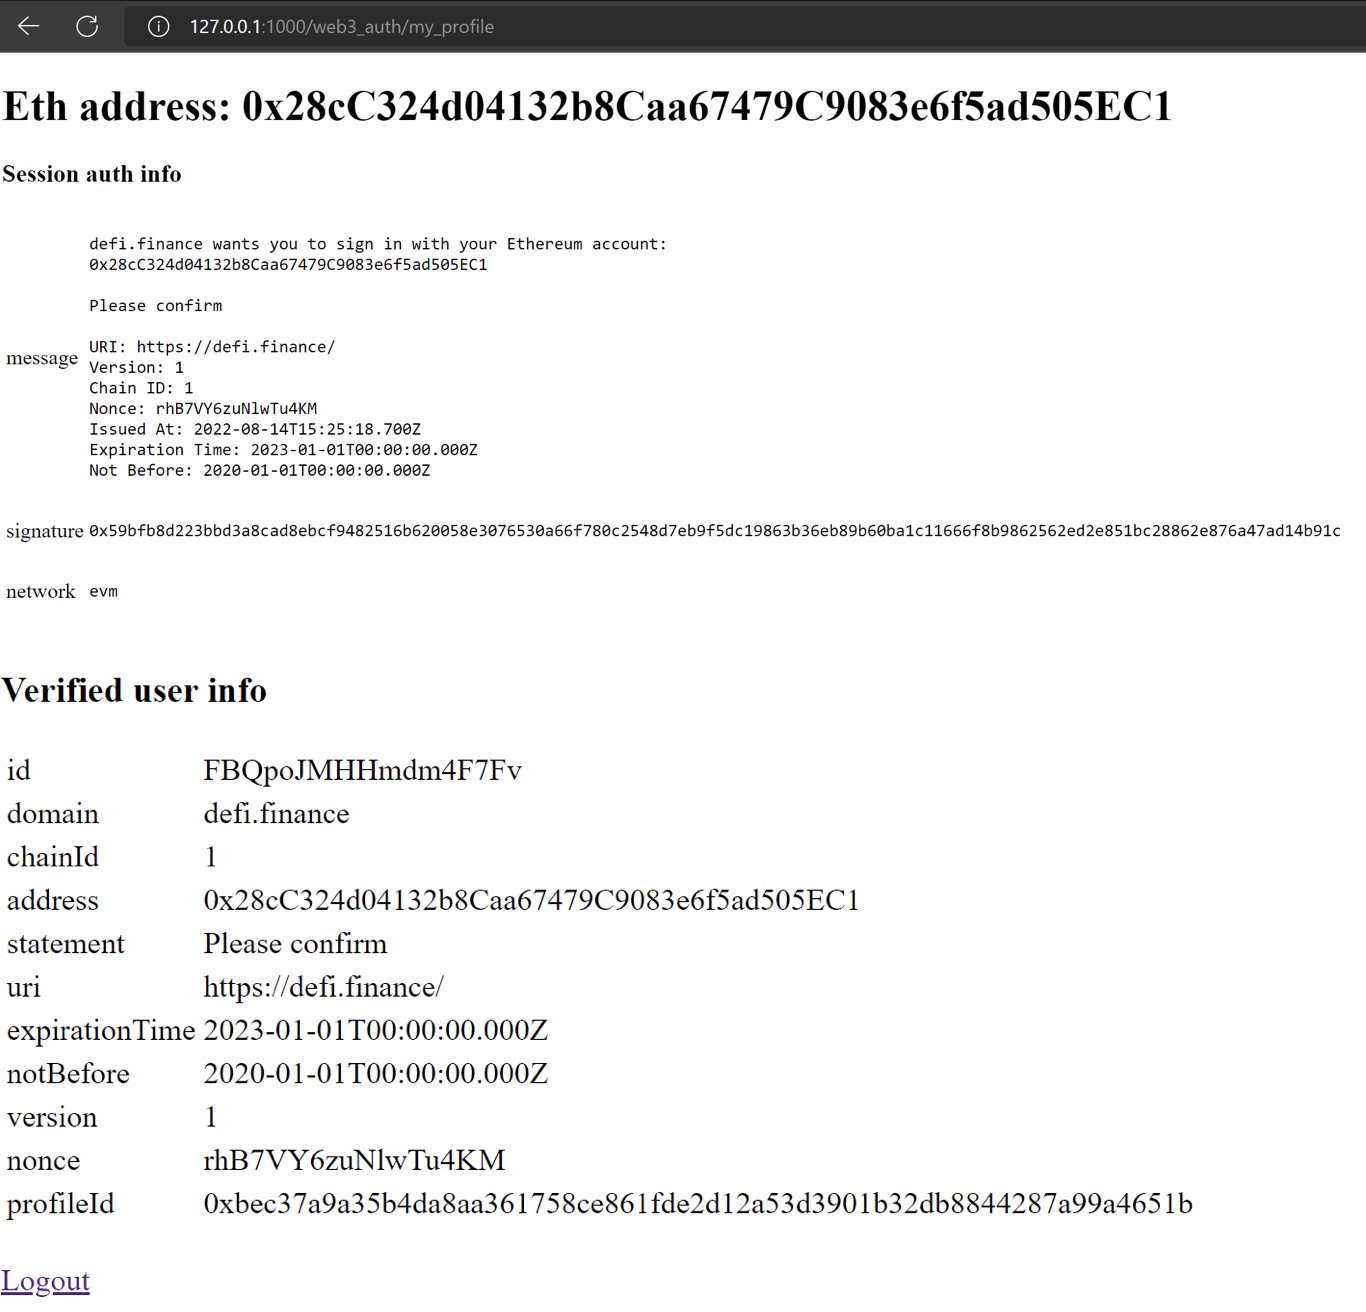
On this tutorial, we’ll look nearer on the intricacies of Moralis Web3 authentication by making a full-stack Django app. Furthermore, app customers will be capable to log in with their Web3 wallets and confirm their Web3 identification. Then, as soon as the customers have authenticated themselves, they will view details about themselves. For instance, they will see an ID, deal with, chain ID, and so forth. So, as an instance what we’re working in direction of, listed below are two print screens of the login and consumer pages:
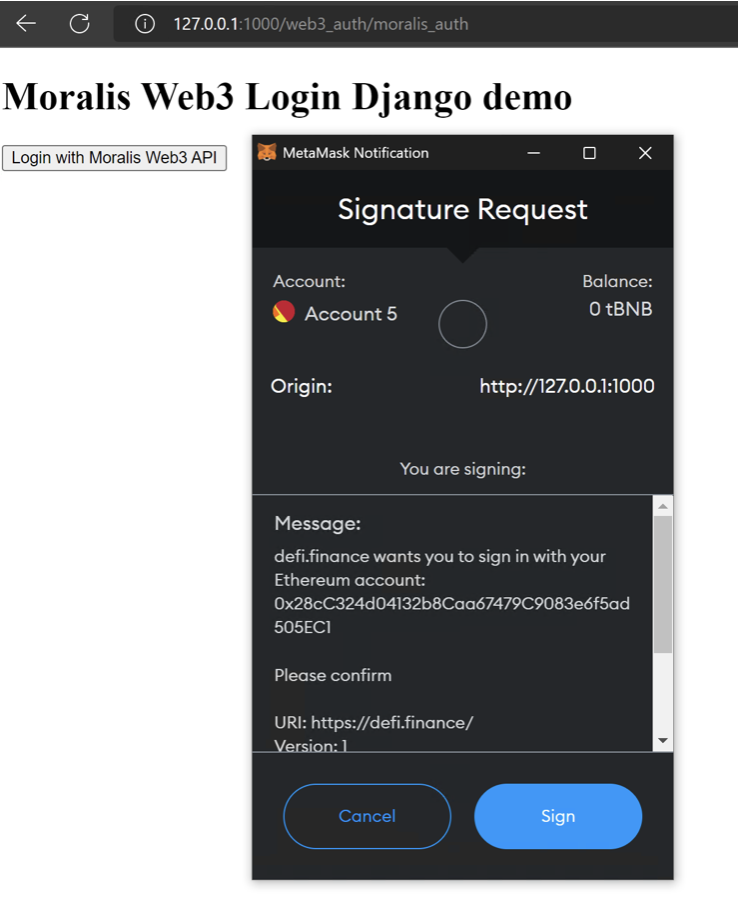
Login Web page:

Person Web page:
As talked about, since we’re opting to work with Moralis, it is possible for you to so as to add MetaMask authentication with Django in solely 5 easy steps:
- Including Conditions
- Putting in Dependencies
- Making a Django Undertaking and Utility
- Edit ”moralis_auth” Settings
- Creating the Most important “web3_auth” Utility and Templates
So, with no additional ado, let’s soar straight into step one and take a look at the required conditions we have to care for earlier than we begin creating the applying itself and add MetaMask authentication with Django!
Step 1 – Including Conditions
As with every tutorial, there are particular conditions required. So, for this tutorial, a Moralis account is the primary prerequisite you have to if you wish to add MetaMask authentication with Django. Therefore, in case you haven’t already, we advise you enroll with Moralis instantly! Furthermore, creating an account is free and solely takes a few seconds.

Moreover, with a Moralis account at your disposal, the second prerequisite is Python 3. So, if you don’t have already got it, it’s worthwhile to set up Python 3. In our case, we’re utilizing Python 3.10 as an instance the method.
Lastly, we advise you purchase primary data about Django to make the tutorial extra understandable. Though it isn’t required, in doing so, you’ll profit from it if you wish to comply with alongside throughout this tutorial. Thus, you possibly can try the official documentation right here to be taught extra about Django.
That’s it for the conditions and step one of this tutorial! So, with all of the preparations full, we are able to transfer on to the second step of the information to indicate you find out how to set up the mandatory dependencies.
Step 2 – Putting in Dependencies
Whether it is wanted, the very first thing you have to to do is create a digital atmosphere. Nevertheless, why so? Briefly, digital environments present a number of advantages as they’ve their very own website directories. Additionally, they are often remoted from different system website directories. Moreover, this implies they will have their very own set of packages. What’s extra, making a digital atmosphere is comparatively easy, and all you want is the next command:
python3 -m venv django_web3_auth_env
With a digital atmosphere at your disposal, we are able to transfer on. To take action, we’ll set up numerous dependencies. Therefore, it’s essential to set up “django” and “requests” dependencies. For this tutorial, we used Django model 3.1, and you should utilize the next instructions to put in each dependencies:
django_web3_auth_envScripts>pip3.10.exe set up django
django_web3_auth_envScripts>pip3.10.exe set up requests
Nevertheless, guarantee these instructions execute within the explicit scripts folder for the native atmosphere you beforehand created. Furthermore, that is specified within the instructions above since we set the trail to our native atmosphere.
So, with each dependencies put in, the second step on this tutorial is full. Therefore, let’s transfer on and try how one can create a Django undertaking and utility!
Step 3 – Making a Django Undertaking and Utility
To provoke the third step, it’s essential to create a Django undertaking. So, to create a undertaking, you should utilize the next command:
django_web3_auth_envScriptsdjango-admin startproject moralis_auth
When you run this command and the undertaking establishes, it is possible for you to to seek out “django-admin” within the “Scripts” folder with the next path “django_web3_auth_envScriptsdjango-admin.exe“.
Subsequent up, it’s essential to additionally create a Django utility, and to make the app, use this command:
django_web3_auth_envScriptspython.exe handle.py startapp web3_auth
Furthermore, make it possible for “web3_auth” is situated in the identical folder the place you discover “handle.py”. Nevertheless, this shouldn’t be an issue if the earlier command was run within the folder the place “handle.py” is discovered. As well as, you then have to run database migrations. That is comparatively simple, and you should utilize the next command:
django_web3_auth_envScriptspython.exe handle.py migrate
Moreover, throughout this stage, it’s essential to use the entire path pointing to Python executable within the digital atmosphere created within the second step. Moreover, for the ultimate step, you possibly can create a “superuser”; nevertheless, that is non-obligatory. So, to create the superuser, you should utilize the next code (as soon as once more, it’s essential to level to Python executable in your digital atmosphere):
django_web3_auth_envScriptspython.exe handle.py createsuperuser
Step 4 – Edit ”moralis_auth” Settings
We’ve now arrived on the fourth step of this information. So, on this part, you have to so as to add the newly created app referred to as “web3_auth” to the record of apps in “settings.py”. Moreover, it’s essential to add the app on the finish of the “INSTALLED_APPS” record. Furthermore, it’s going to look one thing like this within the code:
INSTALLED_APPS = [
    'django.contrib.admin',
    'django.contrib.auth',
    'django.contrib.contenttypes',
    'django.contrib.sessions',
    'django.contrib.messages',
    'django.contrib.staticfiles',
    'web3_auth'
]
Additionally, it’s worthwhile to embody URLs within the “urls.py” file for the brand new app within the undertaking. You must also embody URLs from “django.contrib.auth.urls“, as this lets you use log-out performance. Furthermore, it ought to appear like this within the code:
from django.contrib import admin
from django.urls import path, embody

urlpatterns = [
    path('admin/', admin.site.urls),
    path('web3_auth/', include('web3_auth.urls')),
    path('auth/', include('django.contrib.auth.urls')),
]
That’s it for the fourth step; nevertheless, we’ve obtained another factor to do. So, on this transient information’s fifth and ultimate step, we’ll create the primary “web3_auth” utility. Moreover, this contains” urls.py”, “views.py”, and two templates. However, with no additional ado, allow us to take a more in-depth take a look at the ultimate step!
Step 5 – Creating the Most important “web3_auth” Utility and Templates
Subsequent up, you have to to create a brand new file referred to as ”urls.py” with the next content material:
from django.urls import path

from . import views

urlpatterns = [
    path('moralis_auth', views.moralis_auth, name='moralis_auth'),
    path('request_message', views.request_message, name='request_message'),
    path('my_profile', views.my_profile, name='my_profile'),
    path('verify_message', views.verify_message, name='verify_message')
]
Furthermore, as soon as you’re accomplished including the contents to “urls.py”, it’s worthwhile to create a brand new “views.py” file and add the next:
import json
import requests

from django.shortcuts import render, redirect
from django.http import HttpResponse, JsonResponse
from django.contrib.auth import authenticate, login
from django.contrib.auth.fashions import Person

API_KEY = 'WEB3_API_KEY_HERE'
if API_KEY == 'WEB3_API_KEY_HERE':
    print("API key will not be set")
    increase SystemExit


def moralis_auth(request):
    return render(request, 'login.html', {})

def my_profile(request):
    return render(request, 'profile.html', {})

def request_message(request):
    information = json.hundreds(request.physique)
    print(information)

    REQUEST_URL = 'https://authapi.moralis.io/problem/request/evm'
    request_object = {
      "area": "defi.finance",
      "chainId": 1,
      "deal with": information['address'],
      "assertion": "Please affirm",
      "uri": "https://defi.finance/",
      "expirationTime": "2023-01-01T00:00:00.000Z",
      "notBefore": "2020-01-01T00:00:00.000Z",
      "timeout": 15
    }
    x = requests.submit(
        REQUEST_URL,
        json=request_object,
        headers={'X-API-KEY': API_KEY})

    return JsonResponse(json.hundreds(x.textual content))


def verify_message(request):
    information = json.hundreds(request.physique)
    print(information)

    REQUEST_URL = 'https://authapi.moralis.io/problem/confirm/evm'
    x = requests.submit(
        REQUEST_URL,
        json=information,
        headers={'X-API-KEY': API_KEY})
    print(json.hundreds(x.textual content))
    print(x.status_code)
    if x.status_code == 201:
        # consumer can authenticate
        eth_address=json.hundreds(x.textual content).get('deal with')
        print("eth deal with", eth_address)
        strive:
            consumer = Person.objects.get(username=eth_address)
        besides Person.DoesNotExist:
            consumer = Person(username=eth_address)
            consumer.is_staff = False
            consumer.is_superuser = False
            consumer.save()
        if consumer will not be None:
            if consumer.is_active:
                login(request, consumer)
                request.session['auth_info'] = information
                request.session['verified_data'] = json.hundreds(x.textual content)
                return JsonResponse({'consumer': consumer.username})
            else:
                return JsonResponse({'error': 'account disabled'})
    else:
        return JsonResponse(json.hundreds(x.textual content))
Web3 API Key and Moralis Auth
So, from trying on the above code, an important factor it’s worthwhile to care for is including an API key on the ninth line. Moreover, it’s essential to exchange “WEB3_API_KEY_HERE” with an actual API key. Furthermore, this code offers a view for the first authentication “moralis_auth“, a view to show profile data “my_profile“, and two views particulate to authentication “request_message” and “verify_message“.
Moreover, “verify_message” is answerable for requesting messages from the Moralis Auth API to be signed with MetaMask. Additionally, it’s going to validate the returned signature and arrange a consumer each time the validation course of succeeds. Therefore, as soon as the validation is profitable, we create a session for that consumer and add more information.
Including the Templates
Lastly, to high every thing off, we have to add two templates. Nevertheless, earlier than doing so, it’s worthwhile to create a brand new folder referred to as “templates”. Subsequent up, you possibly can create a brand new “login.html” file with the next content material:
<!DOCTYPE html>
<html lang="en">
<head>
    <meta charset="UTF-8">
    <meta http-equiv="X-UA-Suitable" content material="IE=edge">
    <meta identify="viewport" content material="width=device-width, initial-scale=1.0">
    <title>Moralis Auth Django Demo</title>
</head>
<physique>
    <div>

    {% if consumer.is_authenticated %}
        <h1>Welcome Moralis Web3 Person, {{ consumer.username }} !</h1>
        <a href="{% url 'logout' %}?subsequent={% url 'moralis_auth' %}">Logout</a>
        <br/>
        <a href="{% url 'my_profile' %}"> My profile </a>
    {% else %}
        <h1>Moralis Web3 Login Django demo</h1>
        <button class="btn" id="auth-metamask">Login with Moralis Web3 API</button>
    {% endif %}
    </div>

    <script src="https://cdn.jsdelivr.web/npm/axios/dist/axios.min.js"></script>
    <script src="https://cdn.ethers.io/lib/ethers-5.2.umd.min.js" kind="utility/javascript"></script>

    {% if consumer.is_authenticated %}
    {% else %}
    <script>
    const elBtnMetamask = doc.getElementById('auth-metamask');

    const handleApiPost = async (endpoint, params) => {
      const end result = await axios.submit(`${endpoint}`, params, {
        headers: {
          'content-type': 'utility/json',
          "X-CSRFToken": '{{ csrf_token }}'
        },
      });

      return end result.information;
    };

    const requestMessage = (account, chain) =>
      handleApiPost('{% url 'request_message' %}', {
        deal with: account,
        chain: chain,
        community: 'evm',
      });

    const verifyMessage = (message, signature) =>
      handleApiPost('{% url 'verify_message' %}', {
        message,
        signature,
        community: 'evm',
      });

    const connectToMetamask = async () => {
      const supplier = new ethers.suppliers.Web3Provider(window.ethereum, 'any');

      const [accounts, chainId] = await Promise.all([
        provider.send('eth_requestAccounts', []),
        supplier.ship('eth_chainId', []),
      ]);

      const signer = supplier.getSigner();
      return { signer, chain: chainId, account: accounts[0] };
    };

    const handleAuth = async () => {
      // Connect with Metamask
      const { signer, chain, account } = await connectToMetamask();
      console.log("account", account, "chain", chain)

      if (!account) {
        throw new Error('No account discovered');
      }
      if (!chain) {
        throw new Error('No chain discovered');
      }

      const { message } = await requestMessage(account, chain);
      const signature = await signer.signMessage(message);
      const { consumer } = await verifyMessage(message, signature);
      console.log(consumer)
      if (consumer) {
        location.reload();
      }
      else{
        alert("authentication error")
      }
    };


    operate init() {
      elBtnMetamask.addEventListener('click on', async () => {
        handleAuth().catch((error) => console.log(error));
      });
    }

    window.addEventListener('load', () => {
      init();
    });

    </script>
    {% endif %}
</physique>
</html>
This file additionally accommodates the JavaScript code required to signal messages with MetaMask. Furthermore, you possibly can then create a file referred to as “profile.html”, which is the template that exhibits present data with reference to an authenticated consumer. Accordingly, you possibly can add the next code to this file:
<!DOCTYPE html>
<html lang="en">
<head>
    <meta charset="UTF-8">
    <meta http-equiv="X-UA-Suitable" content material="IE=edge">
    <meta identify="viewport" content material="width=device-width, initial-scale=1.0">
    <title>Moralis Auth Django Profile Web page Demo</title>
</head>
<physique>
    <div>

    {% if consumer.is_authenticated %}
        <h1>Eth deal with: {{ consumer.username }}</h1>
        <h3>Session auth data</h3>
        <desk width="200px" border="0px" padding="5px">
        {% for key,worth in request.session.auth_info.gadgets %}
            <tr><td>{{key}}</td><td><pre>{{ worth }}</pre></td></tr>
        {% endfor %}
        </desk>
        <desk width="200px" border="0px" padding="0px">
        <h3>Verified consumer data</h3>
        {% for key,worth in request.session.verified_data.gadgets %}
            <tr><td>{{key}}</td><td>{{ worth }}</td></tr>
        {% endfor %}

        </desk>
        <br/>
        <a href="{% url 'logout' %}?subsequent={% url 'moralis_auth' %}">Logout</a>
    {% else %}
        <a href="{% url 'moralis_auth' %}"> Login web page </a>
    {% endif %}
    </div>

</physique>
</html>
So, that’s it; congratulations! At this level, you know the way so as to add MetaMask authentication with Django to your future tasks! Furthermore, in case you loved this tutorial, you possibly can be taught extra about different authentication alternate options with Moralis. For instance, discover ways to add sign-in with RainbowKit or add a sign-in with Magic.Hyperlink.
Add MetaMask Authentication with Django – Beginning and Testing the Utility
Now that the applying is finalized, the very last thing it’s worthwhile to do is check the applying to verify it really works as supposed. So, the very first thing it’s worthwhile to do is begin a neighborhood server on port “1000” with the next command:
django_web3_auth_envScriptspython.exe handle.py runserver 1000
Furthermore, upon getting began the applying, it’s best to be capable to entry the login web page by means of the next hyperlink: http://127.0.0.1:1000/web3_auth/moralis_auth.
So, from there you possibly can check the applying by clicking on the “Login with Moralis Web3 API” button:

This could immediate your MetaMask pockets and can help you signal a message:
As quickly as you signal the message and the authentication is profitable, you’ll be directed to the consumer web page, which can look one thing like this:

You probably have additional questions relating to the method of including MetaMask authentication with Django, try the GitHub repository we initially linked to within the introduction. Additionally, you possibly can examine Moralis’ official documentation for additional data on the method.
Add MetaMask Authentication with Django – Abstract
If you happen to adopted alongside on this article, you now know find out how to add MetaMask authentication with Django. In doing so, you created a easy full-stack Django utility the place customers might sign up with their MetaMask wallets. Additionally, as soon as authenticated, the applying would show data relating to the customers. Furthermore, because of Moralis’ authentication circulation, you have been in a position to create this utility following the 5 steps beneath:
- Including Conditions
- Putting in Dependencies
- Making a Django Undertaking and Utility
- Edit ”moralis_auth” Settings
- Creating the Most important “web3_auth” Utility and Templates

Nevertheless, Web3 authentication is simply one of many areas by which Moralis turns out to be useful. For instance, the platform means that you can create Web3 webhooks simply or implement Web3 syncs in a heartbeat!
As well as, if you wish to develop into more adept in Web3 improvement, try Moralis’ Web3 weblog. Briefly, the weblog presents premium content material with each day updates. For instance, be taught extra in regards to the EIP-4361 customary, and blockchain syncs. Moreover, you possibly can find out about several types of DAOs. Additionally, we extremely suggest testing Moralis Workshops the place you possibly can dive into hands-on challenges aimed towards Web3 improvement. As an example, you possibly can discover ways to clone standard Web2 apps and switch them into Web3 functions. What’s extra, a few of these examples embody cloning Sim Metropolis and an Elden Ring Web3 sport. Furthermore, you possibly can discover ways to construct a Web3 Twitter or a Web3 Offended Birds sport! So, by taking part in these challenges, you possibly can develop into a more adept Web3 developer very quickly!
So, if you’re planning on moving into blockchain improvement or wish to add MetaMask authentication with Django, enroll with Moralis now! Moreover, creating an account solely takes seconds, which can offer you a extra accessible developer expertise!


