
If you happen to’ve been utilizing Moralis for a very long time, you’ve in all probability operated a Moralis server. This characteristic is now not out there as we transition to Moralis 2.0, however now you can as an alternative arrange a self-hosted Web3 server. This offers you entry to the identical highly effective Moralis options and quick access to Moralis’ Web3 APIs. Herein, we present you the precise technique of the best way to accomplish this and join your server to Moralis. Moreover, with a self-hosted Web3 server, you’ll be able to take full management of your backend, information, and database. Additionally, you’ll be able to finetune your internet hosting to cut back internet hosting prices. Furthermore, a self-hosted server for Web3 lets you tweak any buyer code, plugins, and packages, providing a greater developer expertise.
So, in case you are concerned about establishing a self-hosted substitute in your Moralis server, learn on! To make the method as easy and simple for you as doable, we additionally ready a number of code repositories. Therefore, as we transfer ahead, you’ll save lots of time by cloning our code or downloading the acceptable ZIP recordsdata from GitHub. We will even make the most of some glorious instruments to finish as we speak’s problem. Other than Moralis, additionally, you will use MongoDB, Redis, and Heroku. As such, you’ll be capable to get your Mongo database, arrange your connection string, and deploy your server to manufacturing. Briefly, it would take you about twenty minutes to arrange a self-hosted Web3 server.
That stated, you should utilize as we speak’s article in case you are simply beginning with Moralis or seeking to migrate your Moralis database. We’ll take you thru the method step-by-step. We even have a neat video tutorial ready for you on the backside of this text for added readability on the best way to arrange a self-hosted server for Web3!

Set Up a Self-Hosted Web3 Server by Operating Parse Server Regionally
Step one to establishing a self-hosted Web3 server requires you to run a Parse Server domestically. To do that, you could set up a suitable model (v16 or above) of NodeJS. You additionally have to have a bundle supervisor prepared – both npm or yarn. Transferring ahead, we are going to use the latter.
Subsequent, obtain the “migration-demo-parse-server” challenge’s ZIP file. Then, unzip the file and open it in Visible Studio Code (VSC). Transferring on, you need to set up all dependencies utilizing the “yarn set up” command:

Whereas the set up of dependencies is underway, open the “.env.instance” file. Begin by renaming the file to “.env”. Moreover, contained in the file, you’ll see a number of essential environmental variables. As such, you could get hold of their values:

Trying on the screenshot above, you’ll be able to see that the primary variable is your Moralis Web3 API key. To acquire that key, log in to your Moralis dashboard and choose the “Web3 APIs” possibility within the facet menu:

Maintain the port worth as it’s. So far as the grasp key goes, you’ll be able to set it up your self (guarantee it’s safe). You’ll be able to comply with our lead and use “001” in your utility ID. Concerning the server URL, you should utilize the native server for now. Nevertheless, as soon as we go to the manufacturing part, you’ll use a unique URL. Moreover, you’ll generate the cloud path when you construct your challenge. Moreover, to generate your database URI, you’ll use your MongoDB account.

Utilizing MongoDB to Generate Your Database URI
In case you don’t have a MongoDB account, create one now. Then, full the preliminary setup, together with the cluster setup. With that lined, you’ll be taking a look at one thing like this:
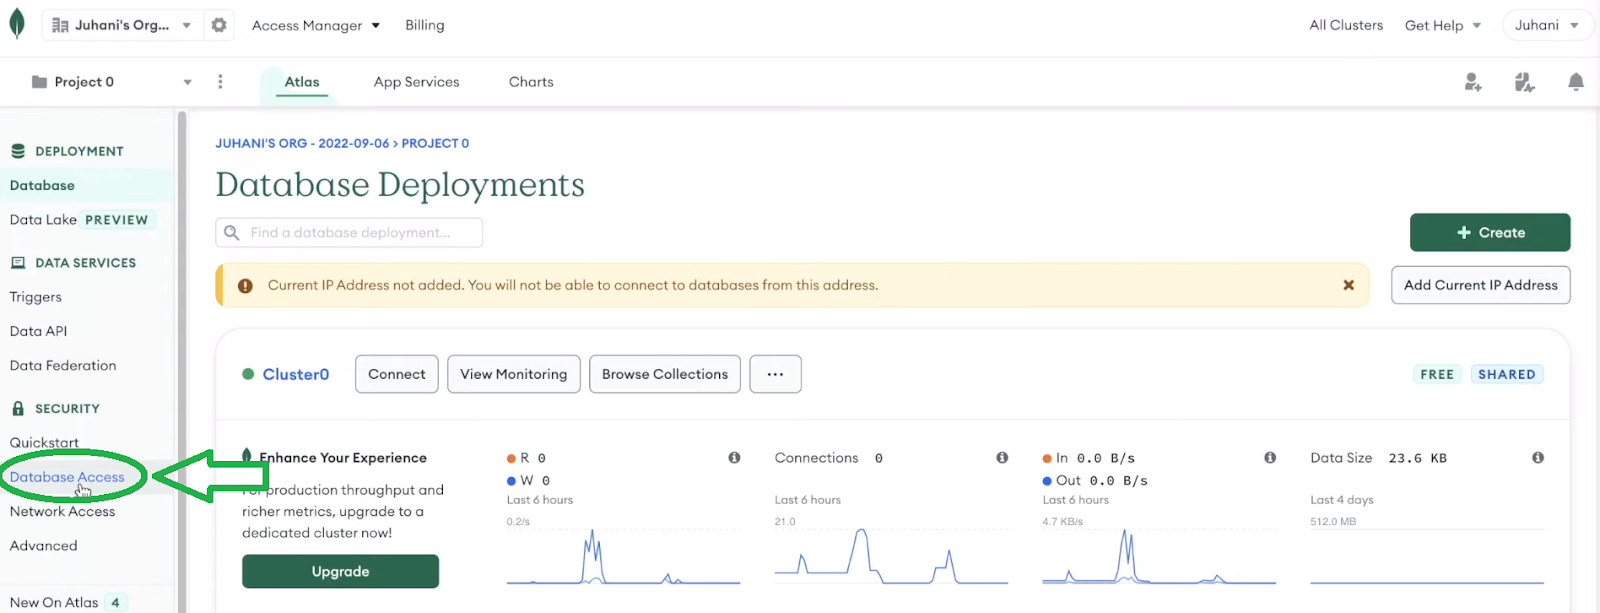
Furthermore, as indicated by the above picture, you could click on on the “Database Entry” possibility from the sidebar. As soon as on the “Database Entry” web page, add a brand new database consumer utilizing the “Password” authentication methodology. Then, enter your username and create your password:

Additionally, don’t neglect to provide this consumer each “learn” and “write” roles. Then, click on on the “Add Person” button:

With a brand new consumer in place, go to the “Community Entry” web page and add an IP tackle:

As you’ll be able to see within the screenshot above, you’ll be able to enable entry from wherever. Subsequent, go to the “Database Deployments” web page and use the “Join” possibility:

Then, choose the “Join your utility” possibility:

Lastly, you’ll be capable to copy your database URI:
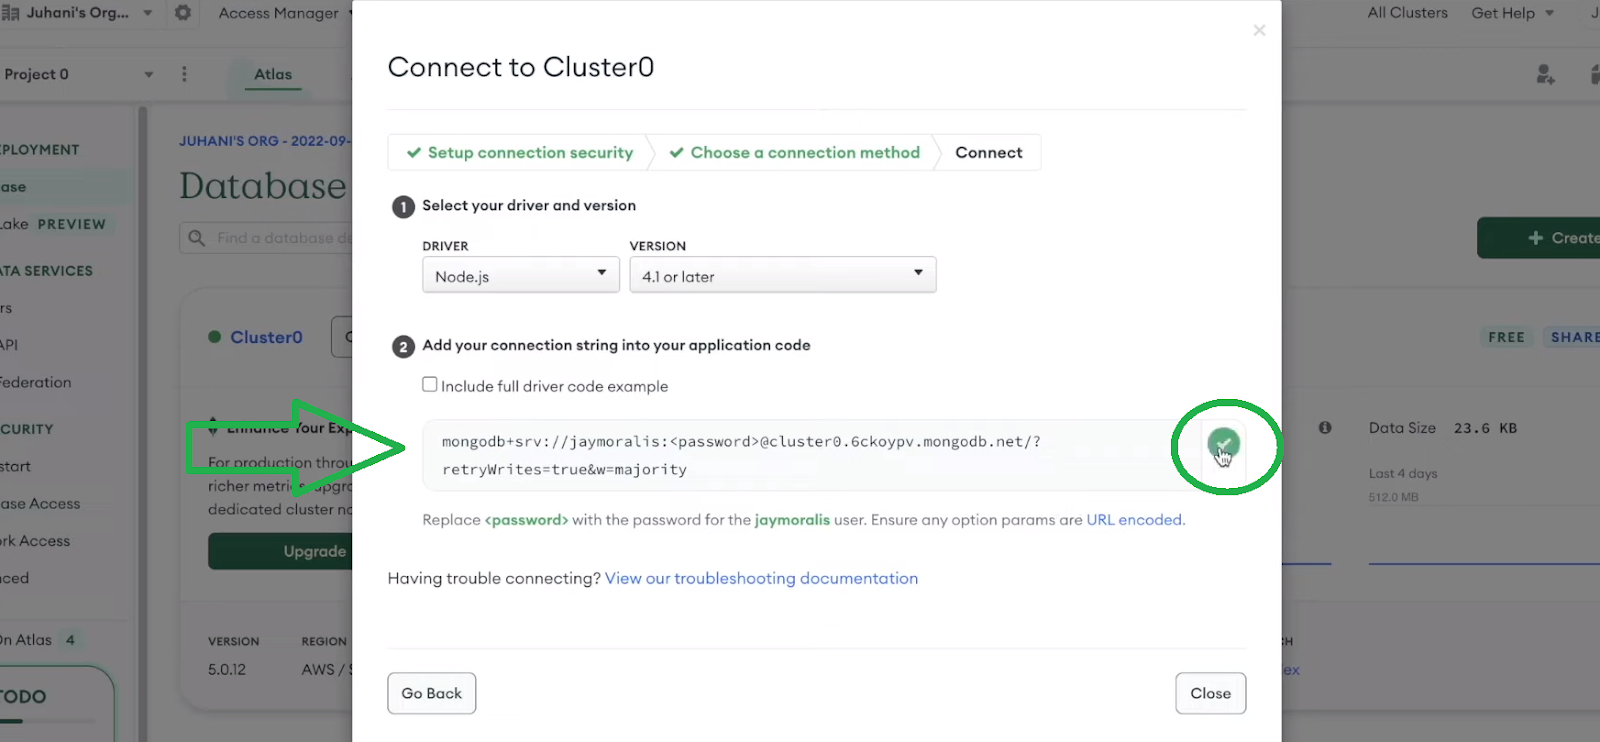
Then, return to your “.env” file and paste the above-copied URI into the designated space:

Along with your MongoDB URI in place, you could additionally tweak the URI. First, change “<password>” together with your precise password and add your database identify (“parse” for instance):

You might be greater than midway by the preliminary setup in your self-hosted Web3 server. Subsequent, you could get hold of your Redis URI.
Acquiring Your Redis URI
your “.env” file, you’ll be able to see that “REDIS_CONNECTION_STRING” is the subsequent variable. As such, ensure that to go to the Redis enterprise cloud web page and click on on the “Strive Free” button:

By finishing the preliminary setup, you’ll most definitely create your database. Nevertheless, in case you haven’t, achieve this as soon as inside your dashboard:

Subsequent, go to the “Knowledge Entry Management” web page, choose the “Roles” tab, and click on on the “Add new function” button:

Within the “Create new function” window, enter that function’s identify and choose your subscription (the one created when creating your Redis database). Furthermore, ensure that to provide this function full entry. Additionally, bear in mind to avoid wasting the modifications and save your new function:

With the brand new function in place, you should utilize the “Customers” tab of the “Knowledge Entry Management” web page to create a brand new consumer. The function ought to match the above-created function (e.g., tremendous); therefore, you could provide you with a username and password:

As soon as the above consumer is prepared, you’ll be able to copy your endpoint from the “Databases” web page:

Along with your endpoint copied, return to VSC and paste it underneath the “REDIS_CONNECTION_STRING” worth, leaving “redis://” in place:

Subsequent, add your Redis consumer’s username and password in the beginning of the string, adopted by “@“:

Word: We’ve used the identical username and password in MongoDB and Redis.
Operating a Self-Hosted Web3 Server Regionally
So far as the “RATE” variables go, you’ll be able to go together with the default values. Additional, you should utilize your terminal and enter the “yarn construct” command, which can create the “construct” folder. Subsequent, use the “yarn dev” command to get a improvement server of your backend Parse Server:

Now you can use your browser to go to “localhost:1337/server”:

The above error is a sign that the server is up and working. Therefore, you’ll be able to go forward and create a shopper the place you’ll be able to name a server and have entry to Moralis.
Setting Up and Operating a Consumer
Along with your self-hosted Web3 server working domestically, you could arrange and run a shopper. That is the place it can save you a while by utilizing our “parse-server-migration-react-client” challenge. As such, obtain the ZIP file from GitHub, unzip it, and open the challenge in VSC. Then, rename the “.env.instance” file to “.env” and open it:

In case you are acquainted with creating dapps utilizing Moralis 1.0, you realize you needed to get hold of your app ID and server URL. Nevertheless, because you created your personal native server above, you should utilize that server’s particulars. As such, make the most of the values used within the earlier part:

Subsequent, set up all dependencies utilizing the “yarn set up” command. Then, you should utilize the “yarn begin” command to run this challenge domestically. Therefore, it is best to be capable to see this boilerplate dapp in your browser. As such, you’ll be able to mess around with its already built-in Web3 authentication:

When you join your pockets to the dapp, you should utilize the “EVM NFTs” possibility. By doing so, you’ll be able to discover NFTs on totally different chains:

If there are precise NFTs in that pockets, the dapp will show them after you click on on the “Present NFTs” button:

For a walkthrough of the “NftGrid.tsx” file, use the video beneath, beginning at 10:55. That is the place you’ll be able to see how the Moralis Web3 API works together with your self-hosted Web3 server. Basically, the code follows the identical rules because it did with Moralis servers.
Instance of Writing to MongoDB
Now that you’ve got your self-hosted Web3 server and your instance dapp working domestically, you’ll be able to mess around with the performance. For example, you’ll be able to add particular traces of code to the “House.tsx” script to jot down to MongoDB (11:28). For starters, you need to import “useMoralis” from “react-moralis“. Then, add a easy operate that can add an instance object to your database:

Lastly, you additionally need to add a button that can allow you to name the above instance operate:
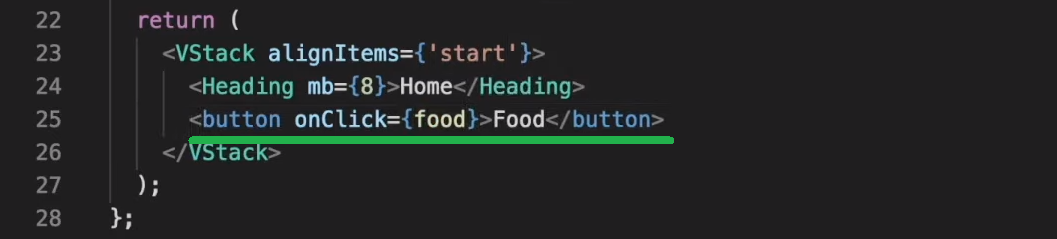
If you happen to now restart your dapp with the “yarn begin” command, it is best to see the “Meals” button:

If you happen to click on on that button, it would add the above object to your MongoDB. Therefore, you’ll be able to see that by returning to the “Database Deployments” web page and clicking on the “Browse Collections” possibility:

On the “Collections” tab, you’ll be capable to see your “parse” database (when you used the identical identify as us) and the “Meals” object:

It’s also possible to see that different courses have been added to your database out of your Moralis database (0:45). Additionally, you’ll be able to migrate parts from distinctive courses inside your Moralis database (13:52).
Deploying Your Self-Hosted Web3 Server with Heroku
To date, you’ve been working your self-hosted Web3 server domestically. Nevertheless, it’s now time you discover ways to deploy your server so everybody can entry it. That is the place we’ll use Heroku. Therefore, create or log in to your current Heroku account and create a brand new app:

Title your app as you want, choose your area, and click on on the “Create app” button:

Then you should utilize your terminal to push your dapp to Heroku. To try this, you’ll have to obtain and set up the Heroku CLI. Then, you’ll be capable to use the “heroku login” command (17:51):

Word: Be sure you are again within the “pare-server-migration” challenge.
When you’ve logged in to Heroku utilizing your terminal, enter the “git init” command. Then, use the “heroku git:distant -a moralis-host” command. In case you named your Heroku app otherwise, use that identify as an alternative of “moralis-host“. Subsequent, add all of your folders into that repository with the “git add .” command, adopted by this: git commit -am “make it higher”.

Lastly, you push it to the Heroku grasp department with the “git push heroku grasp” command.
Moreover, you could manually enter your environmental variables and their values (from “.env”) to Heroku. As such, you will want to go to the “Settings” tab of your Heroku app:

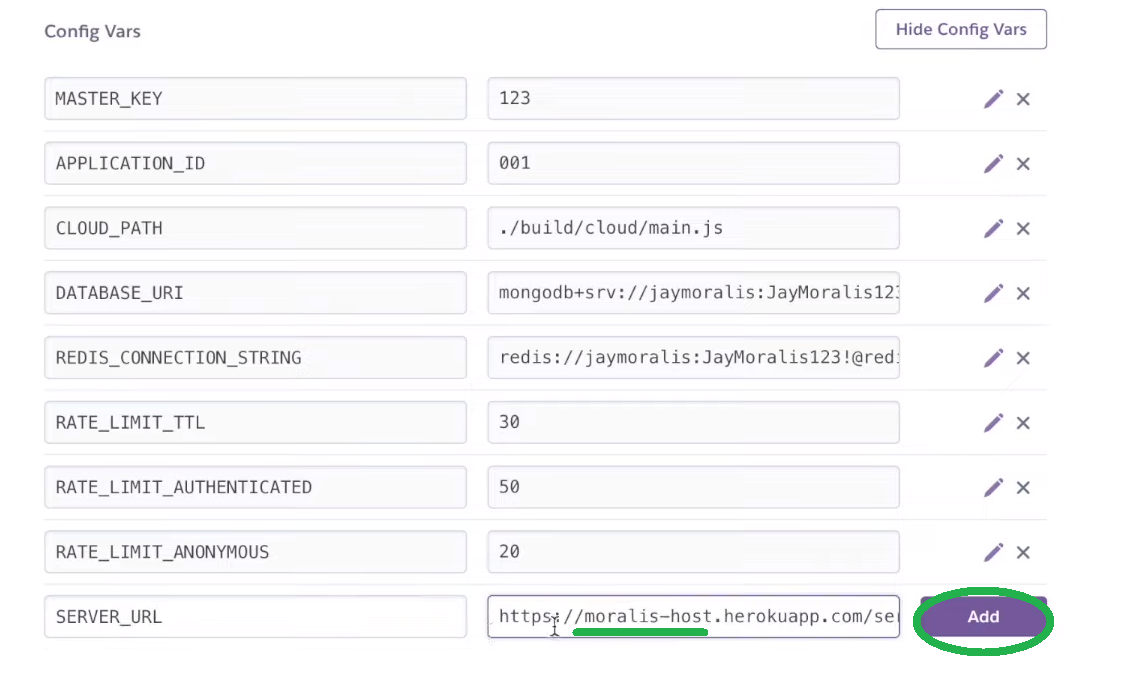
As soon as on the “Settings” tab, you could click on on the “Reveal Config Vars” button:

Then, merely enter all of the variables and their values. Final however not least, you additionally want so as to add your server URL, which wants to incorporate your Heroku app identify adopted by “.herokuapp.com/server”:
Now you can paste the above server URL into your client-side React app’s “.env” file:

Lastly, right here’s the video tutorial with all the main points:
How you can Set Up a Self-Hosted Web3 Server – Abstract
As we speak, you realized the best way to arrange a self-hosted Web3 server. You should utilize the steps herein emigrate your current Moralis database effortlessly. Alongside the best way, you had an opportunity to discover ways to use MongoDB and Redis. Therefore, you now know the best way to arrange the database and set up a connection string. We first centered on working your self-hosted Web3 server domestically. Additional, we even confirmed you the best way to arrange and run a shopper. Final however not least, you additionally realized the best way to deploy your Web3 server utilizing Heroku.
Now that you know the way to get Web3 servers up and working, it’s time to dive deeper into dapp improvement. That is the place Moralis’ cross-platform interoperability makes issues easy. In any case, it lets you use legacy dev instruments and programming languages to create killer dapps (decentralized purposes). For example, you should utilize Firebase or Unity to create superior Web3 video games. Along with your JavaScript proficiency, you’ll be able to deploy all kinds of DeFi dapps. If that sounds fascinating, ensure that to discover the Moralis YouTube channel, the Moralis weblog, and the Moralis documentation. With the assistance of those precious assets, you’ll be able to turn into a Web3 developer without spending a dime.
Alternatively, you might be concerned about going full-time crypto sooner reasonably than later. If that’s the case, turning into blockchain licensed may make lots of sense for you. As such, you might need to contemplate enrolling in Moralis Academy. Other than top-tier crypto programs, that is the place to get skilled mentorship, a personalised examine path, and membership in one of the advancing communities within the business.


