
It doesn’t matter what kind of Web3 tasks you got down to create, a central performance most dapps (decentralized functions) require is the integration of blockchain-based authentication options. Furthermore, it’s extremely helpful to combine your Web3 authentication flows with backend companies like, for instance, Firebase to retailer person info effectively. With that in thoughts, do you know that Moralis presents essentially the most accessible approach to create a Web3 Firebase login with MetaMask? If this pursuits you, observe alongside as this tutorial covers the method of including a Web3 Firebase login with MetaMask from begin to end!
The information illustrates the whole course of by displaying you methods to arrange an easy React software the place customers can register with their MetaMask wallets. Moreover, because of Moralis’ Auth extension, you’ll be able to create a Firebase login with MetaMask very quickly. Furthermore, the method will be damaged down into the next sections:
- Setting Up Firebase
- Initiating the Firebase CLI
- Setting Up Moralis’ Auth Extension
- Deploying the Extension
- Creating the React App
Furthermore, if you wish to be taught extra about Web3 authentication, take a look at Moralis’ Web3 Auth API. This wonderful software is among the many enterprise-grade Web3 APIs provided by Moralis. With this software, you’ll be able to add a number of authentication mechanisms with ease. For instance, be taught so as to add an indication in with RainbowKit in minutes!
However, it doesn’t matter what kind of blockchain-related undertaking you need to create, join with Moralis to construct sooner and smarter with wonderful growth instruments bridging the hole between Web2 and Web3 growth!
What are You Working In direction of? – Including Firebase Login with MetaMask
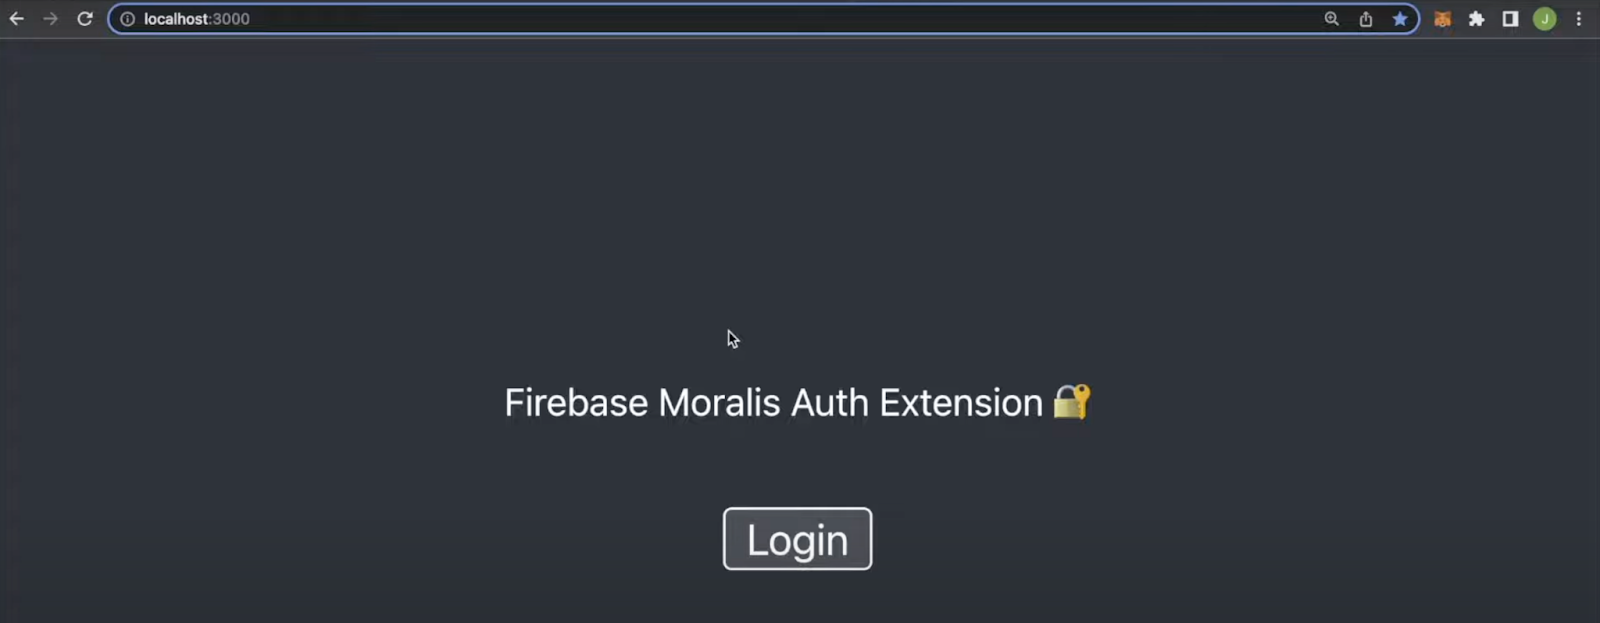
As talked about earlier, this tutorial demonstrates methods to create a Web3 Firebase login with MetaMask. As an instance the method, we’ll present you methods to create an easy React software the place you’ll be able to register along with your Web3 pockets. Furthermore, that is what the touchdown web page will appear like:
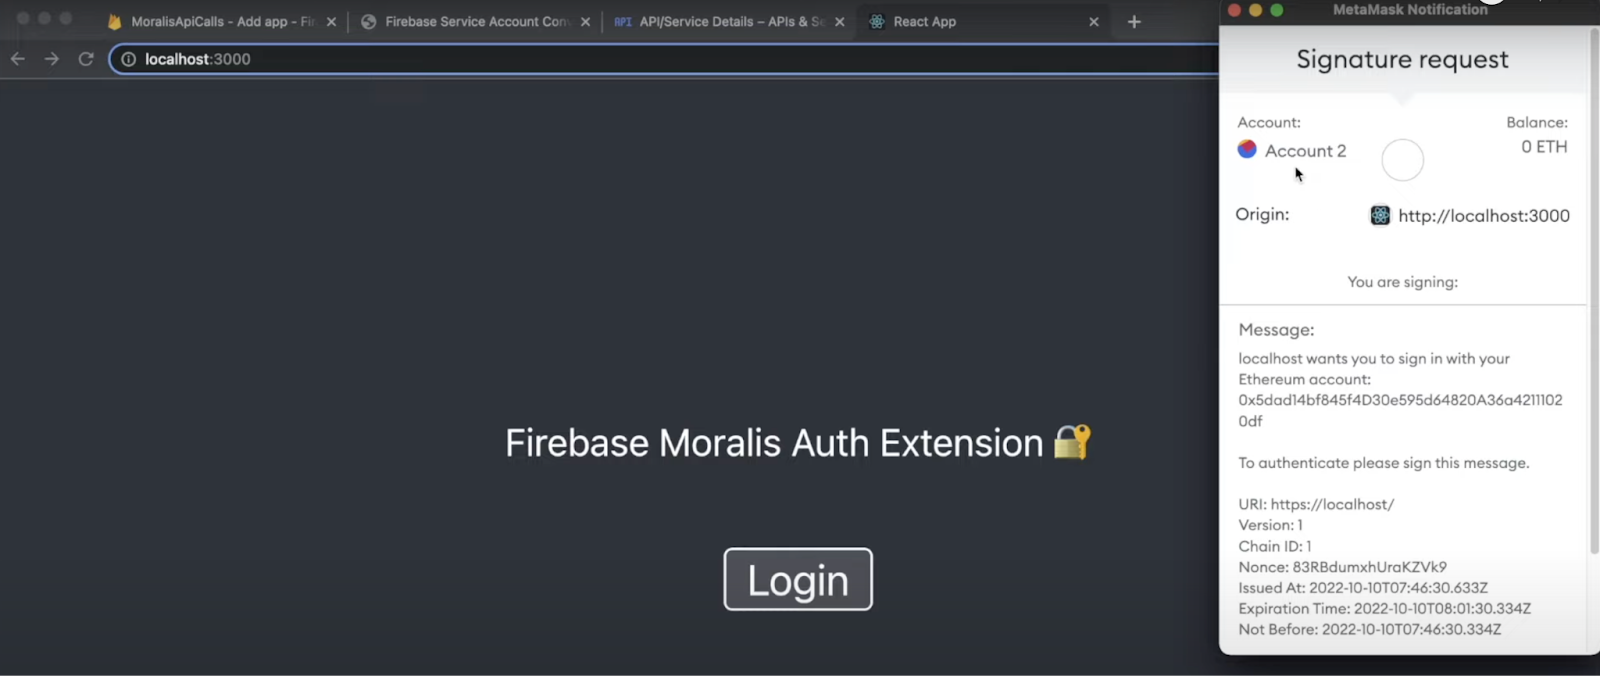
When you click on on the ”Login” button, it ought to immediate your MetaMask pockets, assuming you may have the browser extension put in:
Once you signal the message and authenticate your self, the app will show a person ID:

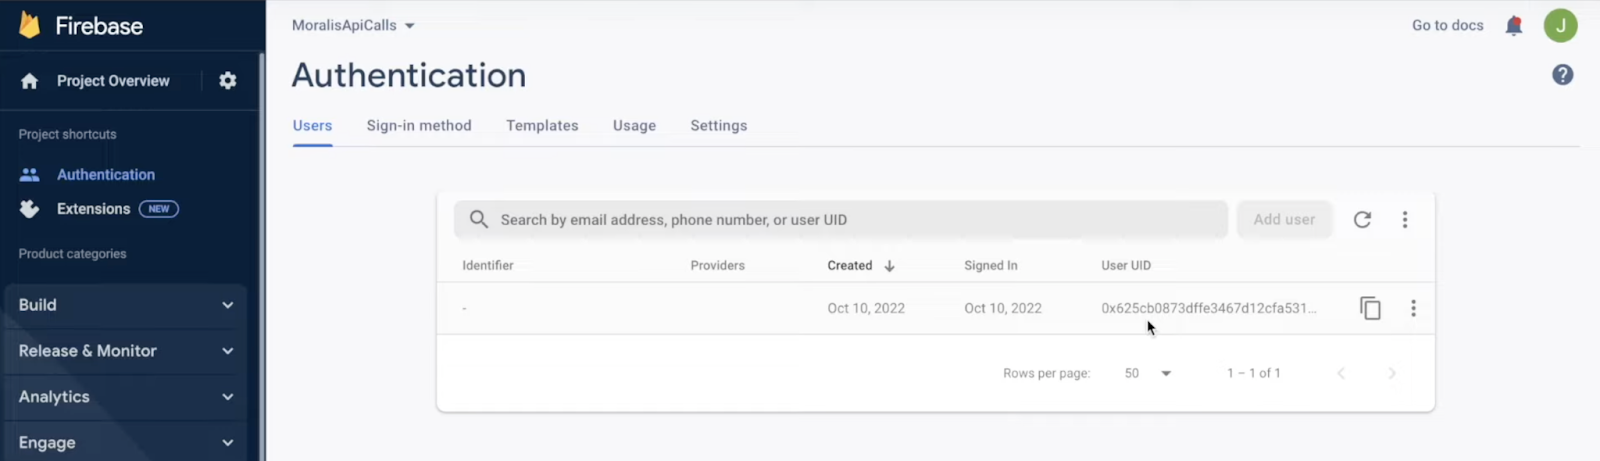
Along with this, the app will add a brand new person with the identical ID to Firebase beneath the ”Authentication” tab:
You’ll be able to then combine this performance with extra Firebase companies just like the database. If this sounds fascinating and also you wish to discover ways to create a Web3 Firebase login with MetaMask, be part of us, as the next sections cowl the whole course of step-by-step!
Add Firebase Login with MetaMask – Full Breakdown
With a greater thought of what you might be working in direction of, it’s time to soar into the central a part of this tutorial and present you methods to create a Web3 Firebase login with MetaMask. We are going to use Moralis’ Auth extension for this temporary information, permitting you to perform this text’s activity very quickly!

Due to the accessibility of Moralis, it is possible for you to to implement this superb function by organising Firebase, initiating the Firebase CLI, organising Moralis’ Auth extension, deploying the extension, and creating an easy React software. Furthermore, to make the tutorial simpler to observe, the information will probably be break up into varied sections depending on the steps we introduced earlier!
Now, in case you are extra of a video learner, be happy to take a better take a look at the next Moralis YouTube video outlining the method of making a Web3 Firebase login with MetaMask in additional element:
However, allow us to kick off this tutorial by taking a better take a look at methods to arrange Firebase!
1. Setting Up Firebase
To start this ”Create a Web3 Firebase Login with MetaMask” tutorial, you have to initially arrange Firebase. If in case you have not already, navigate to the Firebase web site and click on on the ”Get Began” button:
Clicking on the button above permits you to create an account, and when you log in, create a brand new undertaking utilizing the button beneath and observe the directions:
When you create your undertaking, you’ll arrive on the Firebase admin panel. The very first thing you have to do from right here is to alter the billing plan. Firebase tasks embody the ”Spark plan” by default; nevertheless, you wish to swap from ”Spark plan” to “Blaze”. Accordingly, click on on the ”Improve” button on the backside and choose ”Blaze”:

Furthermore, you’ll rapidly discover that ”Blaze” is a ”Pay as you go” billing plan. Nonetheless, you continue to have a free restrict and can solely be charged as soon as your app will get lots of traction, which you shouldn’t have to fret about for now through the tutorial.
Subsequent up, click on on the ”Construct” tab to the left of the Firebase admin panel, press ”Authentication”, and hit ”Get Began”:

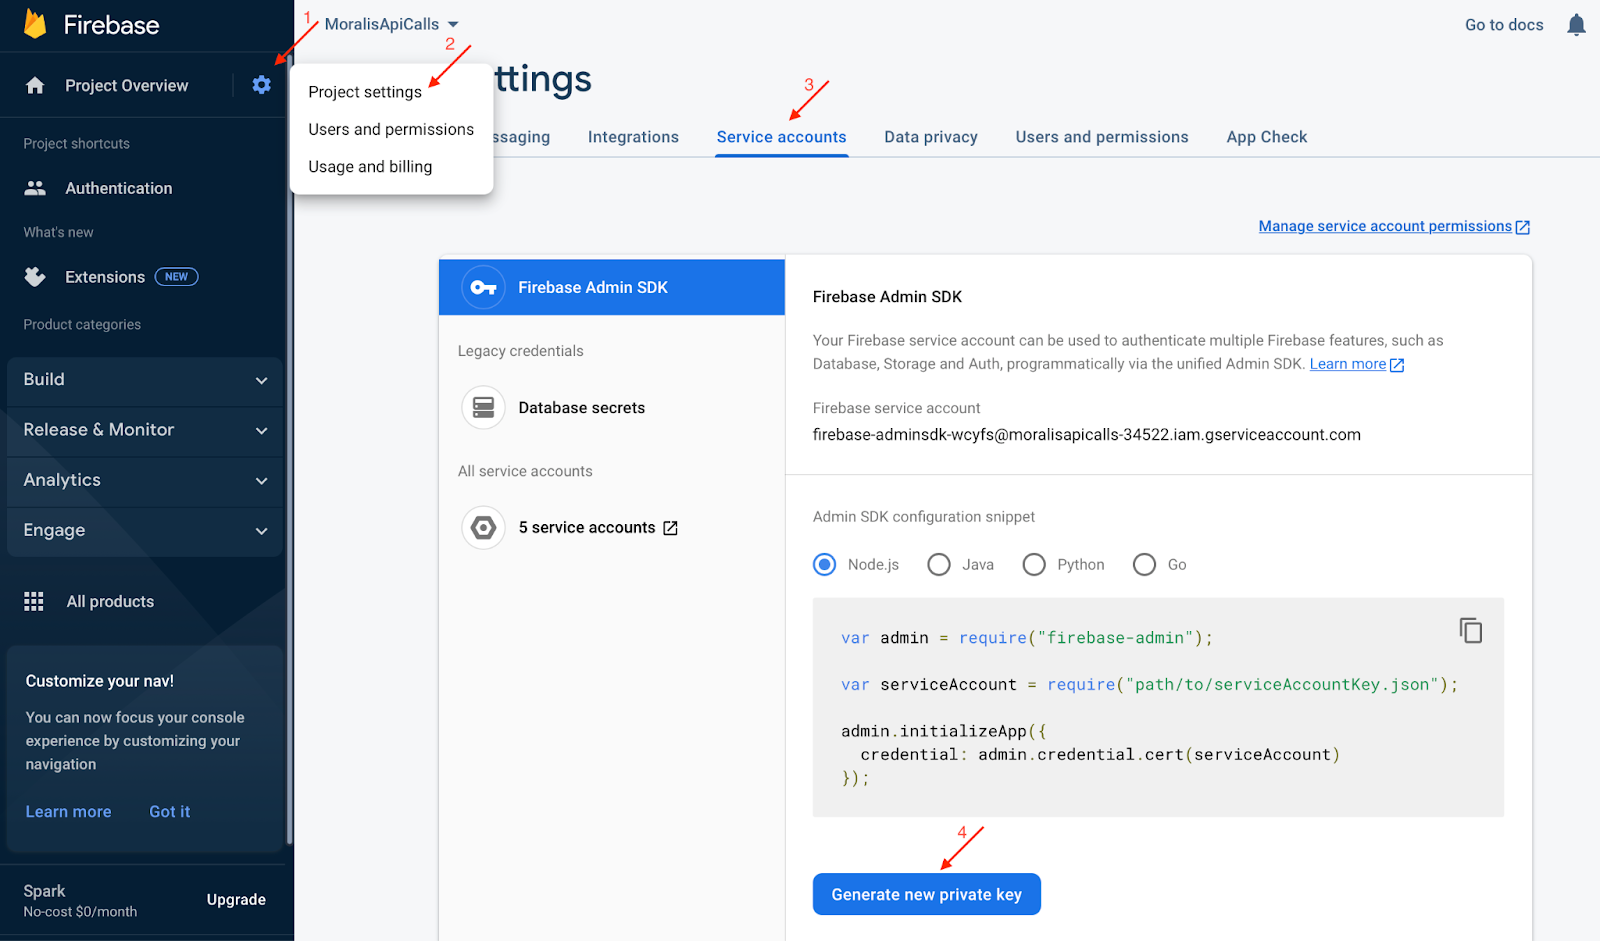
Lastly, click on on the cogwheel on the prime of the admin panel, press ”Mission settings”, choose the ”Service accounts” tab, and generate a brand new non-public key:
Producing a brand new non-public key will obtain a file to your gadget. You’ll be able to then paste the contents of the file into Moralis’ Firebase Service Account Converter and obtain the mandatory extension parameters that you simply’ll must arrange a Firebase login with MetaMask:

This covers the preliminary Firebase setup and the primary a part of this ”Create a Web3 Firebase Login with MetaMask” tutorial. The next part will illustrate methods to arrange the Firebase CLI (command line interface)!
2. Initiating the Firebase CLI
The following step to implement a Firebase login with MetaMask into your undertaking is putting in the Firebase CLI. To take action, go forward and open an IDE (built-in growth atmosphere) and arrange a brand new folder/repository. We use VSC (Visible Studio Code) for this Web3 Firebase authentication tutorial. For those who go for one other different, be aware that the workflow would possibly differ.
Along with your IDE open, you have to launch a brand new terminal. In case you are utilizing VSC like us, click on on the ”Terminal” tab on the prime, adopted by ”New Terminal”:

With a terminal open, ensure to put in Firebase instruments in your native machine by inputting the next command into the terminal:
For macOS:
sudo npm set up -g firebase-tools
For Home windows:
npm set up -g firebase-tools
Subsequent up, log in to Firebase utilizing the command beneath:
firebase login
As soon as logged in, go forward and provoke your Firebase undertaking by working the next command within the terminal:
firebase init internet hosting
From there, you’ll be able to choose an present undertaking, which ought to correspond to the Firebase undertaking you arrange within the earlier part:

You’ll be able to then select what you wish to use as your public listing, and on this case, you’ll be able to enter the next and hit enter:
frontend/construct
Lastly, choose ”No” for each the ”Configure as a…?” and ”Arrange automated builds…?” questions:

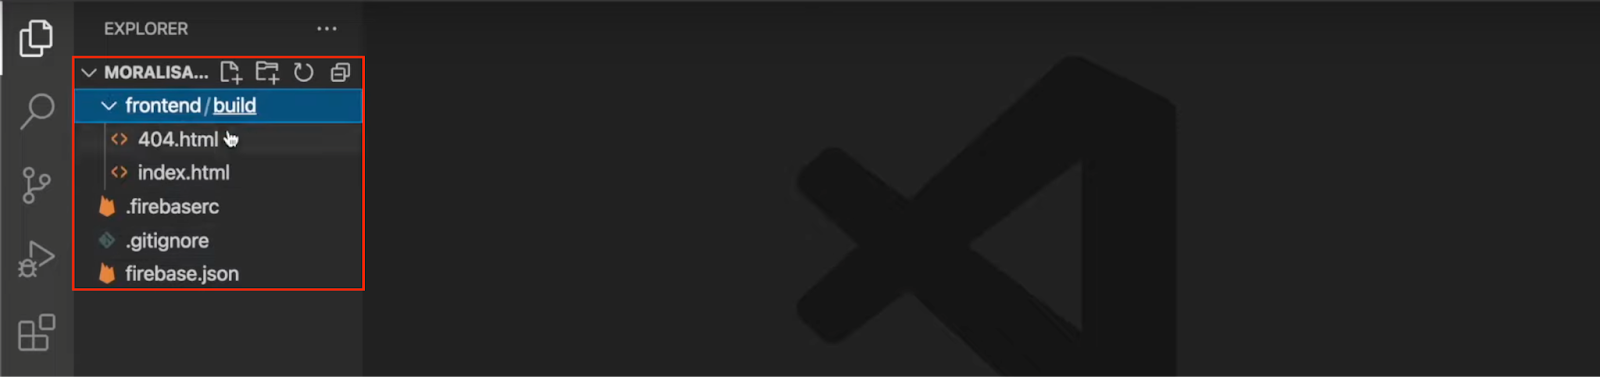
That covers the Firebase CLI setup course of! For those who adopted alongside and executed the right instructions, you need to now have a construction much like this in your native listing:
3. Setting Up the Firebase Authentication Extension
It’s time to arrange Moralis’ Firebase Auth extension, as that is how you’ll add a Web3 Firebase login with MetaMask. As such, soar straight again into the terminal and run this command:
firebase ext:set up moralis/moralis-auth
For the primary prompts, choose ”Sure”, decide the ”Iowa…” choice, and select to retailer your secrets and techniques on ”Google Cloud Secret Supervisor”:

As soon as you choose the ”Google Cloud Secret Supervisor” choice, it would end in an error much like the one introduced within the picture beneath:

For those who expertise this subject, go to the hyperlink introduced in your terminal, which brings you to a web page wanting like this:
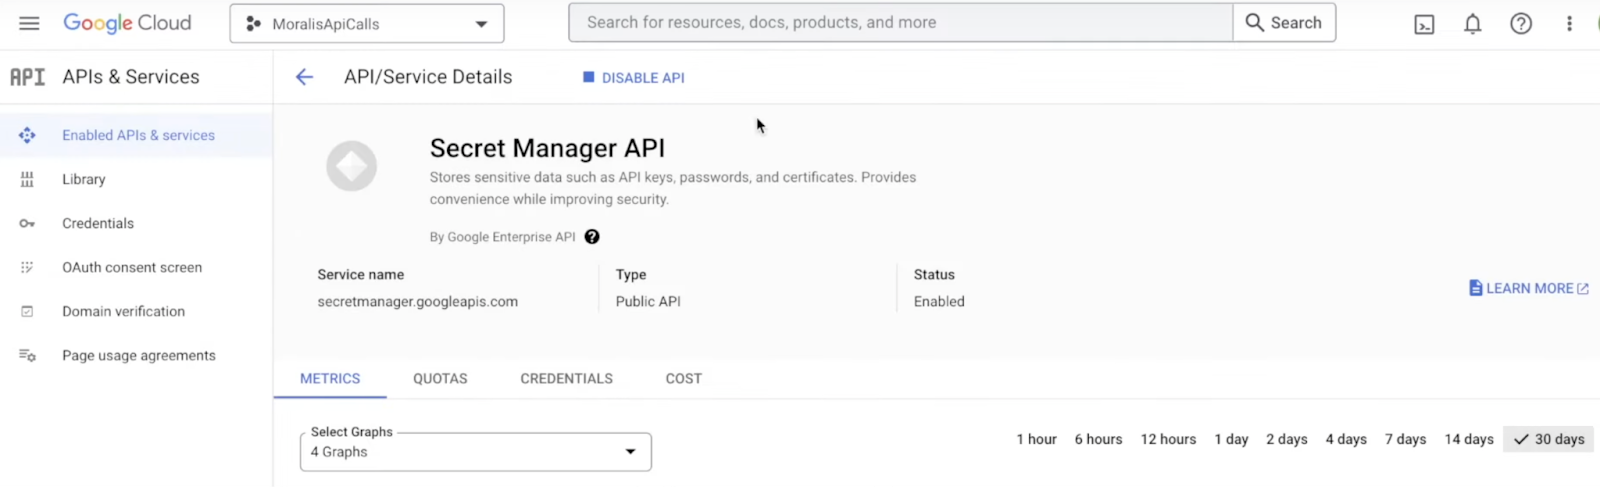
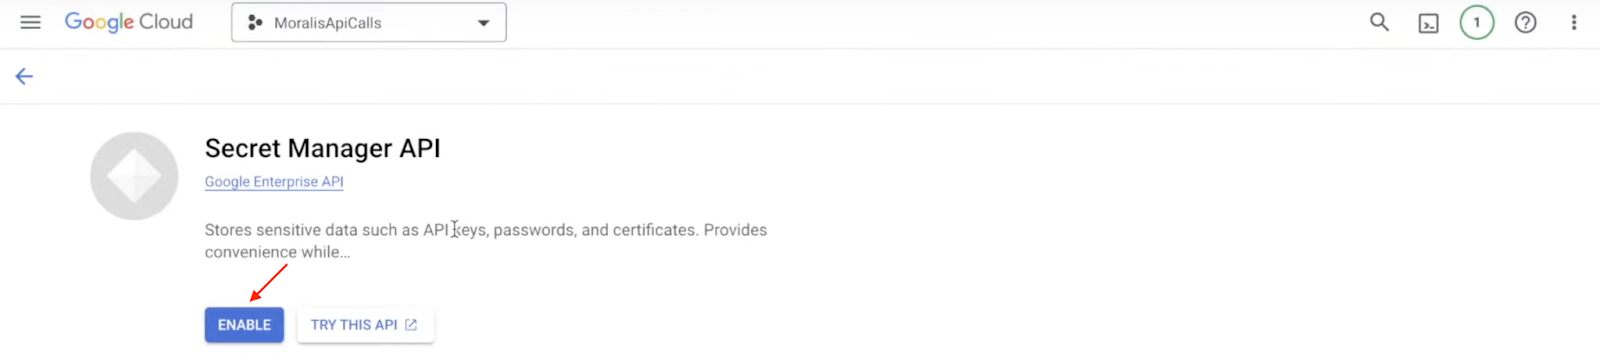
From there, you could disable and reenable the API by clicking on ”DISABLE API”:

This could deliver you to the ”Secret Supervisor API” web page, the place you’ll be able to allow the API:
Now, wait a couple of minutes. Then, repeat the method by inputting the command from above into the terminal as soon as once more:
firebase ext:set up moralis/moralis-auth
This time, it shouldn’t end in an error. As an alternative, you’ll now must enter your Moralis API key:

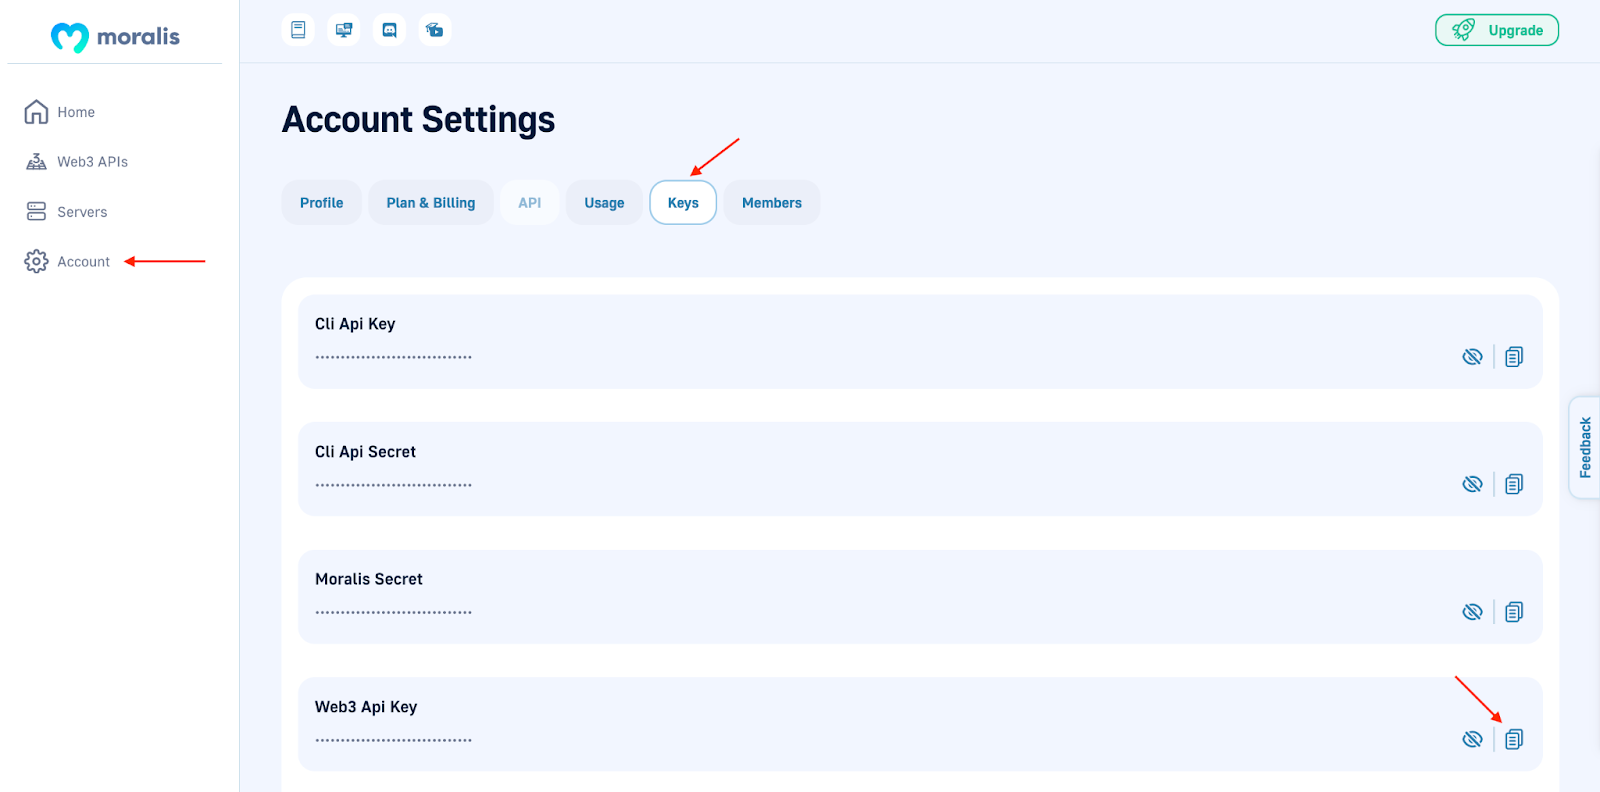
As such, when you have not already, ensure to arrange your Moralis account instantly. With an account at your disposal, you’ll be able to fetch the API key by logging in to Moralis, clicking on the ”Account” tab, hitting ”Keys”, and at last copying the Web3 API key:
After inputting the API key and hitting enter, you have to so as to add an internet site URL. On this case, enter the next:
https://localhost
From there, the terminal will immediate you for the ”Mission ID of Service Account”, which you’ll purchase from Moralis’ Firebase Service Account Converter you explored beforehand:

Lastly, the terminal will ask for the ”E mail of Service Account” and ”Personal Key of Service Account”, which you’ll purchase from the Firebase Service Account Converter:

4. Deploying the Extension
This part will present you methods to deploy the Moralis Auth extension. So, to deploy the extension, enter the next command into the terminal:
firebase deploy --only extensions
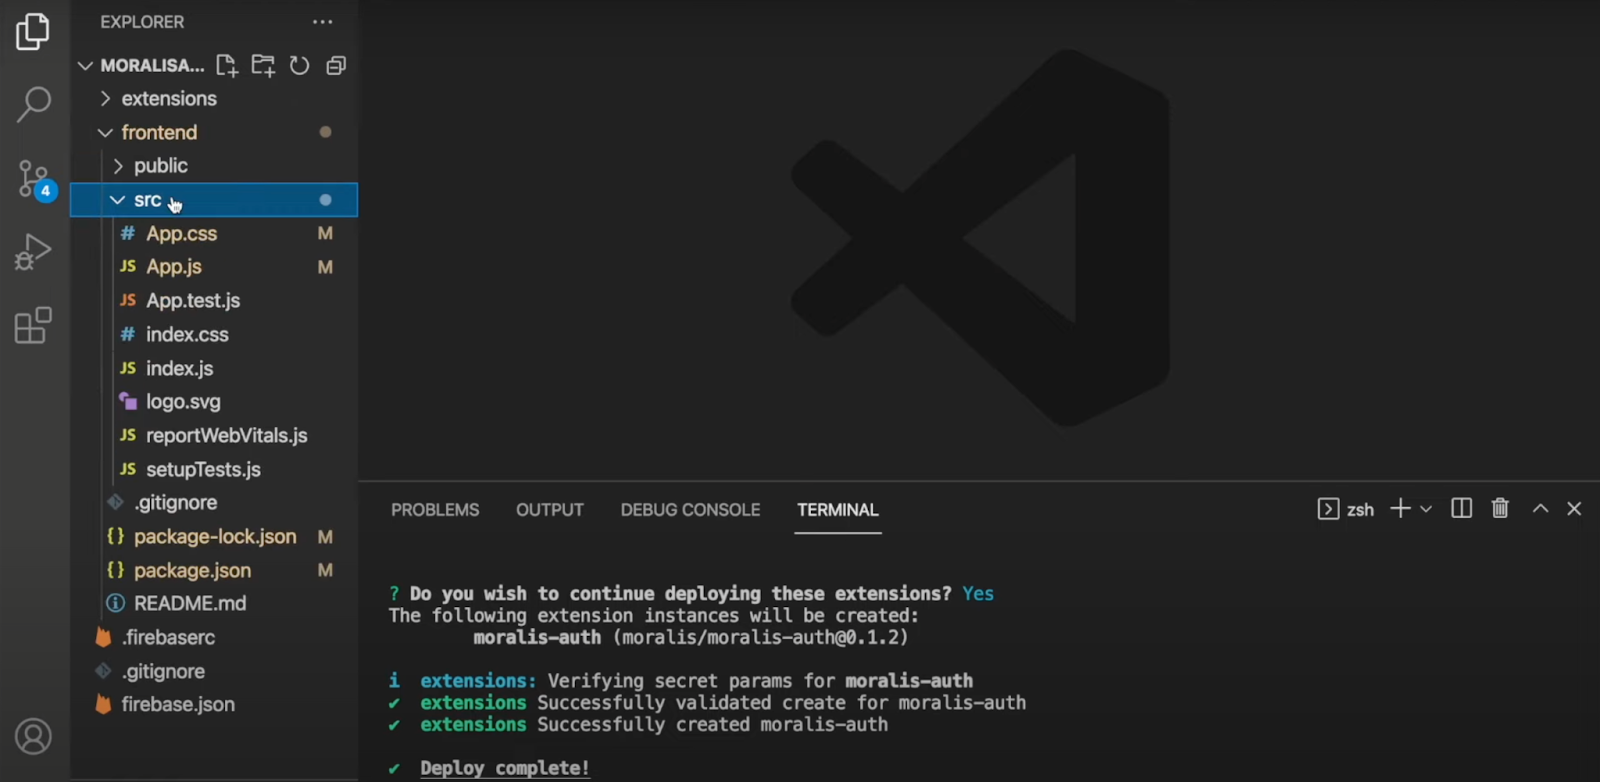
When you run the command above, it would immediate some questions, and you may choose ”Sure” for all of them. Furthermore, it would take a few minutes; nevertheless, fear not; the extension will deploy shortly.
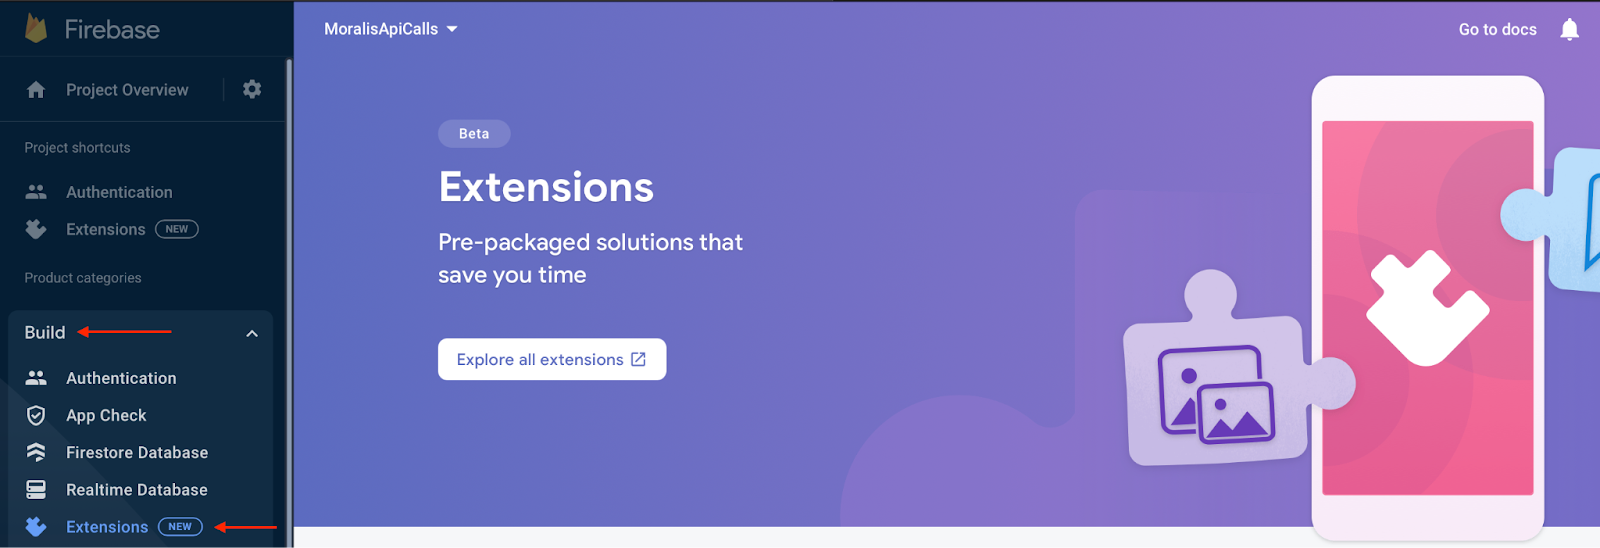
If the whole lot is deployed efficiently, you need to now be capable to discover the Moralis Auth extension in your Firebase admin panel. To examine, click on on the ”Construct” tab, adopted by ”Extensions”:
Now, with the Moralis Auth extension at your disposal, you have to strive it out with a React app. As such, the next part will delve deeper into how one can create the app and check that the whole lot works as supposed.
5. Creating the App
For those who look carefully at your native listing, you’ll discover the ”frontend/construct” folder. This initially accommodates two information; nevertheless, we wish to exchange these with a React app as a substitute. On this case, we’ll use an already ready template, and you could find the whole code for the undertaking beneath:
Full React App Documentation – https://github.com/MoralisWeb3/youtube-tutorials/tree/important/FirebaseAuthExtension
Copy all of the information from the repository above and implement them into the ”frontend” folder. Consequently, your IDE ought to now look one thing like this:
From there, all you could do is add your Firebase configurations to the ”src/App.js” file on the eighth line, the place you will see the ”firebaseConfig” object. To accumulate the configurations, go to the Firebase admin panel in your browser, hit ”Mission Overview”, and arrange an internet app:

From there, enter a reputation and hit ”Register app”, which ought to deliver you to the second stage of the registration course of known as ”Add Firebase SDK”. It is going to look one thing like this, and you may go forward and duplicate the whole lot inside the ”firebaseConfig” object:
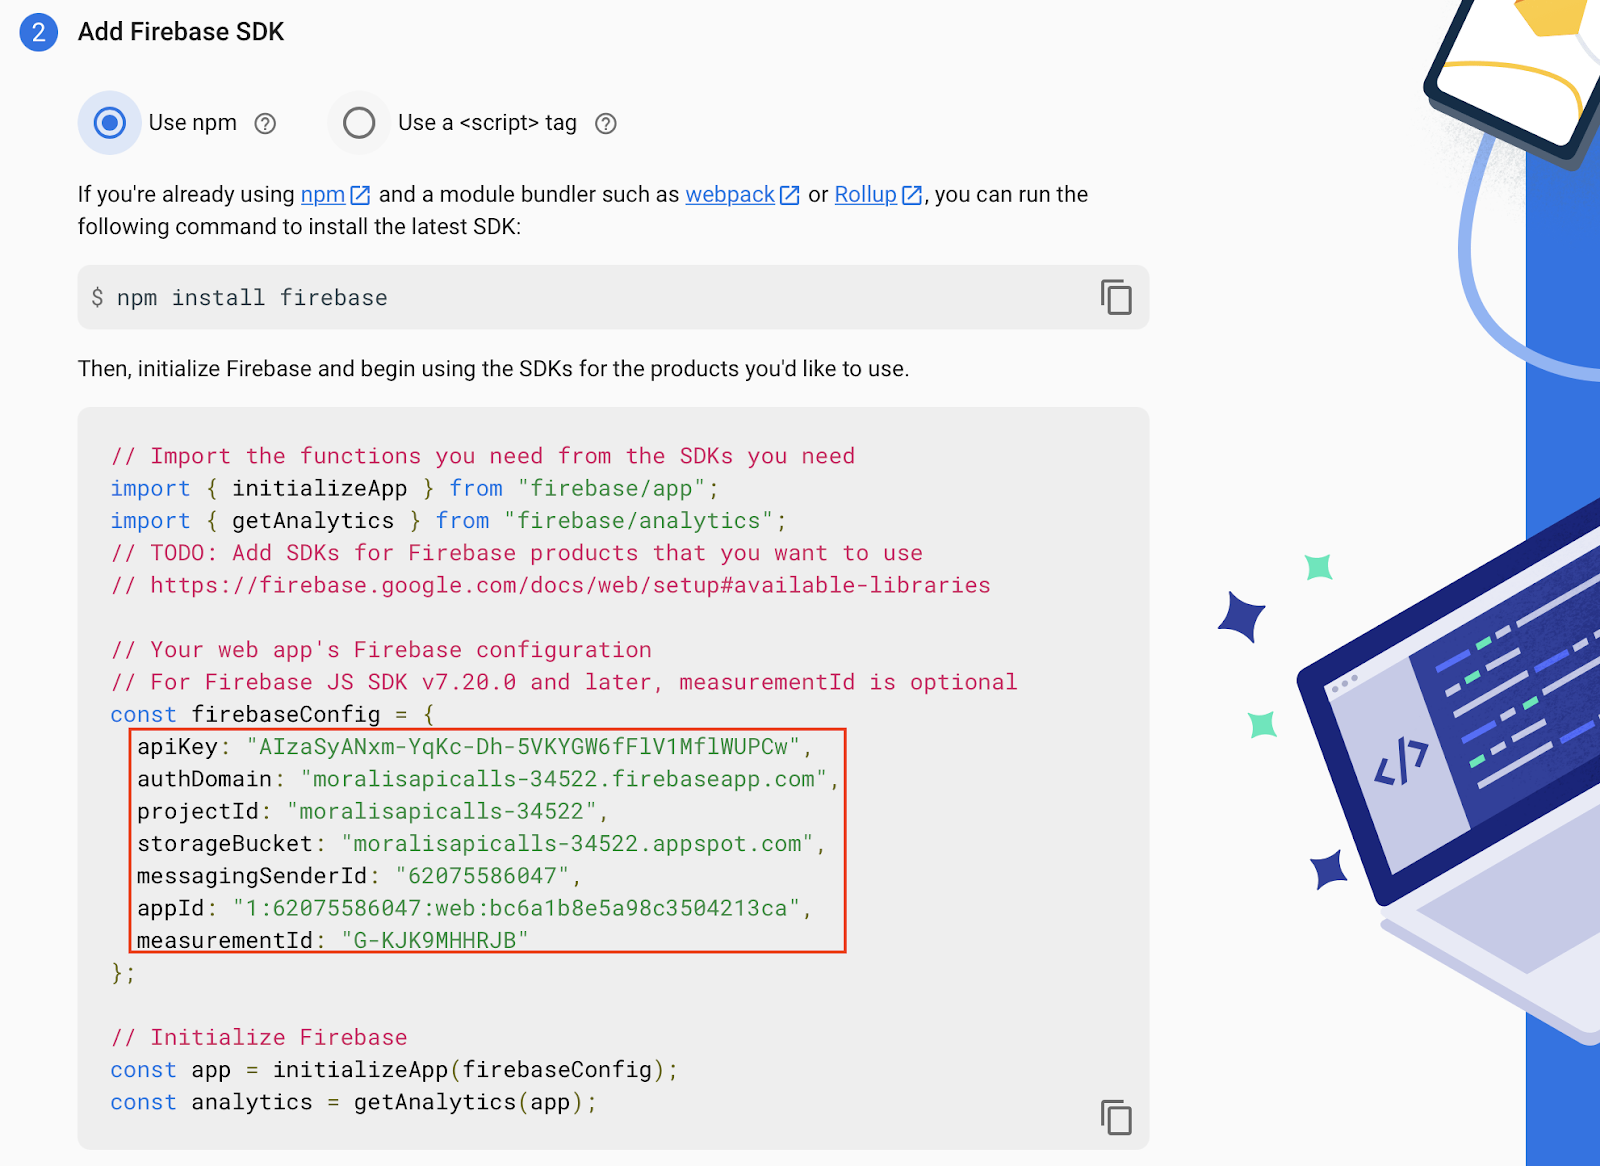
All that is still is to stick this info into your native listing’s ”firebaseConfig” object. Subsequent up, go to the terminal as soon as once more and ”cd” into the ”frontend” folder with the next command:
cd frontend
Set up all the mandatory dependencies with this command:
npm i
Lastly, you need to now be capable to run the appliance domestically with the next command:
npm run begin
It is best to now be capable to entry the appliance on ”localhost:3000”. That’s it for this tutorial! You’ll now be capable to create a Web3 Firebase login with MetaMask for all future tasks!
For those who skilled bother through the tutorial, take a look at the video from earlier than or be part of Moralis’ Discord channel and ask our gifted group engineers for help!
Abstract – Create a Web3 Firebase Login with MetaMask
Do you know that Moralis presents essentially the most accessible approach to create a Firebase login with MetaMask? If not, you need to know that the Moralis Auth extension permits you to create a React app the place customers can log in with their MetaMask wallets in solely 5 easy steps:
- Setting Up Firebase
- Initiating the Firebase CLI
- Setting Up Moralis’ Auth Extension
- Deploying the Extension
- Creating the React App
Following the steps above leads to an software the place customers can register with their Web3 wallets. What’s extra, because of the Firebase integration, the app generates person IDs and permits you to retailer useful person info in your app’s backend!
For those who realized one thing from the article and wish to increase your Web3 proficiency, take a look at extra content material right here on the Moralis Web3 weblog. For instance, take a look at different Firebase integrations by studying methods to use Firebase as a proxy API for Web3. Furthermore, you too can discover different areas of Web3 growth, reminiscent of sensible contract growth. If this pursuits you, we advocate our information on methods to write Solana sensible contracts!
So, join with Moralis instantly if you wish to create a Firebase login with MetaMask. Becoming a member of the platform is fully free, so you don’t have anything to lose!


