
This information covers the intricacies of crypto pockets integration together with an indication of Moralis‘ Web3 Auth API. To reveal the ability of the perfect crypto pockets API, you’ll learn to create a simple internet app implementing three authentication strategies: MetaMask, WalletConnect, and Coinbase Pockets. If you wish to soar straight into the central a part of this tutorial, be at liberty to go on to the “Methods to Add Crypto Pockets Integration” part! It’s also possible to entry the code instantly within the GitHub repository beneath:
Full Crypto Pockets Integration Documentation – https://github.com/MoralisWeb3/youtube-tutorials/tree/primary/MultipleWalletAuthentication
Web3 authentication is important to Web3 improvement, permitting customers to authenticate with their crypto wallets and offering a unified Web3 identification layer. This gives a extra seamless consumer expertise for all the Web3 ecosystem and lowers onboarding friction, highlighting the necessity for accessible crypto pockets integration. Thus, with this being such a vital job for blockchain improvement, this text delves deep into crypto pockets integration and explores the perfect crypto pockets API!
As soon as you’re conversant in crypto pockets integration and what it entails, we are going to present you the way to create a easy internet software permitting customers to sign up with three completely different authentication strategies. Furthermore, because of Moralis’ Auth API, you may create this software in minutes! Nevertheless, this is just one of Moralis’ Web3 APIs, making Web3 improvement extra accessible. For instance, you must also try Moralis’ Streams API, permitting you to stream blockchain information into the backend of your tasks through Web3 webhooks!
Nonetheless, if you’re searching for an accessible crypto pockets integration workflow, enroll with Moralis and achieve speedy entry to the perfect crypto pockets API!
What’s a Cryptocurrency Pockets?
For anybody considering exploring the Web3 ecosystem or taking up blockchain improvement, an preliminary step is buying a crypto pockets. Crypto wallets, additionally referred to as “Web3 wallets“, are sometimes regarded as easy digital wallets for holding digital property. Nevertheless, they’re greater than that and play a vital function in accessing numerous Web3 ecosystems!

Despite the fact that there may be extra to cryptocurrency wallets than merely holding digital property, they nonetheless come outfitted with every little thing anticipated of a simple digital pockets. They supply the performance for storing digital property similar to fungible tokens and NFTs (non-fungible tokens). Along with holding property, crypto wallets act as gateways to Web3’s intensive ecosystem of dapps. As such, they open the door to the crypto world, enabling you to work together with dapps, DeFi platforms, and many others., on numerous blockchain networks.
Cryptocurrency wallets are sometimes ”non-custodial”, suggesting that you just, because the pockets proprietor, can deal with property with out intermediaries. Consequently, you stay in full management of all digital property. Nevertheless, this unique entry places extra duty on you. As such, preserving observe of your personal keys and never sharing them with anybody is essential.
Since cryptocurrency wallets are gateways to the Web3 ecosystem, they’re important for the area’s unified identification layer. Moreover, dapps and different Web3 tasks implement authentication strategies primarily based on crypto wallets. This implies customers can sign up and authenticate their Web3 id utilizing one pockets on a number of platforms. This makes it simpler for customers to check out platforms and gives a extra seamless consumer expertise.
Furthermore, since Web3 wallets are important for the Web3 ecosystem, there’s a want for simple crypto pockets integration, which is the place crypto pockets integration APIs enter the image!
What’s a Crypto Pockets Integration API?
With a extra profound understanding of crypto wallets and their significance inside the Web3 area, it’s time to discover the intricacies of crypto pockets integration APIs. Nevertheless, earlier than we get to the specifics, we are going to reply the query, ”what are APIs?”.
API is an abbreviation for ”software programming interface”, and they’re instruments facilitating the communication between software program programs. Everytime you work together with an software or dapp, the software program should transmit information to servers throughout the web. Then, the receiving finish should interpret the info and carry out a set of actions earlier than sending a response again. As such, your gadget receives the response and analyzes it earlier than presenting it in a readable approach.

This course of above is mostly facilitated by an API answerable for transferring or translating directions for mutual understanding. Utilizing an API gives a listing of operations obtainable to builders in the course of the improvement course of. In consequence, builders don’t must construct every little thing from scratch, enabling a extra accessible developer expertise.
So, within the context of crypto pockets integration, APIs make it simpler for builders so as to add authentication strategies from numerous crypto pockets suppliers to their Web3 tasks. So, when working with a crypto pockets integration API, you don’t want to fret about constructing an underlying infrastructure when organising an authentication move!
Now, earlier than we take a more in-depth have a look at the perfect crypto pockets API, let’s dive into the following part and have a look at a few of the hottest crypto pockets suppliers!
Crypto Pockets Suppliers
This part explores a few of the most distinguished crypto pockets suppliers. Nevertheless, since there are a lot of options in the marketplace, we are going to solely be capable to cowl a few of them. With that mentioned, this part focuses on MetaMask, Coinbase Pockets, and Belief Pockets!
- MetaMask – MetaMask is among the most well-established cryptocurrency wallets, with over 30 million trusted customers worldwide. Together with offering the normal capabilities of a digital pockets, similar to holding, sending, swapping property, and many others., MetaMask acts as a gateway to an intensive ecosystem of blockchain apps.

- Coinbase Pockets – Coinbase Pockets is a self-custody, multi-asset cryptocurrency pockets supporting tons of of hundreds of dapps and tokens. Furthermore, Coinbase Pockets gives every little thing you want in a Web3 pockets, such because the performance to commerce, purchase, and promote NFTs and cryptocurrencies.

- Belief Pockets – Belief Pockets is Binance’s official non-custodial, multi-crypto pockets. The pockets helps thousands and thousands of currencies and presents glorious options similar to staking tokens, buying tokens, entry to dapps, and extra.

Now that we’ve briefly coated some examples of the market’s most distinguished crypto pockets suppliers, it’s time to discover the perfect crypto pockets API: Moralis’ Auth API!
Exploring the Finest Crypto Pockets API for Builders
Moralis’ Web3 Authentication API is the simplest approach so as to add crypto pockets integration to any dapp or Web3 undertaking. Whether or not you wish to construct a brand new Web3 app, join your present Web2 consumer database with Web3Auth, or use authentication aggregators, Moralis’ crypto pockets integration API has you coated!
The Moralis crypto pockets integration API removes a few of the widespread hassles related to Web3 authentication. This consists of redirecting customers to third-party authentication interfaces, understanding Web3 authentication flows, studying how wallets signal and confirm messages, and many others. As such, when working with Moralis, it can save you an abundance of time by avoiding these redundant duties!
The Moralis Web3 Auth API provides a unified API for all authentication strategies, together with complete SDKs for simple crypto pockets integration. What’s extra, Moralis’ Web3 Auth API is constantly evolving. As such, in a fast-moving Web3 {industry}, the Web3 Auth API allows you to future-proof all authentication flows.
With a greater understanding of the perfect crypto pockets API, allow us to take a more in-depth have a look at how you need to use this unimaginable device so as to add crypto pockets integration!
Methods to Add Crypto Pockets Integration
Now that you’re extra conversant in Moralis’ Auth API, it’s time to put it to make use of by displaying you the way to arrange crypto pockets integration. In doing so, you’ll learn to create a simple internet software that permits customers to authenticate with three crypto pockets options: MetaMask, WalletConnect, and Coinbase Pockets.
You will see two screenshots beneath of the dapp’s UI (consumer interface) as an example what you’re working in direction of. The primary one reveals the login web page; in the meantime, the second picture reveals the consumer web page that shows a consumer session containing an deal with, profile ID, and signature:
Login Web page:

Person Web page:

Creating the net app above and organising the crypto pockets integration is comparatively easy when utilizing the perfect crypto pockets API. To construct the app, you may start by visiting the crypto pockets integration GitHub repository web page and cloning the undertaking to your native listing. You may then set up the mandatory dependencies by working ”npm i” in your code editor’s terminal.
That’s principally it for organising the appliance. It is best to now be capable to begin the appliance on ”native host 3000” by working ”npm run dev” within the terminal.
Nevertheless, you would possibly nonetheless have questions concerning how the Auth API truly works. In that case, the next sections dive deeper into the appliance’s code. If you happen to comply with alongside, you may apply the identical ideas so as to add crypto pockets integration to all future tasks!
Sadly, because the undertaking’s code is comparatively intensive, we are able to solely cowl components of it. As such, the next sections concentrate on the important capabilities for including crypto pockets integration.
Backend Code Walkthrough
To kick issues off, we are going to begin by overlaying the backend code of the net app. The ”api/auth” folder accommodates the backend code, which consists of two information: ”[…nextauth].js” and ”request-message.js”:
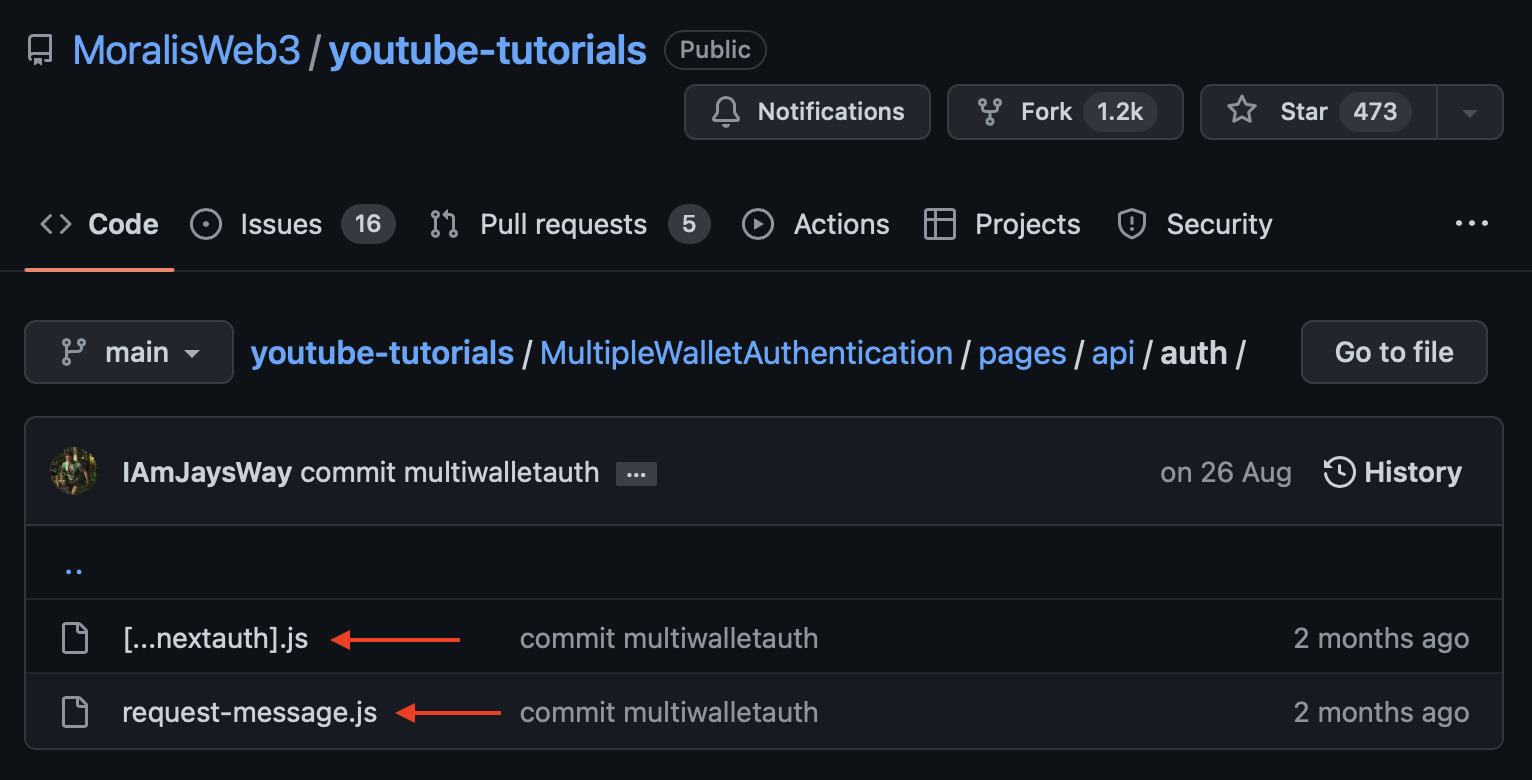
This part dissects every file individually to offer an in depth overview of the backend performance, beginning with ”request-message.js”. Moreover, this file accommodates the endpoint for requesting a message, and that is its total code:
import Moralis from 'moralis';

const config = {
    area: course of.env.APP_DOMAIN,
    assertion: 'Internet Login.',
    uri: course of.env.NEXTAUTH_URL,
    timeout: 60,
};

export default async operate handler(req, res) {
    const { deal with, chain, community } = req.physique;

    await Moralis.begin({ apiKey: course of.env.MORALIS_API_KEY });

    strive {
        const message = await Moralis.Auth.requestMessage({
            deal with,
            chain,
            community,
            ...config,
        });

        res.standing(200).json(message);
    } catch (error) {
        res.standing(400).json({ error });
        console.error(error);
    }
}
The code above triggers Moralis’ ”Moralis.Auth.requestMessage()” operate with the deal with and chain ID of the consumer. The code moreover creates a brand new message despatched to the consumer facet. As quickly as a consumer indicators the message, a put up request is shipped, which takes us to the ”[…nextauth].js” code:
import CredentialsProvider from 'next-auth/suppliers/credentials';
import NextAuth from 'next-auth';
import Moralis from 'moralis';

export default NextAuth({
    suppliers: [
        CredentialsProvider({
            name: 'MoralisAuth',
            credentials: {
                message: {
                    label: 'Message',
                    type: 'text',
                    placeholder: '0x0',
                },
                signature: {
                    label: 'Signature',
                    type: 'text',
                    placeholder: '0x0',
                },
            },
              async authorize(credentials) {
                try {
                  // "message" and "signature" are needed for authorization
                  // we described them in "credentials" above
                  const { message, signature } = credentials;

                  await Moralis.start({ apiKey: process.env.MORALIS_API_KEY });

                  const { address, profileId } = (
                    await Moralis.Auth.verify({ message, signature, network: 'evm' })
                  ).raw;

                  const user = { address, profileId, signature };
                  // returning the user object and creating  a session
                  return user;
                } catch (e) {
                  console.error(e);
                  return null;
                }
              },
        }),
    ],
    // including consumer information to the consumer session object
    callbacks: {
        async jwt({ token, consumer }) {
            consumer && (token.consumer = consumer);
            return token;
        },
        async session({ session, token }) {
            session.consumer = token.consumer;
            return session;
        },
    },
});
Because the file’s code illustrates, it sends one other request to the ”Moralis.Auth.confirm()” operate with the response from the preliminary request. This can be a message and the signature for singing the message on the consumer facet.
Subsequent up, the code generates a brand new ”consumer” object utilizing ”subsequent.auth” with a consumer deal with, profile ID, and signature. We then retailer the brand new consumer in an online session in a JWT (JSON internet token).
That covers the important components of the backend code. So, allow us to progress by shifting on to the frontend!
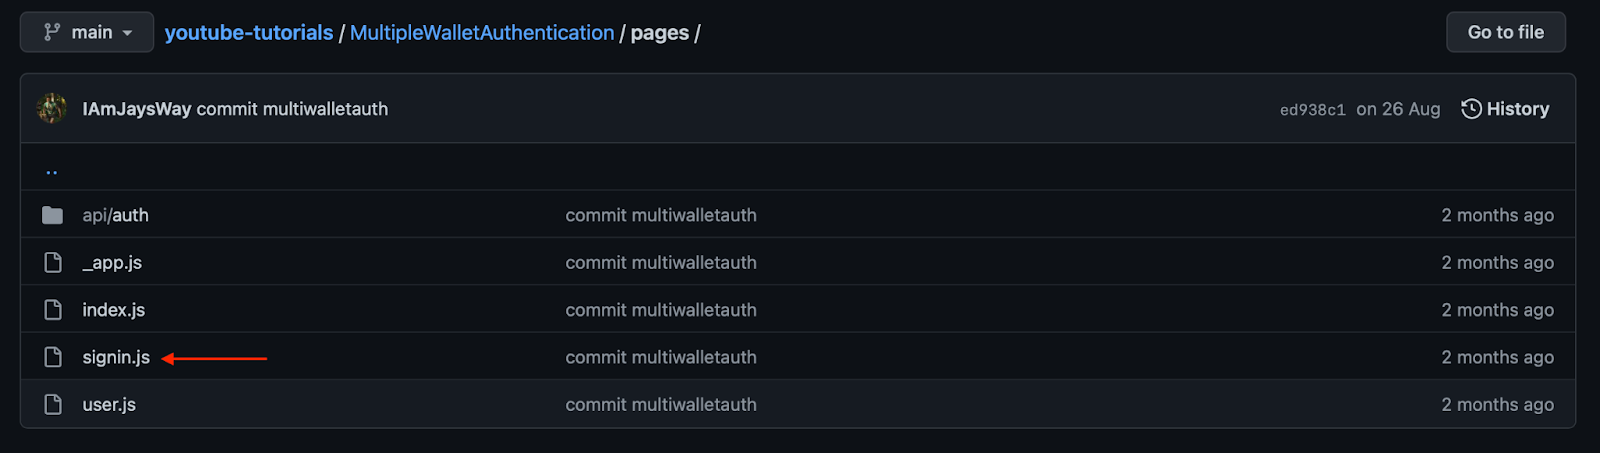
Frontend Code Walkthrough
The app’s frontend consists of a number of setup information similar to ”_app.js”, ”index.js”, and many others. Nevertheless, for this tutorial, we are going to direct our consideration to the ”signin.js” file since that is the place you will discover many of the logic for the authentication strategies:
Initially, the file accommodates a number of imports. On this case, we’re particularly within the connectors used to herald the assorted authentication strategies utilizing wagmi. That is principally what you’re utilizing for the client-side Web3 connections:
import { signIn } from "next-auth/react";
import { useAccount, useConnect, useSignMessage, useDisconnect } from "wagmi";
import { useRouter } from "subsequent/router";
import { MetaMaskConnector } from "wagmi/connectors/metaMask";
import { CoinbaseWalletConnector } from "wagmi/connectors/coinbaseWallet";
import { WalletConnectConnector } from "wagmi/connectors/walletConnect";
import axios from "axios";
The “handleAuth(wal)” Perform
After the mandatory imports, we are going to discover the “handleAuth(wal)” operate. This operate is answerable for connecting the completely different pockets connectors. The ”wal” parameter that the operate takes as an argument specifies which various is for use. Nonetheless, earlier than the connections are established, the code creates a ”userData” object which shops details about the customers. Here’s what the preliminary a part of the operate appears like:
 const handleAuth = async (wal) => {
    if (isConnected) {
      await disconnectAsync();
    }

    console.log("Join To Website Through Pockets");

    const userData = { community: "evm" };
Subsequent up, the operate consists of three ”if” statements for the three options used on this tutorial:
 if (wal === "meta") {
      const { account, chain } = await connectAsync({
        connector: new MetaMaskConnector({}),
      });
      userData.deal with = account;
      userData.chain = chain.id;
    }

    if (wal === "coin") {
      const { account, chain } = await connectAsync({
        connector: new CoinbaseWalletConnector({}),
      });
      userData.deal with = account;
      userData.chain = chain.id;
    }

    if (wal === "wal") {
      const { account, chain } = await connectAsync({
        connector: new WalletConnectConnector({ choices: { qrcode: true } }),
      });
      userData.deal with = account;
      userData.chain = chain.id;
    }
Allow us to break down the primary assertion for instance. The primary ”if (wal === ”meta”)” assertion specifies that ”MetaMaskConnector” will likely be used because the authentication technique. As soon as the consumer authenticates, the code achieve entry to the consumer’s pockets deal with and chain ID, that are added to the ”userData” object.
This info is used to ship a put up request to Moralis’ Auth API:
console.log("Sending Linked Account and Chain ID to Moralis Auth API");

    const { information } = await axios.put up("/api/auth/request-message", userData, {
      headers: {
        "Content material-Kind": "software/json",
      },
    });
With the message at hand, the code makes use of wagmi as soon as extra to signal the message, ship a last put up request to Moralis for verification, and create the consumer JWT that’s pushed to the consumer web page:
console.log("Obtained Signature Request From Moralis Auth API");

    const message = information.message;

    const signature = await signMessageAsync({ message });

    console.log("Succesful Signal In, Redirecting to Person Web page");

    const { url } = await signIn("credentials", {
      message,
      signature,
      redirect: false,
      callbackUrl: "/consumer",
    });

    push(url);
Lastly, the code moreover consists of three buttons related to the assorted options. Every button runs the “handleAuth(wal)” operate with completely different parameters comparable to the ”if” statements beforehand specified:
<div>
      <h3>Web3 Authentication</h3>
      <button onClick={() => handleAuth("meta")}>
        Authenticate through Metamask
      </button>
      <br />
      <button onClick={() => handleAuth("coin")}>
        Authenticate through Coinbase
      </button>
      <br/>
      <button onClick={() => handleAuth("wal")}>
        Authenticate through Pockets Join
      </button>
    </div>
In the end, that is what the ultimate ”signin.js” file appears like:
import { signIn } from "next-auth/react";
import { useAccount, useConnect, useSignMessage, useDisconnect } from "wagmi";
import { useRouter } from "subsequent/router";
import { MetaMaskConnector } from "wagmi/connectors/metaMask";
import { CoinbaseWalletConnector } from "wagmi/connectors/coinbaseWallet";
import { WalletConnectConnector } from "wagmi/connectors/walletConnect";
import axios from "axios";

operate SignIn() {
  const { connectAsync } = useConnect();
  const { disconnectAsync } = useDisconnect();
  const { isConnected } = useAccount();
  const { signMessageAsync } = useSignMessage();
  const { push } = useRouter();

  const handleAuth = async (wal) => {
    if (isConnected) {
      await disconnectAsync();
    }

    console.log("Join To Website Through Pockets");

    const userData = { community: "evm" };

    if (wal === "meta") {
      const { account, chain } = await connectAsync({
        connector: new MetaMaskConnector({}),
      });
      userData.deal with = account;
      userData.chain = chain.id;
    }

    if (wal === "coin") {
      const { account, chain } = await connectAsync({
        connector: new CoinbaseWalletConnector({}),
      });
      userData.deal with = account;
      userData.chain = chain.id;
    }

    if (wal === "wal") {
      const { account, chain } = await connectAsync({
        connector: new WalletConnectConnector({ choices: { qrcode: true } }),
      });
      userData.deal with = account;
      userData.chain = chain.id;
    }

    console.log("Sending Linked Account and Chain ID to Moralis Auth API");

    const { information } = await axios.put up("/api/auth/request-message", userData, {
      headers: {
        "	": "software/json",
      },
    });

    console.log("Obtained Signature Request From Moralis Auth API");

    const message = information.message;

    const signature = await signMessageAsync({ message });

    console.log("Succesful Signal In, Redirecting to Person Web page");

    const { url } = await signIn("credentials", {
      message,
      signature,
      redirect: false,
      callbackUrl: "/consumer",
    });

    push(url);
  };

  return (
    <div>
      <h3>Web3 Authentication</h3>
      <button onClick={() => handleAuth("meta")}>
        Authenticate through Metamask
      </button>
      <br />
      <button onClick={() => handleAuth("coin")}>
        Authenticate through Coinbase
      </button>
      <br/>
      <button onClick={() => handleAuth("wal")}>
        Authenticate through Pockets Join
      </button>
    </div>
  );
}

export default SignIn;
That’s it for this ”Crypto Pockets Integration Utilizing the Finest Crypto Pockets API” tutorial! You probably have any additional questions concerning the code or need a extra detailed breakdown of the method of including a crypto pockets integration, try the Moralis YouTube video beneath!
Crypto Pockets Integration – Abstract
Web3 authentication is crucial to blockchain improvement, permitting customers to sign up and authenticate themselves utilizing their Web3 wallets from numerous crypto pockets suppliers. As such, Web3 builders are in want of simple crypto pockets integration to make their blockchain improvement endeavors extra accessible, which is the place APIs enter the equation.
A crypto pockets integration API permits builders to rapidly implement authentication strategies from numerous crypto pockets suppliers. This text demonstrated the ability of Moralis’ Web3 Auth API – the perfect crypto pockets API – by displaying you the way to create an software the place customers can sign up utilizing MetaMask, WalletConnect, or Coinbase Pockets. Furthermore, you might create this software in report time because of Moralis’ capabilities!
If you happen to discovered this tutorial useful and wish to try extra nice content material delivered to you by Moralis, tune in to Moralis’ Web3 weblog that includes distinctive Web3 improvement content material. For instance, try our article on Dogechain or learn to add information to IPFS!
Furthermore, if you wish to develop into a more adept Web3 developer, contemplate testing Moralis Academy. The academy provides industry-leading blockchain programs for brand spanking new and extra skilled builders. As an example, enroll within the ”Blockchain & Bitcoin 101” course to kickstart your Web3 developer journey.
Nonetheless, are you trying to get into Web3 improvement and wish to leverage the ability of blockchain expertise? In that case, enroll with Moralis right away and supercharge your Web3 tasks with entry to enterprise-grade improvement instruments!


