
Are you in search of methods to combine a NodeJS SDK with AWS Lambda? In that case, you’re exactly the place it’s good to be! This AWS Lambda NodeJS tutorial gives a simple instance illustrating how one can combine the Moralis NodeJS SDK with Lambda. In doing so, we are going to present you the way to create a Lambda utility with a number of capabilities in solely three steps:
- Conditions
- AWS Credential Configuration and Mission Setup
- Creating the App
If you happen to observe alongside, you’ll learn to construct, take a look at, deploy, and run Web3 JavaScript capabilities utilizing Lambda! Furthermore, if you wish to skip straight into the tutorial, soar to the “AWS Lambda NodeJS Tutorial – Instance of The right way to Combine a NodeJS SDK” part! Moreover, you’ll be able to try our AWS Lambda documentation web page for more information! You may also go to our GitHub repository web page for the undertaking beneath.
Overview
Amazon Internet Companies, or AWS, is among the most complete and well-used cloud computing platforms obtainable. The platform consists of a large number of PaaS, SaaS, and IaaS choices, with a whole lot of providers optimizing massive and small organizations’ cloud experiences. Furthermore, inside this in depth ecosystem of cloud computing options, we discover AWS Lambda. Lambda is a serverless, event-driven computing service used to execute code with out the necessity to provision or handle servers. What’s extra, since Lambda is one among Amazon’s most outstanding providers, that is the place the main target of this text is directed!
Particularly, this text will take a better take a look at how one can run JavaScript code with AWS Lambda by NodeJS integration. In doing so, we are going to illustrate the way to combine Moralis’ NodeJS SDK with Lambda by creating a simple utility with a number of capabilities. As such, for those who observe alongside, you’ll learn to construct, take a look at, deploy, and run Web3-compatible JavaScript capabilities with AWS Lambda!
Furthermore, if you’re within the Web3 growth house, we suggest you try extra Moralis instruments. For instance, Moralis provides a choice of enterprise-grade Web3 APIs permitting you to totally leverage the facility of blockchain expertise! Amongst these instruments, it’s also possible to discover the Web3 Streams API, enabling you to stream on-chain knowledge into the backend of your purposes through Web3 webhooks. To study extra about this, try our article on Ethereum webhooks.
Nonetheless, if you wish to combine a NodeJS SDK with Lambda or construct Web3 initiatives basically, join with Moralis instantly to entry a extra seamless blockchain growth expertise!
Exploring AWS Lambda
AWS (Amazon Internet Companies) is among the largest cloud computing platforms obtainable, serving tens of millions of shoppers worldwide. The AWS ecosystem consists of a whole lot of providers, and one of the vital examples is AWS Lambda!
AWS Lambda is an event-driven and serverless computing service. With Lambda, you do not want to fret about managing or provisioning servers, as Lambda takes care of the heavy lifting for you. As such, with Lambda, you’ll be able to run code from any utility or backend service, and all that’s required from you is the code.
When working with Lambda, you set up your code into capabilities, and Lambda solely runs them when requested. Furthermore, AWS Lambda includes a “pay-as-you-go” billing construction, which means that you simply solely pay for the computing time you devour. Consequently, when utilizing AWS Lambda, you’ve gotten wonderful scaling alternatives and might turn into considerably more cost effective.
To summarize, AWS Lambda is among the most important computing providers in the marketplace, serving tens of millions of shoppers throughout the globe. Moreover, when working with Lambda, you entry a whole computing answer totally managed by AWS. As such, you do not want to give attention to backend infrastructures and might dedicate extra time in direction of creating larger worth to your prospects!
What’s AWS Lambda NodeJS?
Earlier than entering into the central a part of this tutorial, we are going to briefly take this part to reply the query, “what’s AWS Lambda NodeJS?”. Nevertheless, the reply to this query is comparatively easy, as AWS Lambda’s NodeJS integration makes it potential to make use of Lambda to execute JavaScript code.
NodeJS is an open-source, cross-platform JavaScript runtime setting. What’s extra, AWS Lambda gives runtimes for NodeJS that run your code to course of occasions. Consequently, your code runs in an setting that features AWS’ JavaScript SDK, together with credentials from an entry administration function and AWS id managed by you.
Supported Runtimes:
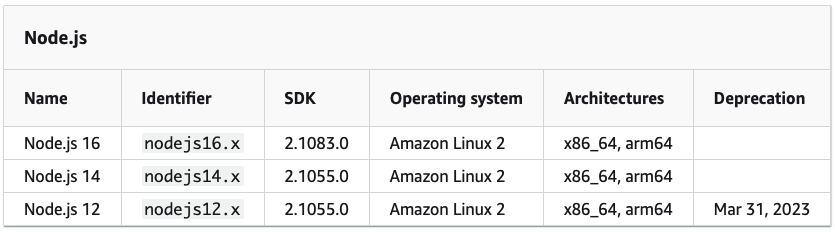
Nonetheless, put merely, AWS Lambda NodeJS makes it potential to make use of the service to run JavaScript code. Now, with a greater understanding of the NodeJS integration, allow us to take a better take a look at an instance of how one can combine this runtime setting with AWS Lambda!
AWS Lambda NodeJS Tutorial – Instance of The right way to Combine a NodeJS SDK
With a extra profound understanding of NodeJS, it’s time to cowl the central a part of this tutorial by displaying you the way to combine Moralis’ NodeJS SDK with AWS Lambda by an instance undertaking. In doing so, you’ll learn to create a simple Lambda utility with two capabilities: “getNativeBalance” and “getWalletNfts“.

Moreover, to make this AWS Lambda NodeJS tutorial extra comprehensible and simple to observe, the article reveals you the way to create this utility in three steps:
- Conditions
- AWS Credential Configuration and Mission Setup
- Creating the App
If you happen to full the steps above, you’ll learn to simply combine Moralis’ NodeJS SDK with AWS Lambda. By following alongside, it is possible for you to to run Web3-compatible capabilities by Lambda with out managing or provisioning servers!
Nonetheless, allow us to soar straight into step one of this AWS Lambda NodeJS tutorial and canopy the mandatory stipulations!
Step 1: Conditions
Earlier than displaying you the way to create the appliance, you should cowl the mandatory stipulations, and there are seven in complete:
- Create a Moralis Account – In case you have not already, it’s good to join with Moralis. Creating an account is free and solely takes a few seconds!
- Set up an IDE – Subsequent, you should set up and arrange an IDE of your alternative. For this tutorial, we use VSC, however you’re free to decide on the setting you’re most snug with. Nevertheless, word that the method would possibly sometimes differ if you choose another choice.
- Set up NodeJS – You must set up the NodeJS runtime setting for this tutorial. You may obtain NodeJS utilizing the next hyperlink: https://nodejs.org/en/.
- Create an AWS Account – If you don’t have already got one, go to AWS’s official web site and create an account instantly.
- AWS CLI (Command Line Interface) – Subsequent up, set up the AWS CLI. You can see a complete setup information by clicking right here.
- Serverless Framework – You moreover want to put in Serverless Framework, and you’ll find a tutorial for doing so right here.
- Create an IAM Person – Lastly, it’s good to create an IAM consumer, which you are able to do by logging in to your AWS account and opening the IAM console. From there, click on on “Customers” and “Add customers” within the navigation panel. This could take you to the next web page, the place it’s good to add a username and choose each AWS credential sorts:

Subsequent up, test the ”AdministratorAccess” field:

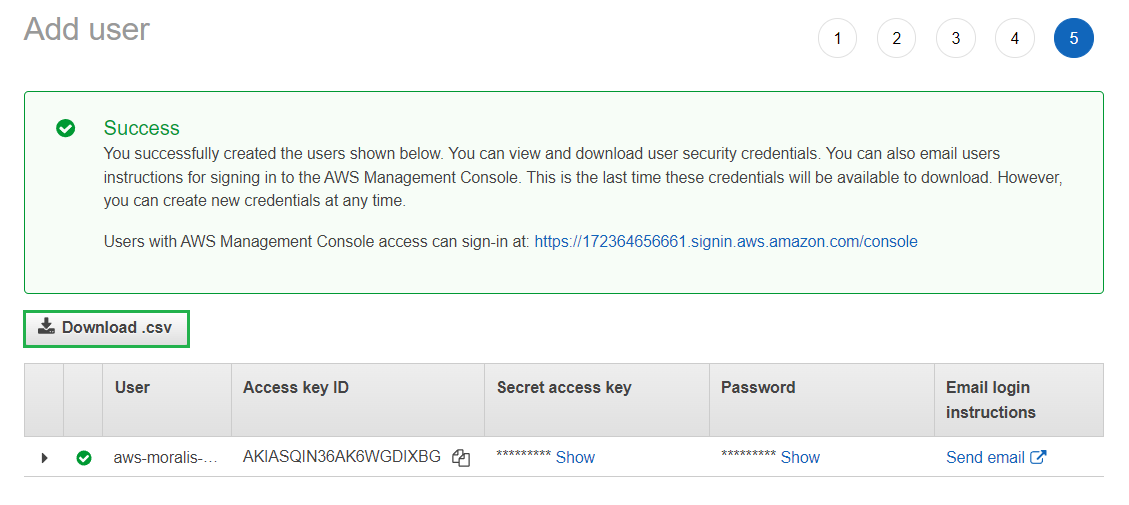
Undergo every step to configure the account in accordance along with your preferences. Nevertheless, within the fifth step, obtain your AWS credentials in a ”.csv” format:
That covers the stipulations! Let’s soar straight into the second step of this AWS Lambda NodeJS tutorial and present you the way to arrange the undertaking!
Step 2: AWS Credential Configuration and Mission Setup
Now, with all stipulations coated, this second step of the AWS Lambda NodeJS tutorial will present you the way to configure your AWS credentials and arrange the undertaking. To start with, we are going to begin with the previous by displaying you to configure your AWS credentials. As such, you’ll be able to proceed from right here by opening a brand new terminal. In case you are utilizing VSC, you are able to do so by clicking on the ”Terminal” tab on the prime of your IDE, adopted by ”New terminal”:

From there, because you put in the AWS CLI in step one, configure the credentials by working the command beneath:
aws configure
Operating this command prompts your terminal, and you should add your ”AWS Entry Key ID” and ”AWS Secret Entry Key”. It ought to look one thing like this:
AWS Entry Key ID [None]: AKIAIOSFODNN7EXAMPLE
AWS Secret Entry Key [None]: wJalrXUtnFEMI/K7MDENG/bPxRfiCYEXAMPLEKEY
Default area identify [None]: ENTER
Default output format [None]: ENTER
Mission Setup
Now that you’re executed with configuring your AWS credentials, this subsection covers the setup strategy of the appliance itself. As such, to start with, create a brand new folder and open it along with your IDE. From there, open a brand new terminal as soon as once more and run the command beneath:
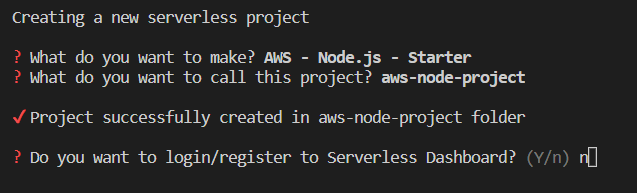
serverless
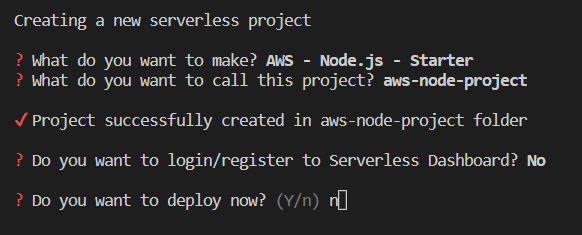
When working the command above, you’re supplied with a couple of choices, and on this case, select ”Starter”:

As soon as you choose this selection, you’re requested to call the undertaking. You may both click on enter to set a default identify or enter one your self:

As quickly as you identify the undertaking, a Serverless Framework template will obtain. When it completes, your terminal will immediate you to log in. Nevertheless, for this undertaking, this isn’t essential. As such, proceed by getting into ”n” and hitting enter:
Lastly, enter ”n” and hit enter as soon as extra since you do not need to deploy the undertaking simply but:
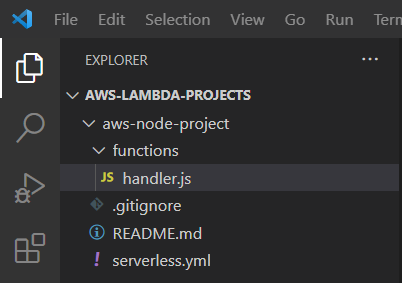
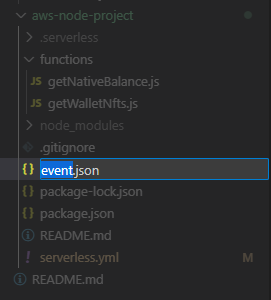
Because of this, you need to now have a pattern undertaking much like the one beneath:

Subsequent up, create a brand new ”capabilities” folder:

From there, transfer the ”handler.js” file into this folder:
You may then open the ”serverless.yml” file and set a brand new location for ”handler.js”:
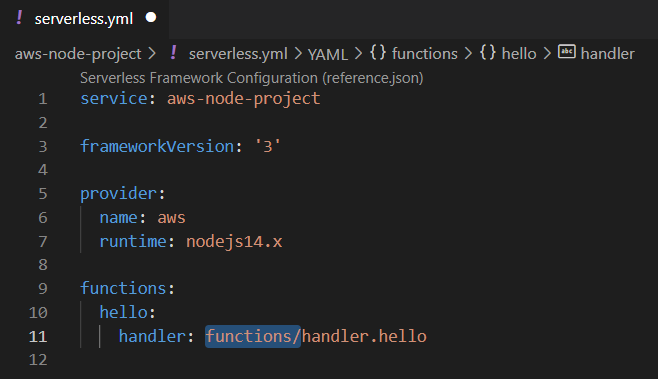
Furthermore, add your Moralis API key as an setting variable. To take action, exchange the code in ”serverless.yml” with the next snippet:
service: aws-node-project

frameworkVersion: '3'

supplier:
  identify: aws
  runtime: nodejs14.x
  setting:
    MORALIS_API_KEY: 'replace_me'

capabilities:
  whats up:
    handler: capabilities/handler.whats up
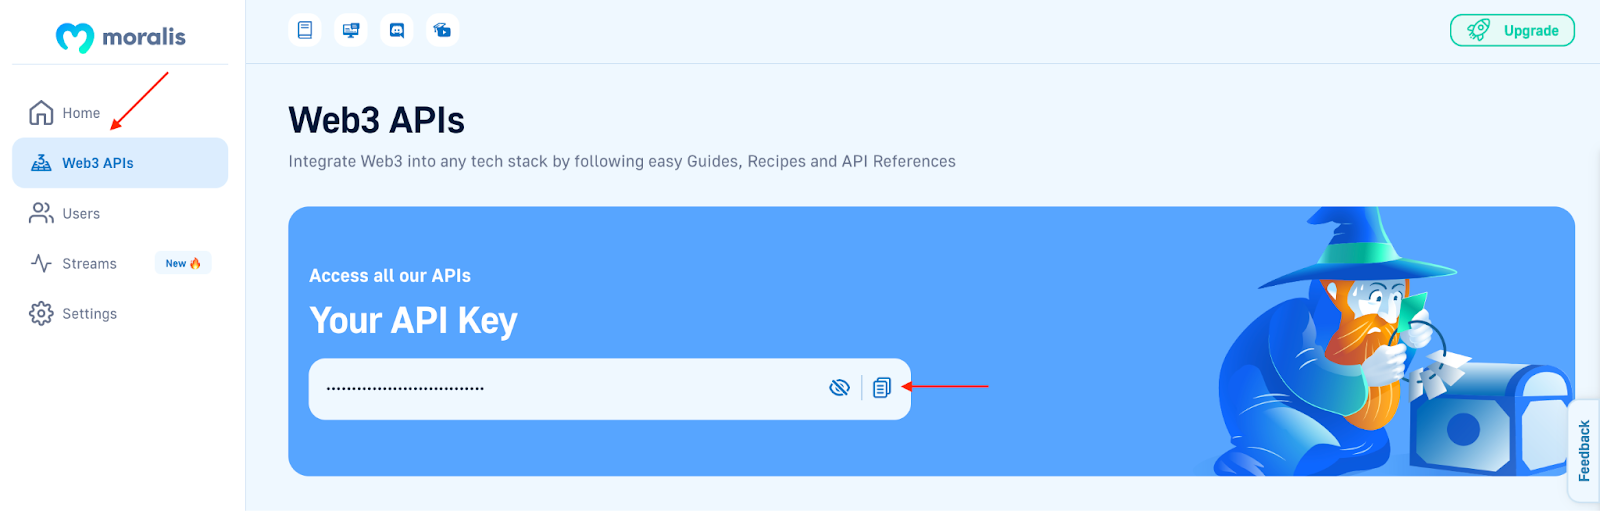
If you happen to examine the code above, you’ll discover that it’s good to set the ”MORALIS_API_KEY” variable to equal your API key. To get the important thing, log in to Moralis, click on on the ”Web3 APIs” tab to the left, copy the important thing, and insert it into the code:
That’s it for the preliminary undertaking setup! Allow us to transfer on to the core growth a part of this AWS Lambda JS tutorial!
Step 3: Creating the App
First up, open a terminal and navigate to the basis folder of your undertaking. You are able to do so by working ”cd ’FOLDER_NAME’ ”. From there, you’ll be able to go forward and set up Moralis by working the next command:
npm set up moralis
Within the following two subsections, you’ll learn to create two capabilities, ”getNativeBalance” and ”getWalletNfts”. The primary returns the native token stability of a specified pockets, and the second returns the pockets’s NFTs. Nonetheless, allow us to kick issues off with the previous.
The getNativeBalance Perform
To begin with, allow us to use the already current ”handler.js” file and rename it ”getNativeBalance.js”:

From there, open the file and exchange ”module.exports.whats up” with ”module.exports.handler”:

You may then proceed by opening the ”serverless.yml” file and altering the operate’s identify and handler. It ought to now look much like this:
service: aws-node-project

frameworkVersion: '3'

supplier:
  identify: aws
  runtime: nodejs14.x
  setting:
    MORALIS_API_KEY: 'replace_me'

capabilities:
  getNativeBalance:
    handler: capabilities/getNativeBalance.handler
Subsequent up, it’s time to customise the operate by including Moralis’ ”getNativeBalance” performance. To take action, navigate again to ”getNativeBalance.js” and begin by including the Moralis necessities:
const Moralis = require('moralis').default;
You may then add the code snippet beneath to initialize Moralis utilizing your Web3 API key specified as an setting variable:
const startMoralis = async () => {
  await Moralis.begin({
    apiKey: course of.env.MORALIS_API_KEY
  });
};

startMoralis();
Lastly, exchange your complete ”module.exports.handler” with the code beneath to implement the specified SDK methodology:
module.exports.handler = async (occasion) => {
  // Get native stability
  const nativeBalance = await Moralis.EvmApi.stability.getNativeBalance({
    deal with: occasion.deal with,
    chain: occasion.chain
  });

  // Format the native stability formatted in ether through the .ether getter
  const nativeBalanceEther = nativeBalance.consequence.stability.ether;

  return {
    consequence: nativeBalanceEther
  }
};
Finally, your ”getNativeBalance.js” file ought to now look one thing like this:
'use strict';
const Moralis = require('moralis').default;

const startMoralis = async () => {
  await Moralis.begin({
    apiKey: course of.env.MORALIS_API_KEY
  });
};

startMoralis();

module.exports.handler = async (occasion) => {
  // Get native stability
  const nativeBalance = await Moralis.EvmApi.stability.getNativeBalance({
    deal with: occasion.deal with,
    chain: occasion.chain
  });

  // Format the native stability formatted in ether through the .ether getter
  const nativeBalanceEther = nativeBalance.consequence.stability.ether;

  return {
    consequence: nativeBalanceEther
  }
};
That covers the preliminary ”getNativeBalance” operate. Allow us to observe the identical process to implement the ”getWalletNfts” operate within the following subsection!
The getWalletNfts Perform
For this operate, it’s good to begin by creating a brand new file within the ”capabilities” folder. On this case, allow us to name the folder ”getWalletNfts.js”:

From there, open the ”serverless.yml” file and add the next code within the ”capabilities” part:
getWalletNfts:
    handler: capabilities/getWalletNfts.handler

Lastly, full the ”getWalletNfts” operate by including the next code to the ”getWalletNfts.js” file:
'use strict';
const Moralis = require('moralis').default;

const startMoralis = async () => {
  await Moralis.begin({
    apiKey: course of.env.MORALIS_API_KEY,
  });
};

startMoralis();

module.exports.handler = async (occasion) => {
  // Get pockets NFTs
  const nfts = await Moralis.EvmApi.nft.getWalletNFTs({
    deal with: occasion.deal with,
    chain: occasion.chain,
    restrict: 10
  });

  return {
    consequence: JSON.stringify(nfts)
  }
};
That’s it for this AWS Lambda NodeJS tutorial! If you happen to adopted alongside this far, you now know the way to combine a NodeJS SDK with Lambda utilizing Moralis!
Nevertheless, you need to conduct a neighborhood take a look at to make sure all the pieces works as meant. What’s extra, as soon as you’re proud of the appliance, you need to deploy it to Lambda. Consequently, we are going to dedicate the ultimate part of this tutorial to displaying you ways these processes work!
Concluding the AWS Lambda NodeJS Tutorial – Testing and Deploying
To start with, you wish to run a neighborhood take a look at to make sure that your Lambda utility works as meant. As such, we are going to dedicate the preliminary a part of this part to displaying you the way to take a look at your Lambda capabilities regionally!
Allow us to begin by creating a brand new file referred to as ”occasion.json” within the undertaking’s root folder:
You may then add an ”deal with” and ”chain” as parameters. It could possibly look one thing like this:
{
    "deal with": "0x99EXAMPLEADDRESS",
    "chain": "chain_id"
}
Nevertheless, as you’ll be able to see from the code snippet, it’s good to add the pockets deal with from which you need the balances and the ID of the chain you wish to question. From there, you’ll be able to take a look at the capabilities, and for instance, enter the next into the terminal to check the ”getNativeBalance” operate:
serverless invoke -f getNativeBalance --path occasion.json
If the take a look at is profitable, it ought to return a message much like the one beneath:

Now that you’ve made positive that all the pieces works effective, all that continues to be is deploying your undertaking to AWS. To take action, be sure to are in your undertaking’s root folder and run the next command within the terminal:
serverless deploy
If the deployment is profitable, you need to obtain a message much like this one in return:
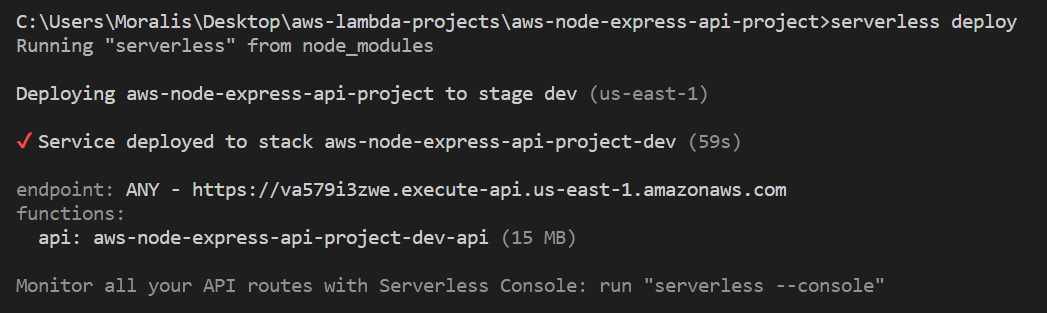
Congratulations; you’ve gotten now efficiently constructed and deployed a Lambda utility with a number of capabilities!
If you happen to expertise any bother at any level, try the AWS Lambda documentation for this tutorial. You may also be part of the Moralis Discord group to obtain help from our group engineers if any questions stay!
Abstract – AWS Lambda NodeJS Tutorial
This text offered an instance of the way to combine a NodeJS SDK with AWS Lambda. As an example the method, you realized the way to combine Moralis’ NodeJS SDK with Lambda by creating a simple utility with a number of capabilities in solely three steps:
- Conditions
- AWS Credential Configuration and Mission Setup
- Creating the App
If you happen to adopted alongside throughout this AWS Lambda NodeJS instance, you now know the way to create, take a look at, deploy, and run Web3 capabilities utilizing Lambda and Moralis’ NodeJS SDK! As such, now you can use the identical rules to run JavaScript capabilities through Lambda sooner or later, which can show useful in your Web3 growth endeavors!
If you happen to discovered this text useful, you’ve gotten extra content material to discover right here at Moralis’ Web3 weblog. For instance, try our articles on AWS Lambda and what it’s used for or Web3 for enterprise if you wish to combine Web3 infrastructure into your enterprise!
What’s extra, you also needs to know that Moralis bridges the hole between Web2 and Web3 growth! As such, join with Moralis right away to leverage the facility of blockchain expertise to its full potential and entry a extra seamless developer expertise!


