
Do you know that Moralis provides essentially the most accessible strategy to combine blockchain performance into any Python software? If you wish to be taught extra about this, be a part of us all through this text as we discover the intricacies of Web3 Python improvement. The accessibility originates from the Moralis Python SDK, permitting you to implement Web3 performance into Python apps in two steps:
- 1. Set up Moralis’ Python SDK by operating the next command:
pip set up moralis
- 2. Make a Moralis Web3 API name. The next is an instance of what it may seem like for fetching NFT metadata:
import json
from moralis import evm_api

api_key = "YOUR_API_KEY"

params = {
    "deal with": "0xb47e3cd837dDF8e4c57F05d70Ab865de6e193BBB",
    "token_id": "3931",
    "chain": "eth",
    "format": "decimal",
    "normalizeMetadata": True,
}

consequence = evm_api.nft.get_nft_metadata(
    api_key=api_key,
    params=params,
)

print(json.dumps(consequence, indent=4))
If you’re in search of extra examples and extra detailed info concerning the method, think about testing Moralis’ Web3 Python SDK documentation! Nonetheless, in the event you’d wish to know extra about implement Web3 utilizing Python and observe alongside in a step-by-step course of, learn on!
Overview
Python is a distinguished, high-level, object-oriented, and general-purpose programming language with many alternative use instances. It is likely one of the hottest programming languages right now, that includes an easy-to-learn syntax, contributing to its excessive adoption. What’s extra, in case you are a Python developer seeking to enter the blockchain house, it’s now simpler than ever, due to Moralis. If this sounds thrilling and also you wish to be taught extra, be a part of us as we discover Moralis’ Python SDK, which is the best strategy to combine Web3 performance into Python functions!
The article begins with a fast Python introduction, the place you acquire an summary of the programming language. Following this, the subsequent part highlights Python in a Web3 context. From there, the subsequent half introduces Moralis and the Python SDK. Lastly, we’ll put Moralis’ Python SDK to make use of by exhibiting you create a Web3 Python software. Moreover, to make the tutorial as simple as attainable, it’s divided into the next three sections:
- Software Demo – What Are You Working In direction of?
- Constructing the Python Flask App
- Setting Up the React Frontend App
By finishing this tutorial, you’ll discover ways to make the most of Moralis’ Python SDK to implement Web3 authentication mechanisms in any Python software. Together with the event equipment, you’ll learn the way Moralis’ Auth API works. Furthermore, on this tutorial, we’ll combine MetaMask authentication; nonetheless, you’ll be able to implement a number of auth strategies with solely single traces of code with the API. If you wish to be taught extra about this, take a look at our guides on add a RainbowKit check in or add Coinbase Pockets login performance!
Now, earlier than transferring ahead, join with Moralis, as you want an account to observe alongside!
What’s Python?
Python is an object-oriented programming language with dynamic semantics. It contains high-level knowledge constructions, dynamic binding, dynamic typing, and a number of other different distinguished options. Since Python is a so-called ”common goal” programming language, it has ample use instances, starting from constructing easy functions to machine studying.
Python includes a simple, easy-to-learn syntax emphasizing readability, contributing to the language’s excessive adoption. Since Python is comparatively simple to understand, it’s a best choice for entry-level coders. Furthermore, it has even been adopted by many non-programmers alike, together with scientists and accountants leveraging Python for on a regular basis duties!
Python offers many benefits and advantages, and within the checklist down under, you’ll discover three distinguished examples:
- Open-Supply – The programming language is open-source. Consequently, it’s free to make use of and distribute, even in industrial contexts.
- Modules and Libraries – Python helps packages and modules, which allows program modularity and code reuse.
- Neighborhood – Python has an intensive group contributing to the pool of libraries and modules, which is a superb asset for different builders.
That covers this temporary preliminary introduction to Python. Within the following part, we’ll look nearer at what the language entails in a Web3 context!
Can You Use Python for Web3?
Now, with a extra profound understanding of what Python is, this part will check out this distinguished programming language in a Web3 context. As such, we’ll got down to reply the query, ”can you employ Python for Web3?”.
The easy reply to the aforementioned query is: sure, you should use Python for Web3! Nonetheless, with regards to the blockchain improvement house, you may wish to grasp libraries similar to “Web3.py”. Moreover, “Web3.py” is a Python-based library that makes interacting with the Ethereum blockchain simpler. As such, regardless that there are a lot of similarities between Web2 and Web3 Python improvement, there are minor variations it’s essential think about!
What’s extra, there are extra improvement instruments that may support in your Web3 Python endeavors to facilitate a extra seamless developer expertise. If you wish to be taught extra about this, observe alongside within the subsequent part, the place we discover the final word Python Web3 improvement instrument!
The Final Python Web3 Growth Instrument
If you’re in search of a extra seamless Web3 improvement expertise, it’s essential learn about Moralis! Moralis is a distinguished Web3 infrastructure supplier supplying enterprise-grade improvement instruments similar to Web3 APIs, SDKs, and many others. Consequently, with Moralis, you’ll be able to totally unlock the ability of blockchain know-how to create refined Web3 dapps (decentralized functions)!
Among the many distinguished options of Moralis, you’ll discover the Moralis Python SDK! This final Python Web3 improvement instrument makes blockchain-related Python improvement extra accessible.
With the Python SDK, you’ll be able to simply combine blockchain and Web3 performance into any Python app. Moreover, due to the synergies between all Moralis’ instruments, you’ll be able to mix the SDK with any of Moralis’ Web3 APIs, such because the Solana API, Streams API, NFT API, and many others., to create extra advanced initiatives!
As well as, due to the cross-chain capabilities of Moralis, you should use the Python SDK to develop dapps shortly on a number of networks, together with Solana, Cronos, Ethereum, and lots of extra, that may, for instance:
- Get native balances
- Purchase all NFTs from a group
- Fetch NFT metadata
- Get all NFTs from a selected pockets
Nonetheless, now that you’re extra accustomed to Moralis’ Python SKD, allow us to take a better take a look at the way it truly works by exploring a Python Web3 instance!
Web3 Python Tutorial – Exploring a Python Web3 Instance
Now that you’re extra accustomed to Python and Moralis’ Python SDK, the next sections illustrate use the event equipment in apply by exploring a Web3 instance. Particularly, this tutorial teaches you deal with Web3 authentication flows with Moralis’ Python SDK to make API calls by way of a Flask server app. What’s extra, you’ll discover ways to shortly arrange a React frontend software exhibiting the authentication circulation in motion!

Furthermore, to make the tutorial as simple as attainable, it’s divided into the next three sections:
- Software Demo – What Are You Working In direction of?
- Constructing the Python Flask App
- Setting Up the React Frontend App
By protecting the aforementioned elements, you’ll discover ways to use Moralis’ Python SDK to make Web3 API calls. In consequence, you’ll be able to simply combine Web3 and blockchain performance into any server-side Python software to question on-chain knowledge! With that stated, in the event you desire watching movies to be taught, you too can take a look at the video under from the Moralis YouTube channel, protecting your entire Web3 Python tutorial in additional element:
Nonetheless, you too can be a part of us right here as we break down your entire course of from begin to end. So, with out additional ado, allow us to take a better take a look at what you might be working in the direction of with a fast walkthrough of how the ultimate software works!
Software Demo – What Are You Working In direction of?
The applying that this Web3 Python tutorial illustrates create is comparatively simple. The touchdown web page includes a ”Python Web3 Authentication” heading together with a single ”Login” button:

When clicking on this button, it’ll autonomously set off your MetaMask, asking you to attach together with your Web3 pockets. When you join your account, it’ll autonomously ship a ”problem” request to the app’s Python backend to ask Moralis’ Auth API to generate a brand new Web3 login problem.
From there, the appliance sends one other request to validate the signature. Whether it is appropriate, it generates a brand new person ID, which is displayed on the frontend:

When you efficiently authenticate new customers, they’re routinely added to your ”Customers” tab in your Moralis admin panel:

This covers the appliance demo, and if you wish to discover ways to create this challenge, be a part of us as we present you create a Python Flask app in your backend within the subsequent part!
Constructing the Python Flask App
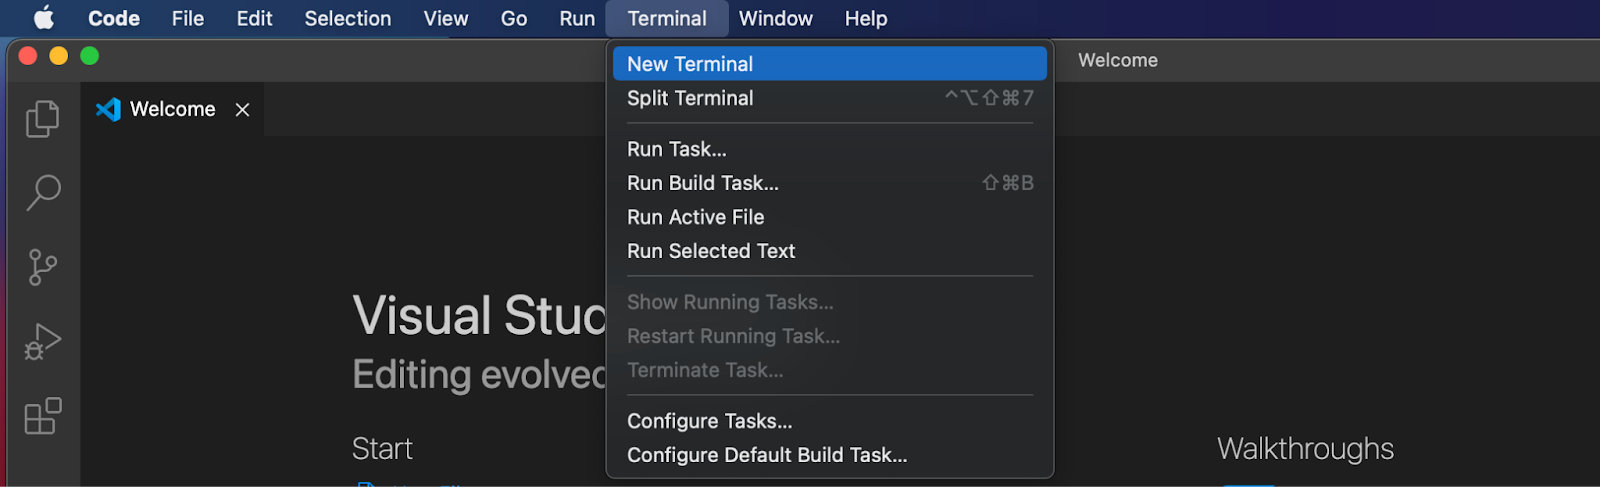
To kick issues off, the preliminary a part of this part revolves round organising the Web3 Python challenge. Moreover, as an instance the method, we’ll use Visible Studio Code (VSC) all through the tutorial. That stated, word that the method may often differ in the event you go for one other setting. Now, you can begin by opening your most popular built-in improvement setting (IDE).
When you launch your IDE, go forward and create a brand new ”PythonSDK” challenge folder and open a brand new terminal. If you happen to, like us, went for VSC, you are able to do so by clicking on ”Terminal” on the prime, adopted by the ”New Terminal” various:
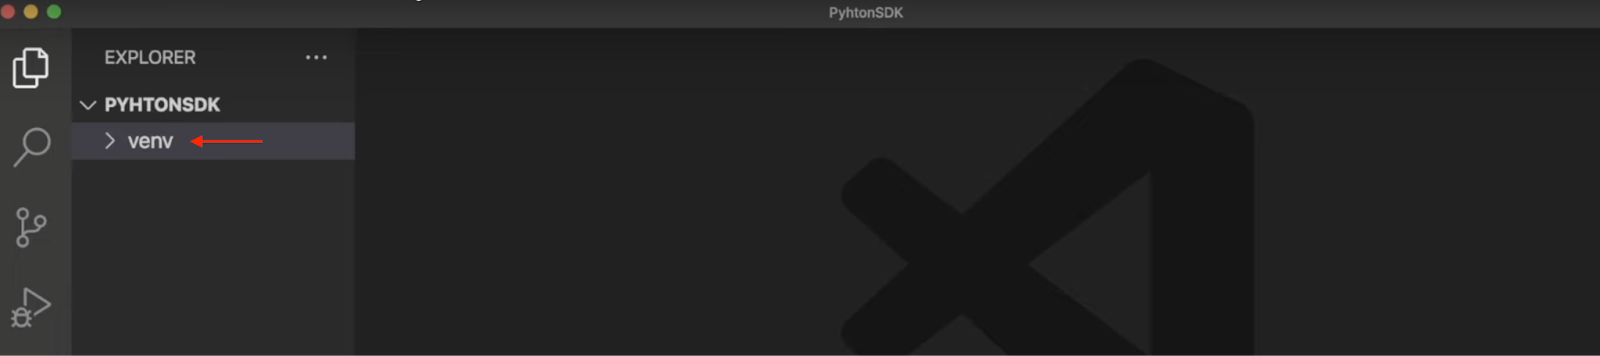
From there, ”cd” into the challenge’s root folder and create a brand new digital setting by operating the command under within the terminal:
python3 -m venv venv
When operating the command above, it ends in a brand new ”venv” folder, which you must have the ability to discover in your native listing:
Subsequent up, it’s essential initialize this digital setting, and you are able to do so by the next terminal command:
supply venv/bin/activate
Now that you’ve initialized the digital setting, the subsequent step is to make sure that you may have the most recent ”pip” model. You’ll be able to verify the present model and set up any current updates by inputting and operating the code under:
pip set up --upgrade pip
Lastly, it’s essential to set up the mandatory dependencies, and there are three in complete. Down under, you’ll discover the suitable instructions for doing so. Enter every command and run them consecutively:
pip set up flask
pip set up flask_cors
pip set up moralis
That covers the preliminary challenge setup! Within the following sub-section, we’ll carefully study the appliance code!
Python Flask Software Code
With the barebones state of the Web3 Polygon challenge at hand, this part focuses on the appliance code. As such, we’ll now present you add the required endpoints and capabilities!
To start, create a brand new file known as ”app.py” within the challenge’s root folder and open it. The very first thing it’s essential do is import the dependencies, which you are able to do by including this code snippet to the highest of the file:
from flask import Flask
from flask import request
from moralis import auth
from flask_cors import CORS
Subsequent, add the snippet under to initialize the app and wrap it in ”CORS”:
app = Flask(__name__)
CORS(app)
From there, add your Moralis API key to the code:
api_key = "xxx"
Nonetheless, make sure that to exchange ”xxx” together with your precise key. To get the important thing, it’s essential to possess a Moralis account. So, when you have not already, create a Moralis account instantly! While you ultimately log in, navigate to the ”Web3 APIs” tab, which is the place you could find the important thing:

To prime issues off, it’s essential to create two routes: ”/requestChallenge” and ”/verifyChallenge”.
- “/requestChallenge“ – Every time a person desires to authenticate themselves, they should request a problem from Moralis, which is what this preliminary route is liable for. This route accommodates a ”reqChallenge()” operate that acquires the request arguments, creates a ”physique” variable, fetches the outcomes from the ”/requestChallenge” endpoint, and eventually passes it to the consumer:
@app.route('/requestChallenge', strategies=["GET"])
def reqChallenge():

    args = request.args
    physique = {
        "area": "my.dapp",
        "chainId": args.get("chainId"),
        "deal with": args.get("deal with"),
        "assertion": "Please affirm login",
        "uri": "https://my.dapp/",
        "expirationTime": "2023-01-01T00:00:00.000Z",
        "notBefore": "2020-01-01T00:00:00.000Z",
        "assets": ['https://docs.moralis.io/'],
        "timeout": 30,
    }

    consequence = auth.problem.request_challenge_evm(
        api_key=api_key,
        physique=physique,
    )

    return consequence
- “/verifyChallenge“ – When a person indicators the message, the result’s returned to the backend and verified utilizing the second ”/verifyChallenge” route. The route has the ”verifyChallenge()” operate, which will get the arguments from the request, creates a ”physique” variable, acquires the outcomes from Moralis’ Auth API endpoint, and eventually returns it to the consumer:
@app.route('/verifyChallenge', strategies=["GET"])
def verifyChallenge():

    args = request.args
    physique={
        "message": args.get("message"),
        "signature": args.get("signature"),
    }

    consequence = auth.problem.verify_challenge_evm(
        api_key=api_key,
        physique=physique
    )

    return consequence
Lastly, add the ultimate code snippet specifying the place you wish to run the app:
if __name__ == "__main__":
    app.run(host="127.0.0.1", port=3000, debug=True)
That covers the code for ”app.py”, and all in all, the file ought to now seem like this:
from flask import Flask
from flask import request
from moralis import auth
from flask_cors import CORS

app = Flask(__name__)
CORS(app)

api_key = "xxx"

@app.route('/requestChallenge', strategies=["GET"])
def reqChallenge():

    args = request.args
    physique = {
        "area": "my.dapp",
        "chainId": args.get("chainId"),
        "deal with": args.get("deal with"),
        "assertion": "Please affirm login",
        "uri": "https://my.dapp/",
        "expirationTime": "2023-01-01T00:00:00.000Z",
        "notBefore": "2020-01-01T00:00:00.000Z",
        "assets": ['https://docs.moralis.io/'],
        "timeout": 30,
    }

    consequence = auth.problem.request_challenge_evm(
        api_key=api_key,
        physique=physique,
    )

    return consequence


@app.route('/verifyChallenge', strategies=["GET"])
def verifyChallenge():

    args = request.args
    physique={
        "message": args.get("message"),
        "signature": args.get("signature"),
    }

    consequence = auth.problem.verify_challenge_evm(
        api_key=api_key,
        physique=physique
    )

    return consequence


if __name__ == "__main__":
    app.run(host="127.0.0.1", port=3000, debug=True)
Beginning the App
With the code for the Web3 Python Flask software all full, the very last thing that continues to be is to run the challenge. To take action, as soon as once more, open a brand new terminal and run the command under:
python3 app.py
That’s it! It ought to now spin up your software on native host 3000, which you beforehand specified! Nonetheless, in the event you plan on launching the appliance sooner or later, you may additionally wish to add some error dealing with. Sadly, we won’t present you ways that is accomplished because it falls outdoors the scope of this text!
Nonetheless, now that we’re accomplished with the Web3 Python Flask software, allow us to dive into the frontend part, the place we’ll shortly arrange a React app for testing the endpoints!
Setting Up the React Frontend App
With the Web3 Python instance software all full, the very last thing it’s essential do is about up a frontend software from which we’ll name the endpoints and deal with the Web3 authentication. As such, on this part, we’ll briefly present you create a React frontend app!
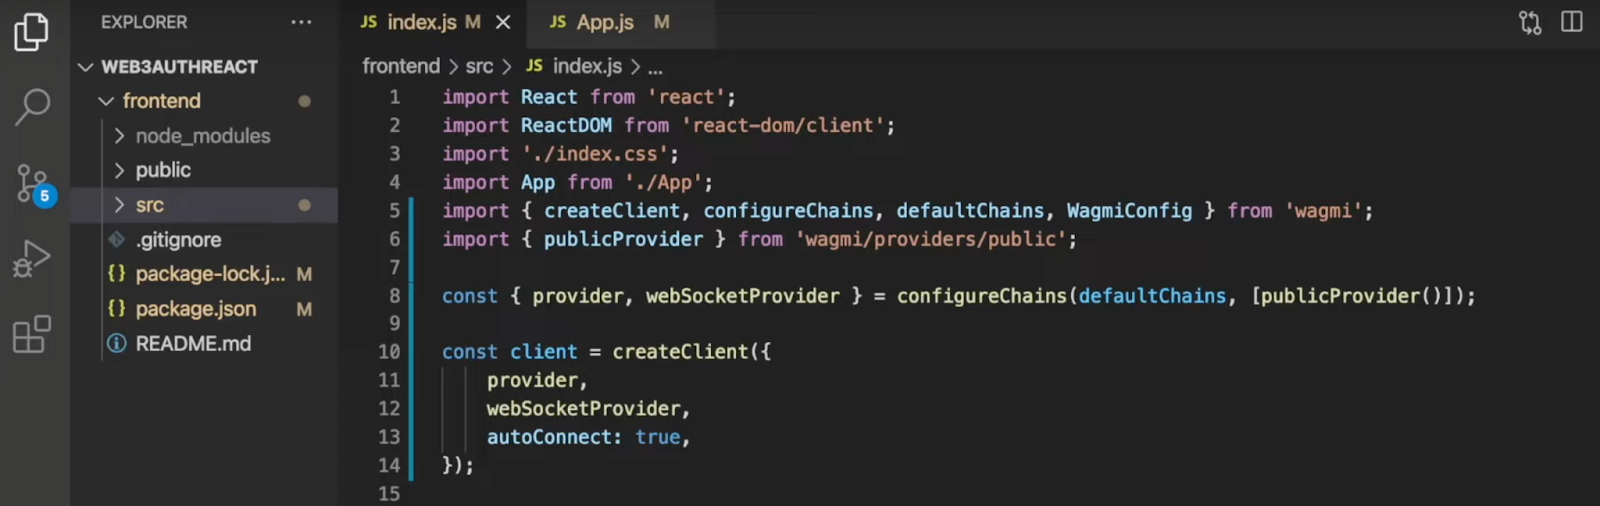
To make issues as simple as attainable, we’ll use an already-prepared React software. Therefore, all it’s essential do is go to the GitHub repository under and clone the challenge to your native listing:
Full Web3 Python Instance Documentation – https://github.com/MoralisWeb3/youtube-tutorials/tree/fundamental/Web3AuthPython
When you clone the repository, you must end up with a file construction just like the one proven within the picture under:
From there, you must now have the ability to begin the appliance. To take action, open a brand new terminal and run the next command:
npm run begin
Now that’s it for this Web3 Python instance tutorial! If you need a extra detailed breakdown of the React software, take a look at the video from the ”Web3 Python Tutorial – Exploring a Python Web3 Instance” part.
Furthermore, when you have adopted alongside this far, now you can use Moralis’ Web3 Python SDK to authenticate customers. If you need extra details about the capabilities of this improvement equipment, take a look at Moralis’ Web3 Python SDK documentation!
Web3 Python Growth – Abstract
On this article, we demonstrated the accessibility of Moralis’ Python SDK by exhibiting you an instance of create a Web3 Python software. Furthermore, to make the tutorial as simple as attainable, it was divided into these three sections:
- Software Demo – What Are You Working In direction of?
- Constructing the Python Flask App
- Setting Up the React Frontend App
If you happen to joined us this far, you now know implement Web3 performance into Python functions. Furthermore, in the event you discovered this tutorial useful, take a look at extra blockchain improvement content material right here at Moralis’ Web3 weblog. For instance, discover ways to create an AWS Lambda operate or discover AWS GameSparks!
Nonetheless, if you wish to create Web3-compatible Python functions, join with Moralis instantly. In doing so, you’ll be able to totally make the most of blockchain know-how to construct Web3 initiatives extra seamlessly!


