
Would you wish to construct a platform that allows you to discover and handle crypto property? In that case, comply with alongside on this tutorial as we showcase how one can clone Zapper in lower than one hour! As such, you’ll be capable to neatly set up blockchain knowledge, reminiscent of DeFi property, and show it to your dapp’s customers. Furthermore, you’ll get to implement backend functionalities shortly and simply. However wait, there’s extra. By extending our one-hour tutorial just a little additional, you’ll additionally get to create a trendy frontend on your Zapper clone.
To finish as we speak’s problem, we’ll present you how one can use some nice Web3 instruments to make the method as simple as potential. We’ll use NodeJS to create a backend server. Then, we’ll use the facility of Moralis’ EVM API to fetch all types of on-chain knowledge with brief snippets of code. Therefore, be sure to create your free Moralis account. Moreover, we are going to use React to create the frontend portion of our instance dapp. The latter will question knowledge from our backend. Final however not least, to clone Zapper in fashion, we may even use Moralis’ web3uikit. Because of this, we can have eye-catching buttons and different elements prepared in minutes.
As well as, it’s price stating that Moralis is all about cross-chain interoperability. As such, you possibly can goal all main chains with the identical traces of code. However on this tutorial, we concentrate on the Ethereum and Polygon chains. Nonetheless, earlier than we present you what you’ll have an opportunity to construct shifting ahead, we have to cowl some fundamentals. For one, earlier than you clone Zapper, you should know what it’s.

What’s Zapper?
Zapper is a fintech platform that allows you to discover and handle all DeFi property from one easy interface. One in all Zapper’s targets is to stage the enjoying area for decentralized finance (DeFi) newcomers and superior traders. They achieve this by offering varied shortcuts (“Zaps”). These shortcuts allow customers to enter DeFi lending, liquidity provisions, and automatic yield farming.

Moreover, Zapper can be a kind of explorer dapp. It permits customers to attach their wallets and discover their property. As well as, they will seek for different accounts, NFTs, DAOs, tokens, and extra. Nonetheless, Zapper additionally features a swap, the place customers can alternate their tokens. Nonetheless, there’s additionally a bridge that allows customers to maneuver tokens from one blockchain community to a different.
If that is the primary time you hear about Zapper, we encourage you to go to “zapper.fi” and discover it. Nonetheless, realizing your manner round Zapper is in no way a prerequisite if you wish to clone Zapper.

The way to Clone Zapper with NodeJS, React, Moralis, and Web3UIKit
To be able to clone Zapper, we should arrange a NodeJS backend and a React frontend. Then, we are going to present you how one can use this backend to fetch on-chain knowledge utilizing the Moralis EVM API. After all, we’ll additionally be certain that the frontend obtains that knowledge and shows it correctly. Moreover, for the sake of this tutorial, we’ll concentrate on acquiring the next particulars for a related pockets:
- Native stability and the USD worth of the native stability
- ERC-20 token balances
- Portfolio of whole USD worth
- Switch historical past
- NFTs and a technique to filter NFTs
Clearly, we’ll commit our consideration to implementing the explorer options. Nonetheless, because of the 1inch aggregator, you possibly can simply add the token swap performance. Furthermore, earlier than we invite you to roll up your sleeves and clone Zapper, let’s take a better have a look at a demo of our instance dapp.

Our Zapper Clone Demo
That is the gist of our dapp that resulted from our feat of cloning Zapper:
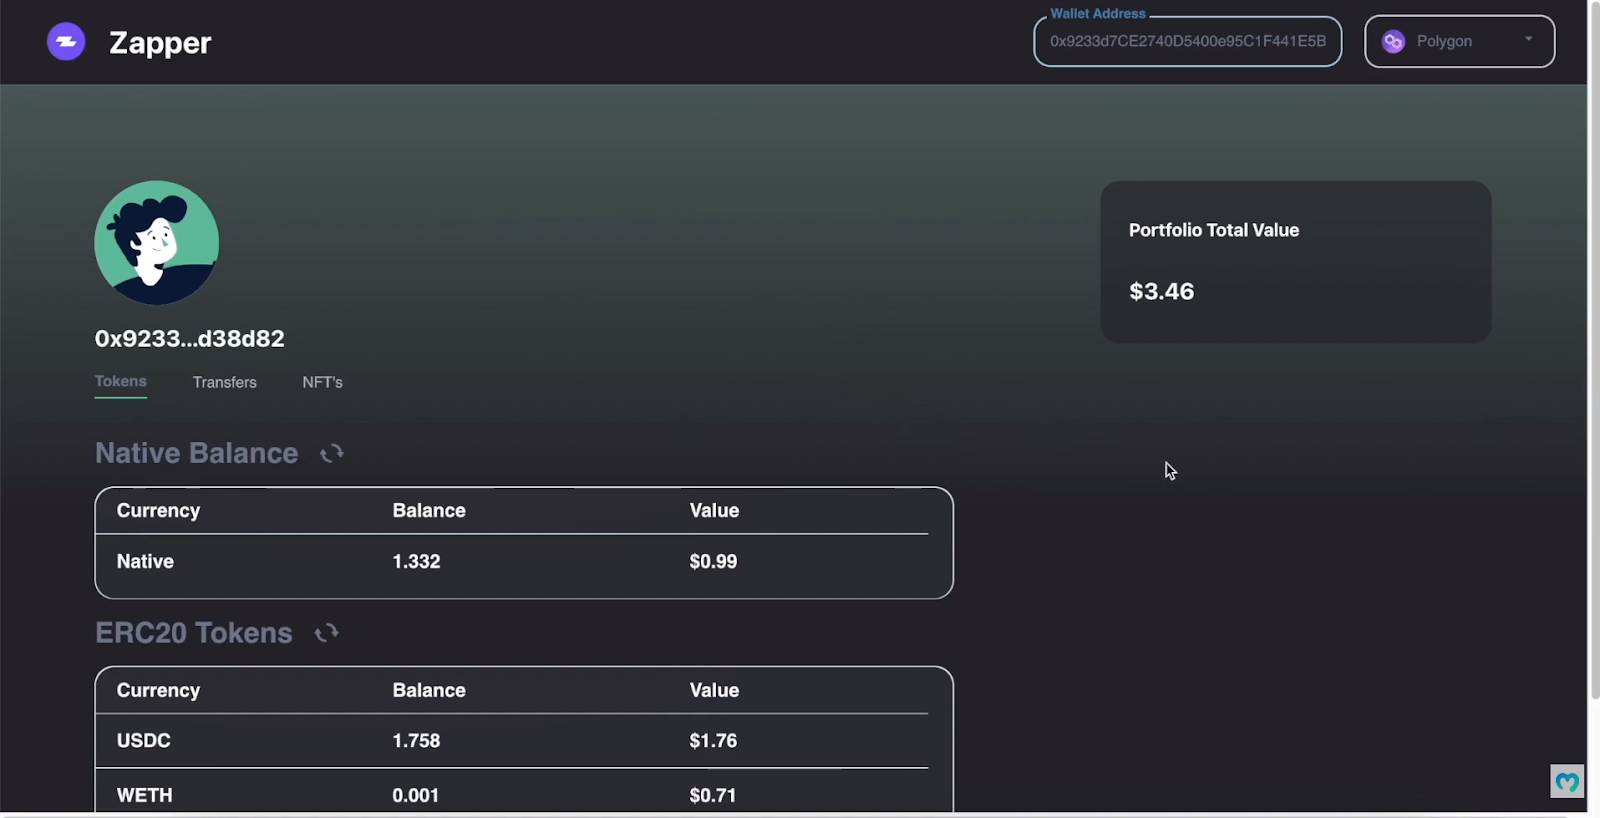
Wanting on the above screenshot, you possibly can see the “Zapper” brand within the top-left nook. On the alternative aspect of the highest bar, you possibly can see the “Pockets Tackle” area and the chain choice menu (at present on “Polygon”):

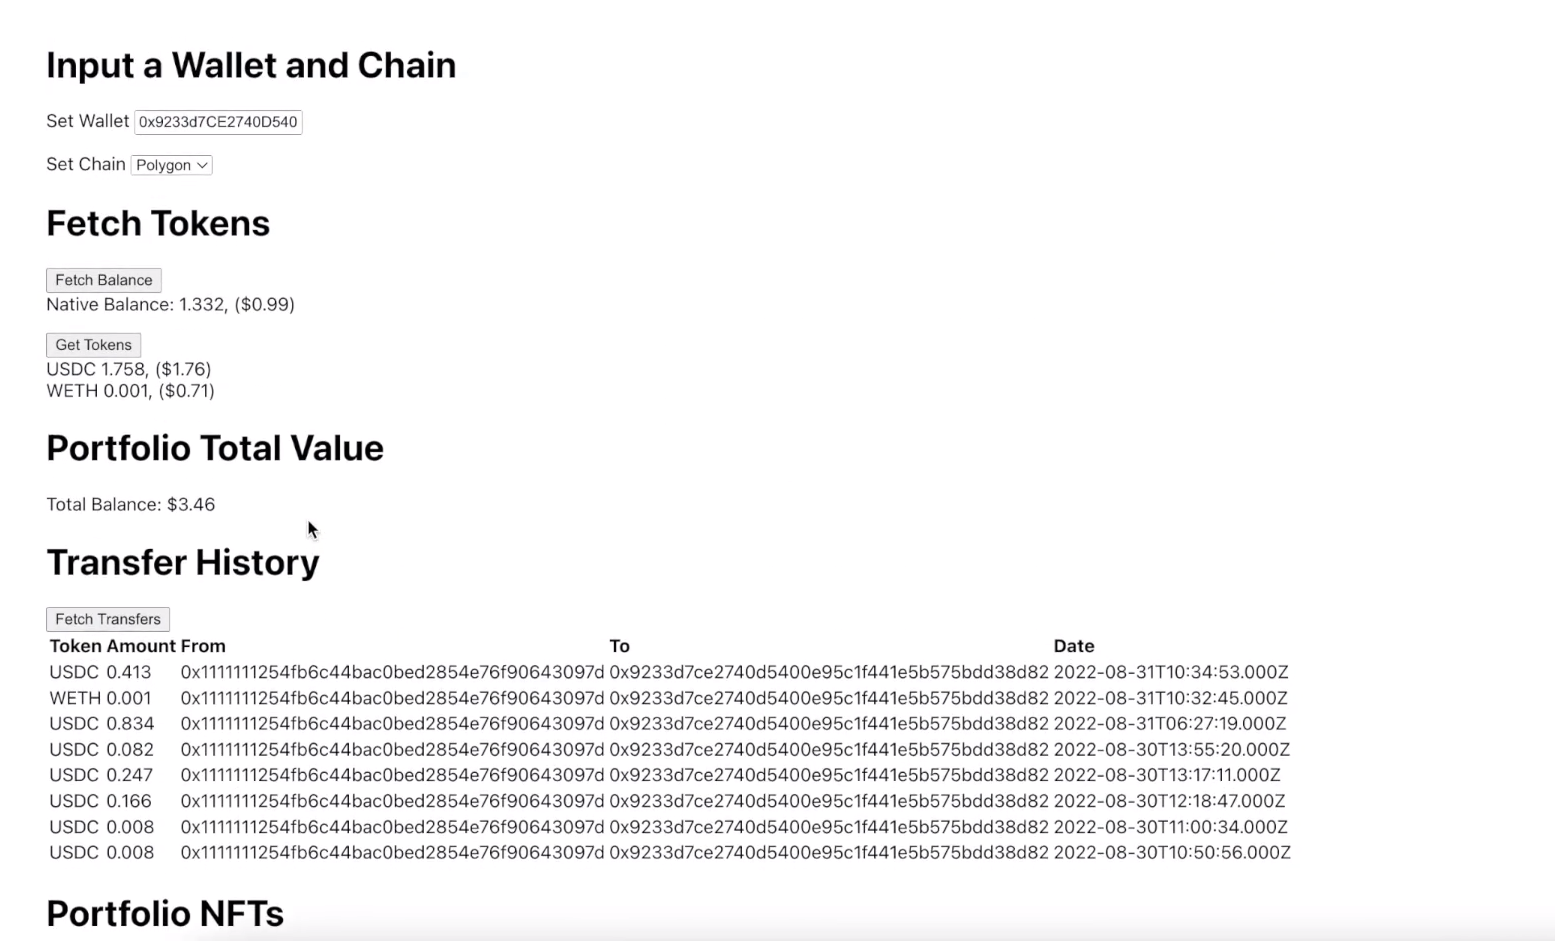
So, the pockets tackle and the chain are the entry parameters. Our Zapper clone shows native, ERC-20, and NFT balances primarily based on these two parameters. Moreover, our instance dapp additionally shows transfers for the given pockets tackle:

As you possibly can see within the above picture, our decentralized utility shows the portfolio’s whole worth in USD on the right-hand aspect. On the left-hand aspect, it shows the person icon and the related pockets’s tackle. Furthermore, under the tackle are the three tabs: “Tokens”, “Transfers”, and “NFTs”.
Moreover, when the “Tokens” possibility is chosen, our dapp shows customers’ native token stability and ERC-20 balances:
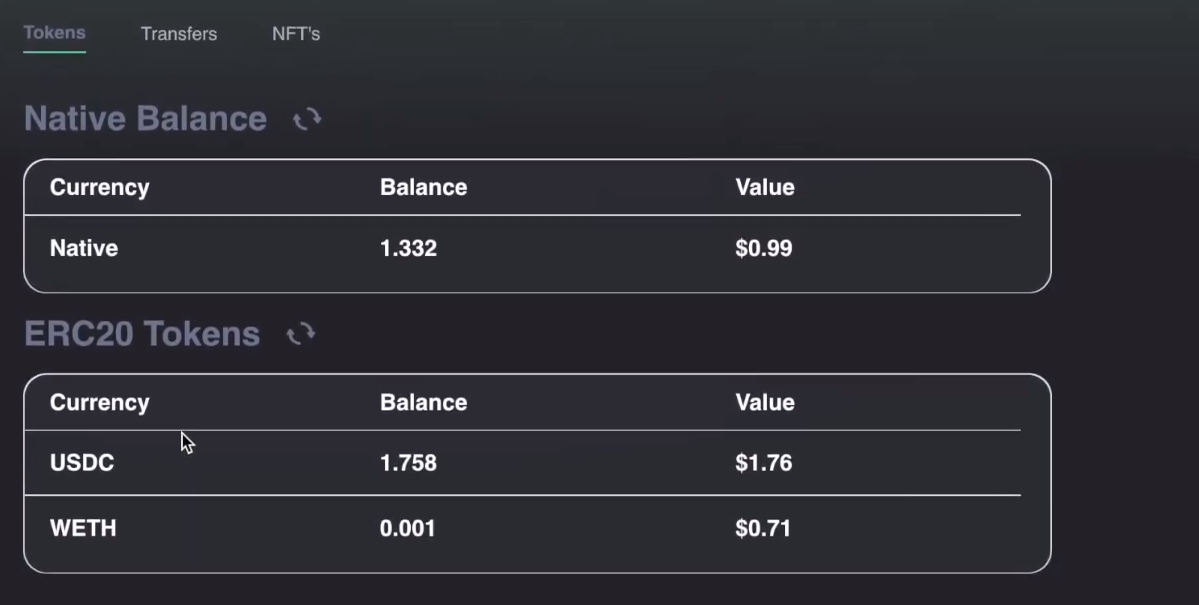
So, the above-connected pockets holds 1.332 MATIC (native coin for the Polygon chain), 1.758 USDC, and 0.001 WETH. If we choose the “Transfers” tab, we get to see the related pockets’s transaction historical past:

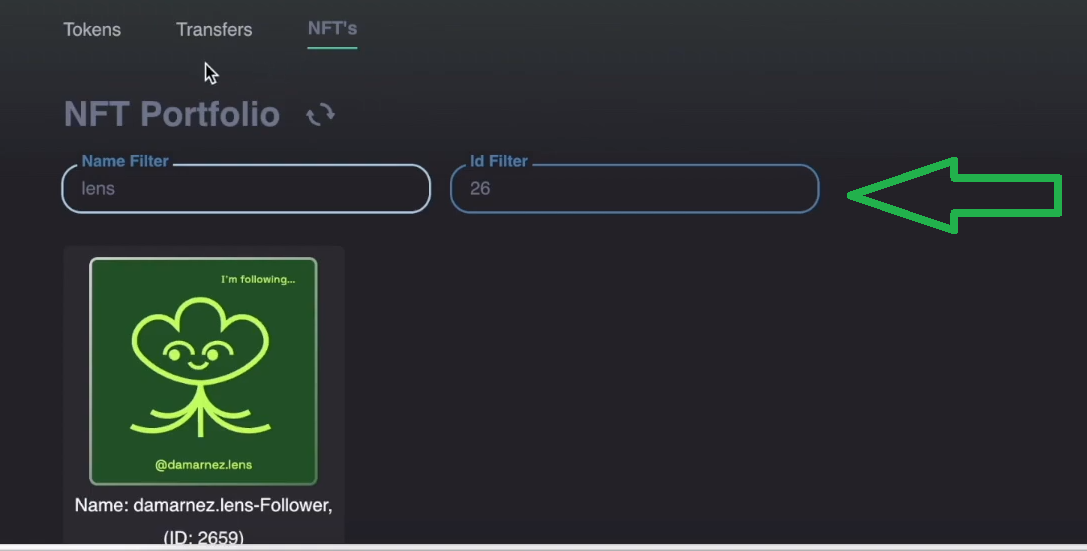
Nonetheless, the “NFTs” tab shows that pockets’s NFT portfolio:

Final however not least, the “NFT Portfolio” web page additionally permits customers to filter NFTs both by identify or token ID:
As you possibly can see within the above screenshots, our instance dapp consists of neat styling. Nonetheless, this would be the last stage of as we speak’s “clone zapper” feat. Initially, we are going to concentrate on performance. Therefore, that is our instance dapp with none fancy styling:
Setting Up Your NodeJS Backend
Word: Just remember to have NodeJS and the “npm” bundle put in.
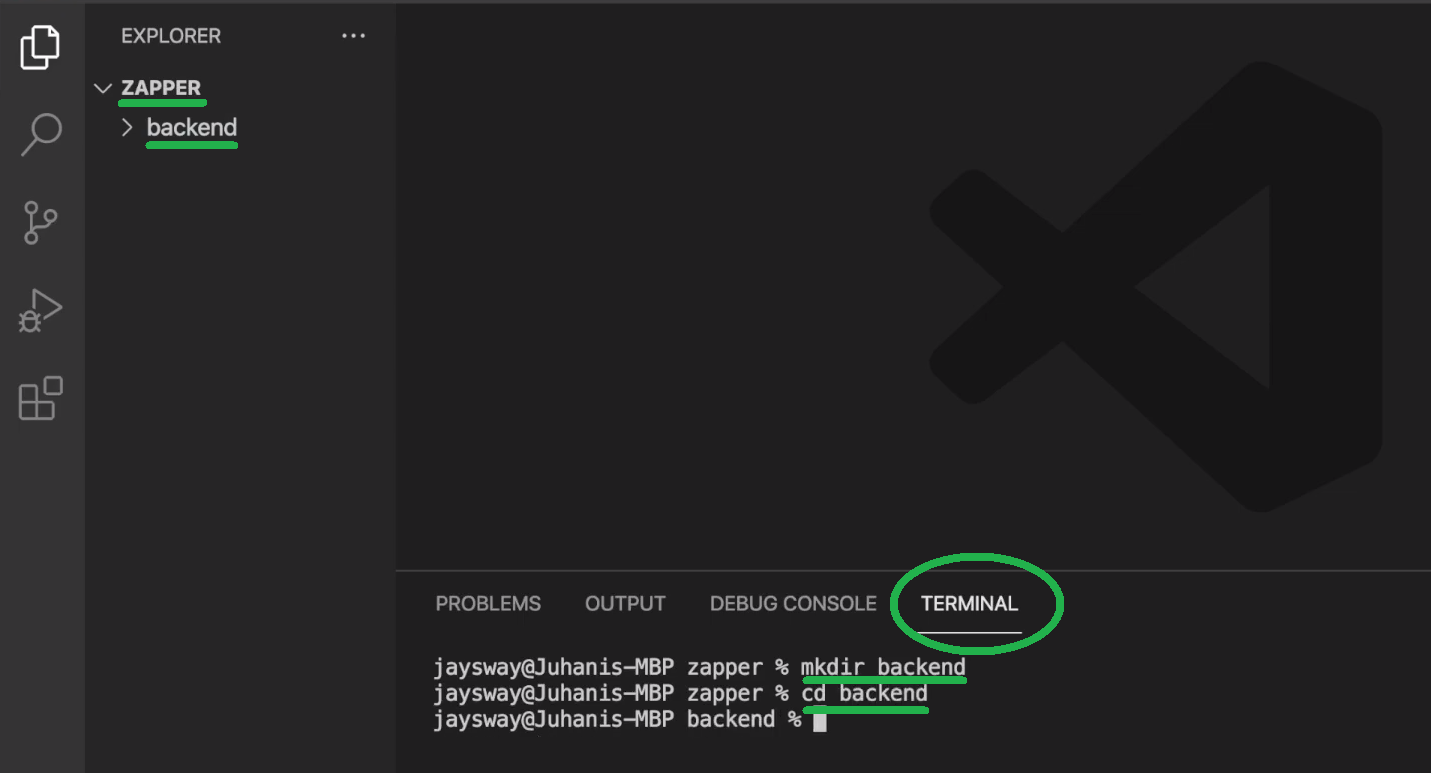
As talked about above, we’ll present you how one can use NodeJS to arrange a backend server. The latter will question the above-presented on-chain knowledge utilizing Moralis’ Web3 EVM API. Begin by creating your “zapper” folder inside Visible Studio Code (VSC). Subsequent, use VSC’s terminal to create your “backend” listing utilizing the “mkdir backend” command. Then “cd” into that folder:
Now, you possibly can run the “npm init” command to initialize your undertaking. Moreover, press “enter” a number of occasions to undergo the initialization choices. Because of this, you must now have your “bundle.json” file contained in the “backend” folder:

Subsequent, create your “index.js” file utilizing the “contact index.js” command. Then, set up all dependencies that can allow you to cowl the required backend functionalities. You do that with the “npm i moralis categorical cors dotenv nodemon” command.
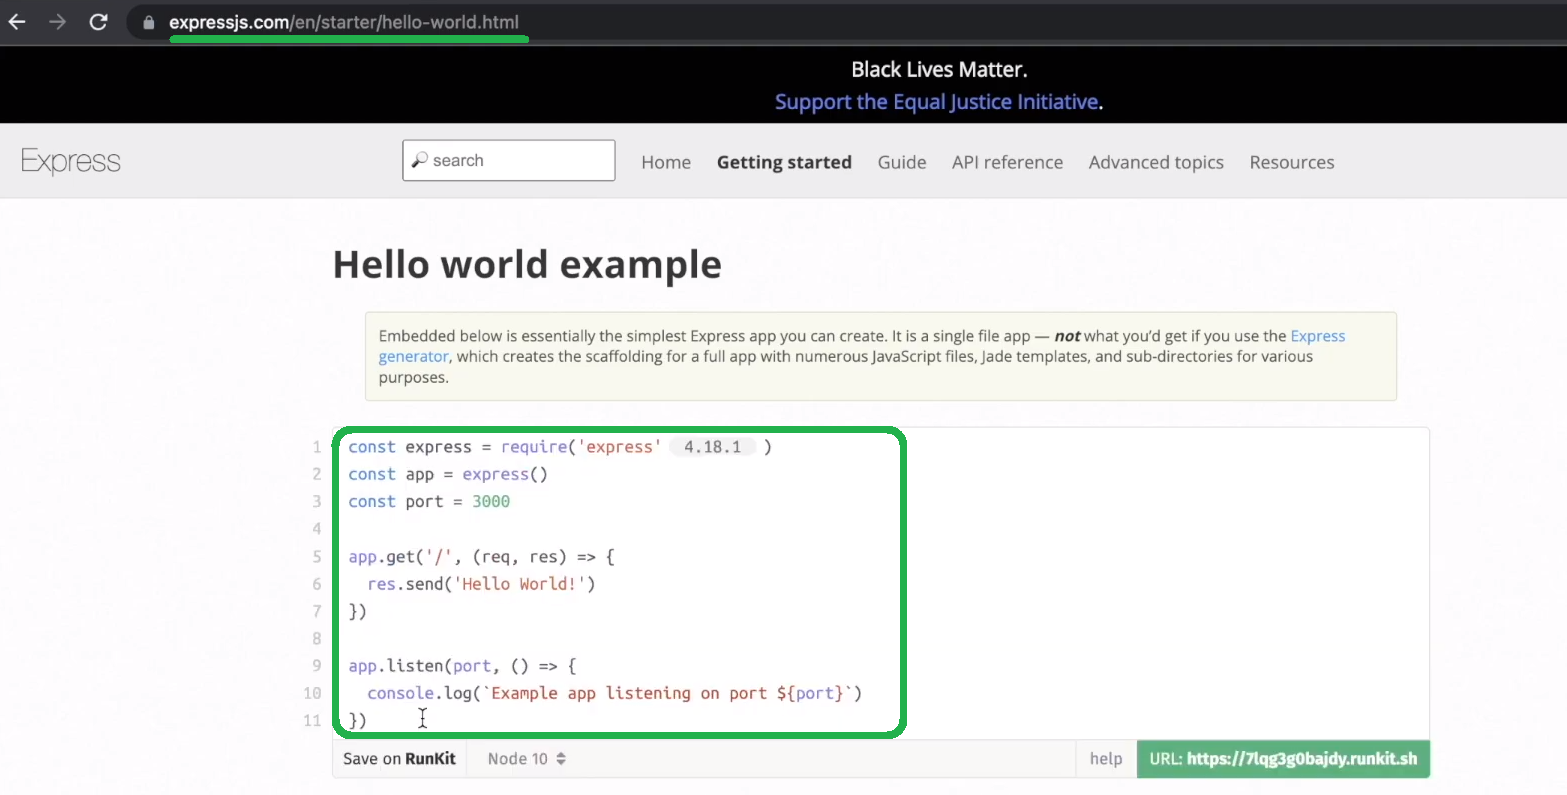
So, with all dependencies in place, you possibly can populate your “index.js” file. To avoid wasting time, you should use the “whats up world instance categorical” template:
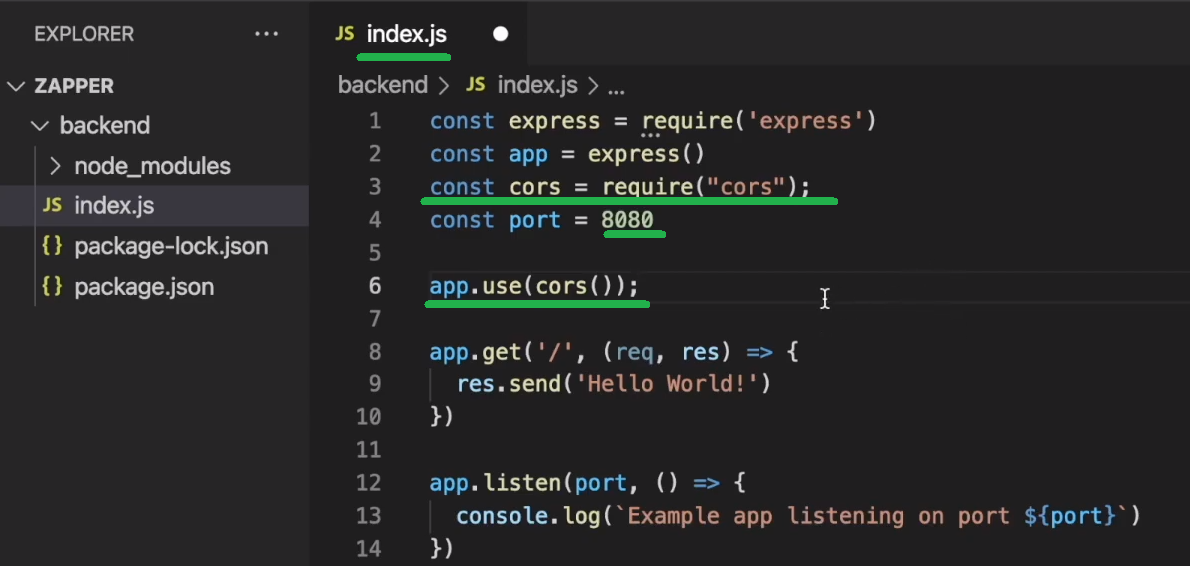
So, paste the above traces of code into your “index.js” file. Subsequent, change the port from “3000” to “8080” and produce within the “cors” bundle:
Then, open your “bundle.json” file and add the “begin” script:
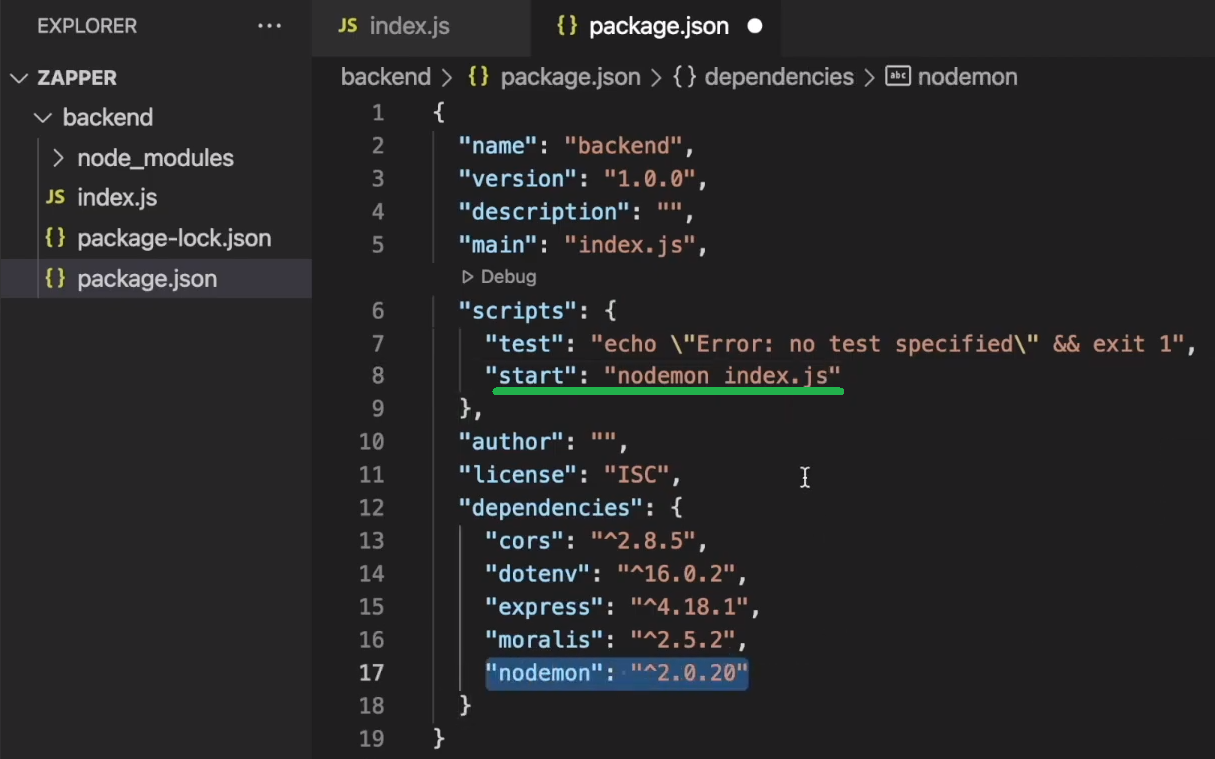
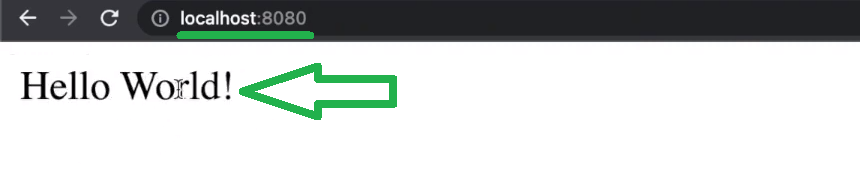
The above line of code will refresh your backend each time you make some adjustments to the “index.js” file. So, that concludes your easy backend setup. Therefore, you should use the “npm begin” command to begin listening on “localhost: 8080“:

After all, you can too use your favourite browser to entry your backend:
The following stage on your backend would evolve round creating endpoints. Nonetheless, you must first arrange your frontend and join it along with your backend. Furthermore, be sure to hold your backend operating.
Setting Up Your React Frontend
Begin by creating a brand new terminal occasion:

Subsequent, create your “frontend” React app utilizing the “npx create-react-app frontend” command:

As soon as your frontend app is prepared, you will notice all of the related information contained in the “frontend” folder:

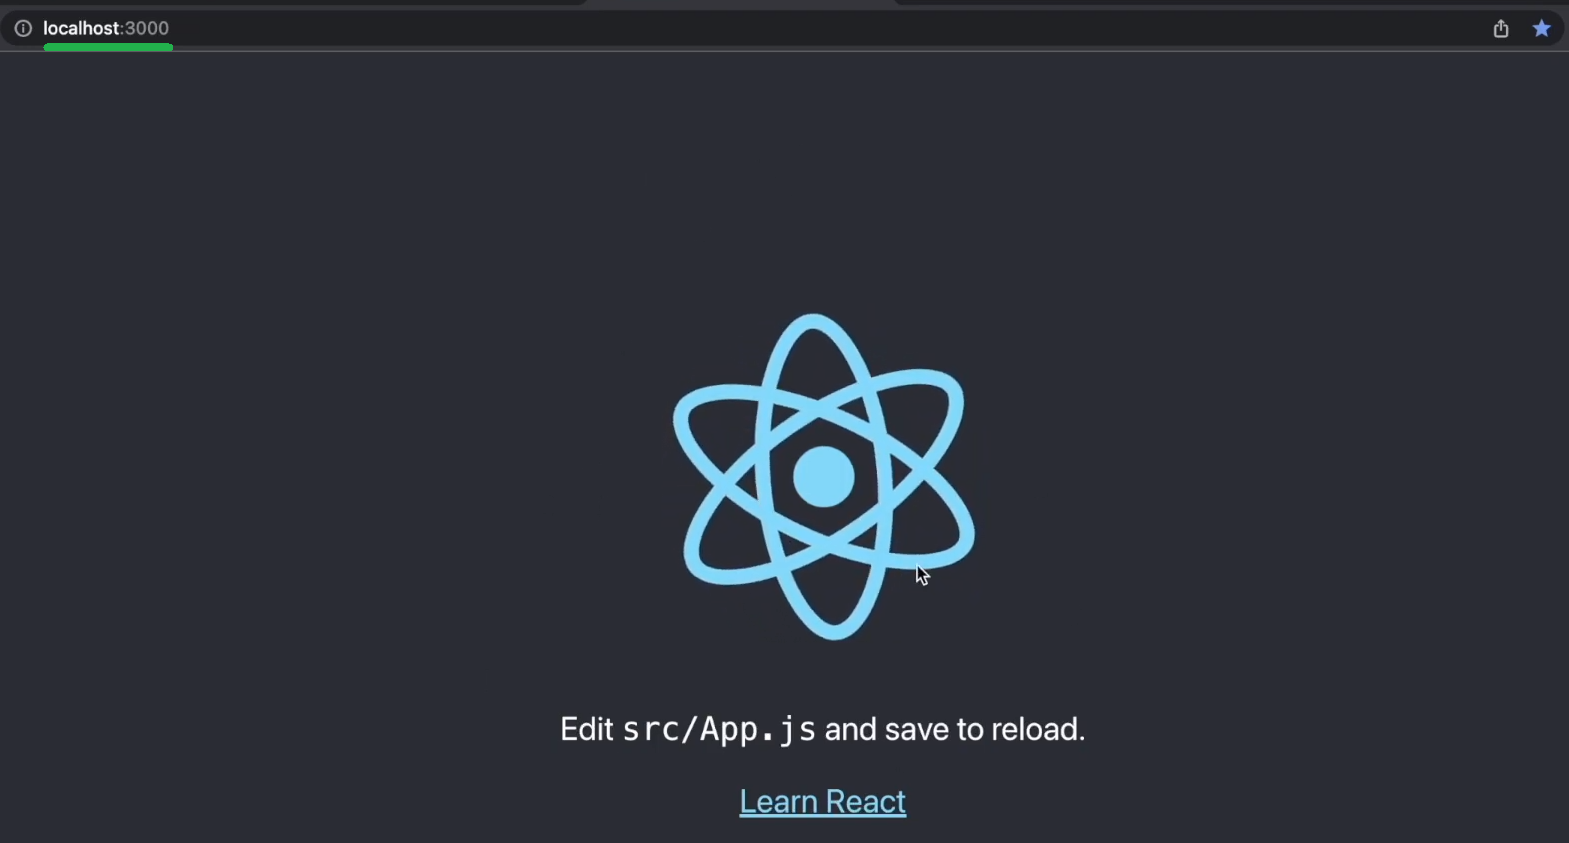
Subsequent, you’ll want to “cd” into the “frontend” folder. Then, you possibly can launch your frontend app with the “npm begin” command. Along with your frontend app launched, you possibly can entry your template React app at “localhost: 3000“:
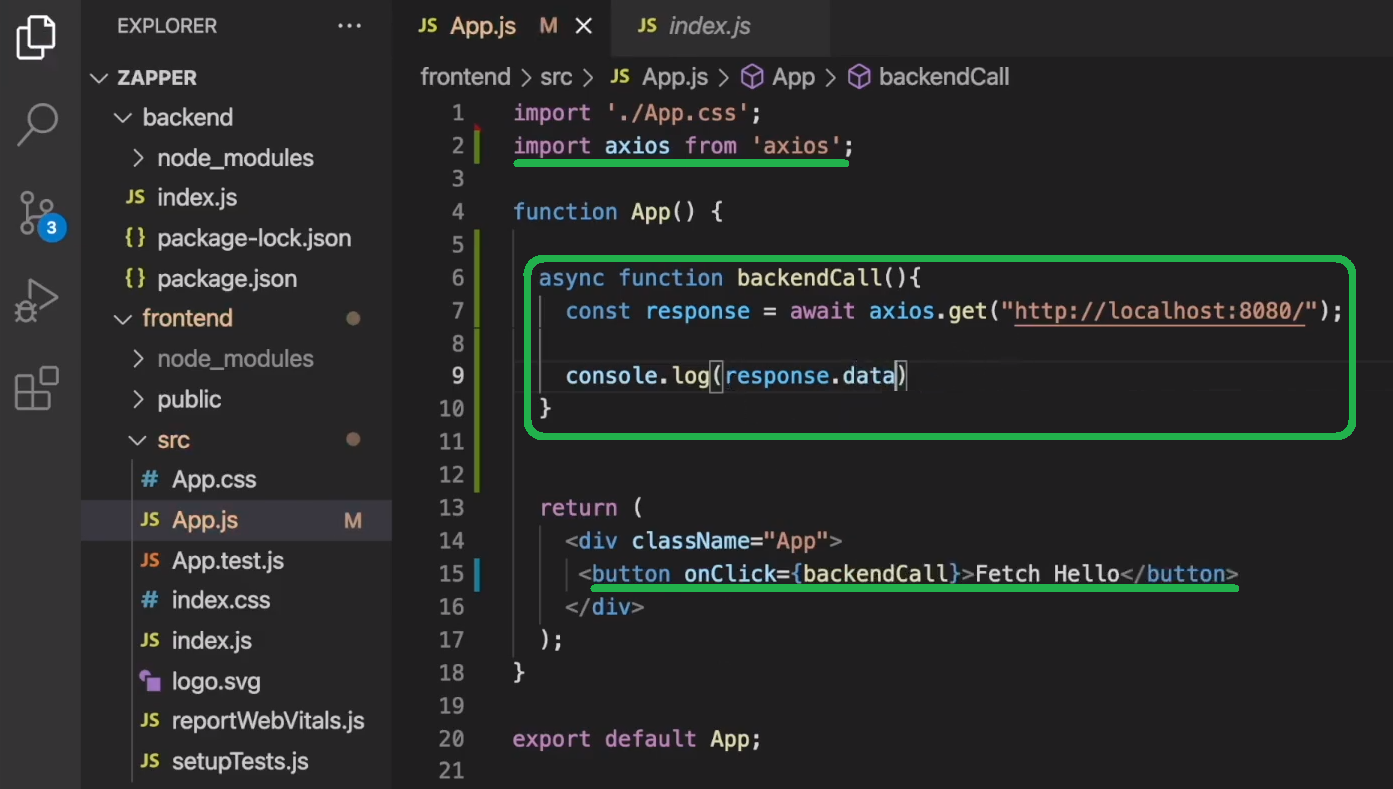
Shifting ahead, you’ll want to join your frontend along with your backend. Therefore, open the “App.js” file and first take away the React brand by deleting the highest row. Subsequent, delete the content material contained in the “App” div:

Then, you possibly can simply add a easy button to that “div” that can fetch the info out of your backend. However first, set up Axios utilizing the “npm i axios” command. Additionally, be sure to import Axios to the “App.js” file. Nonetheless, to make the “Fetch Hi there” button practical, you additionally want so as to add the “backendCall” async perform:
Moreover, in case you now run your frontend app once more with the “npm begin” command, you possibly can see that the “Fetch Hi there” button makes use of the “get” endpoint to fetch the info out of your backend:
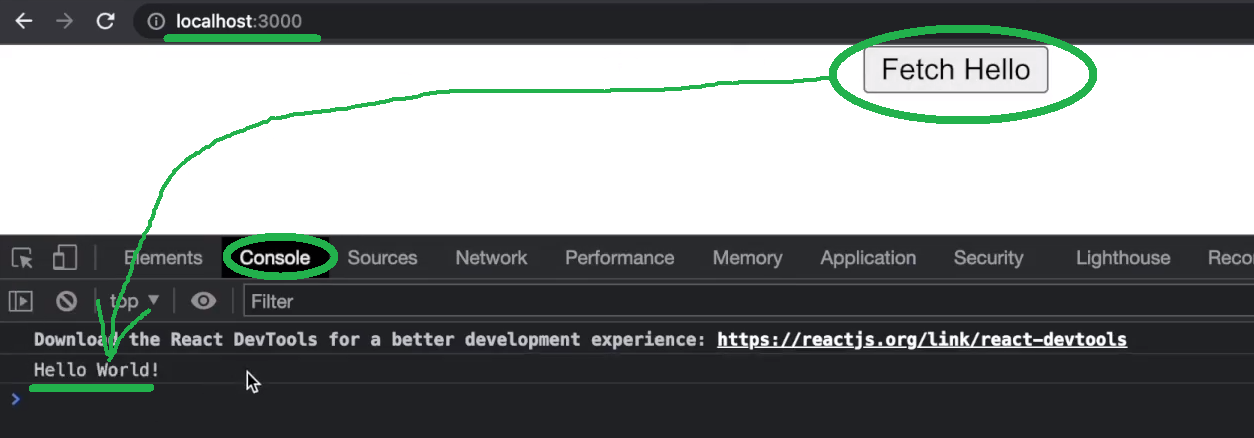
You’ve now efficiently related your shopper aspect along with your server aspect. As such, you’re prepared to begin implementing the Moralis API calls to your backend and show the outcomes on the frontend.
Clone Zapper Functionalities with Moralis API Calls
To start out utilizing the final word EVM API, you want your Moralis account. So, in case you haven’t accomplished so but, use the “create your free Moralis account” hyperlink within the introduction. After all, you can too go to Moralis’ homepage and click on on the “Begin for Free” button:

Upon getting your Moralis account up and operating, you possibly can entry your Moralis admin space. There, you’ll want to full two easy steps to acquire your Moralis Web3 API key:

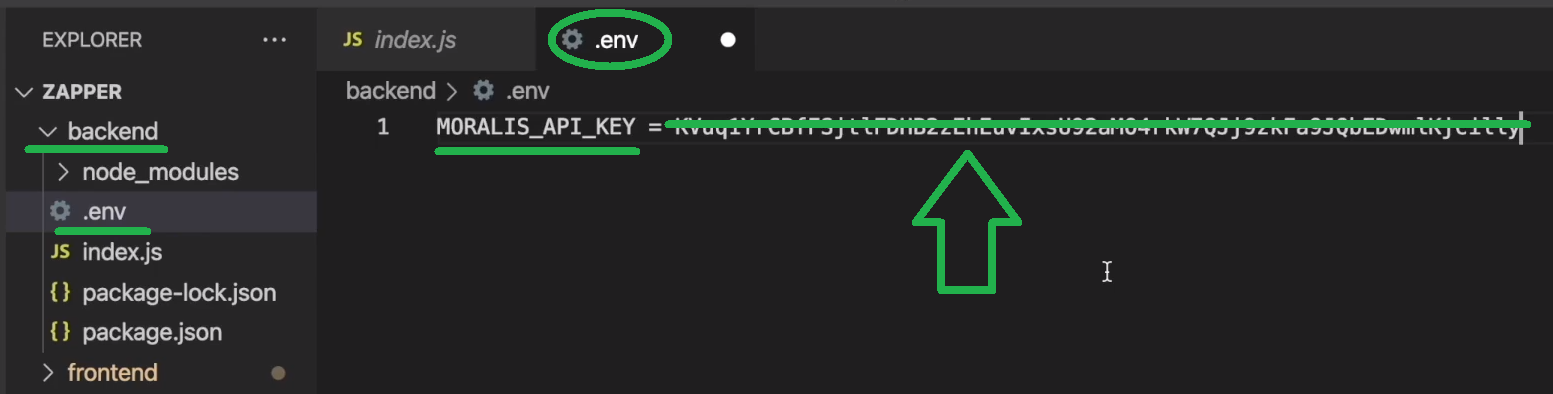
As indicated by the above picture, you need to first go to the “Web3 APIs” web page. Then, you get to repeat your Web3 API key utilizing the copy icon. Subsequent, return to your “backend” folder and create your “.env” file. Inside that file, create the “MORALIS_API_KEY” variable and set its worth by pasting the above-copied API key:
Subsequent, return to the “index.js” file and “require” the “.env” file. Additionally, be sure to import Moralis:

The “getNativeBalance” and “getTokenPrice” Moralis Web3 API Endpoints
With the above traces of code in place, you’re prepared to make use of Moralis’ EVM API endpoints to acquire the native stability. Within the Moralis documentation, you possibly can receive all the required particulars in regards to the “getNativeBalance” and “getTokenPrice” endpoints. Furthermore, right here’s the “getNativeBalance” web page:
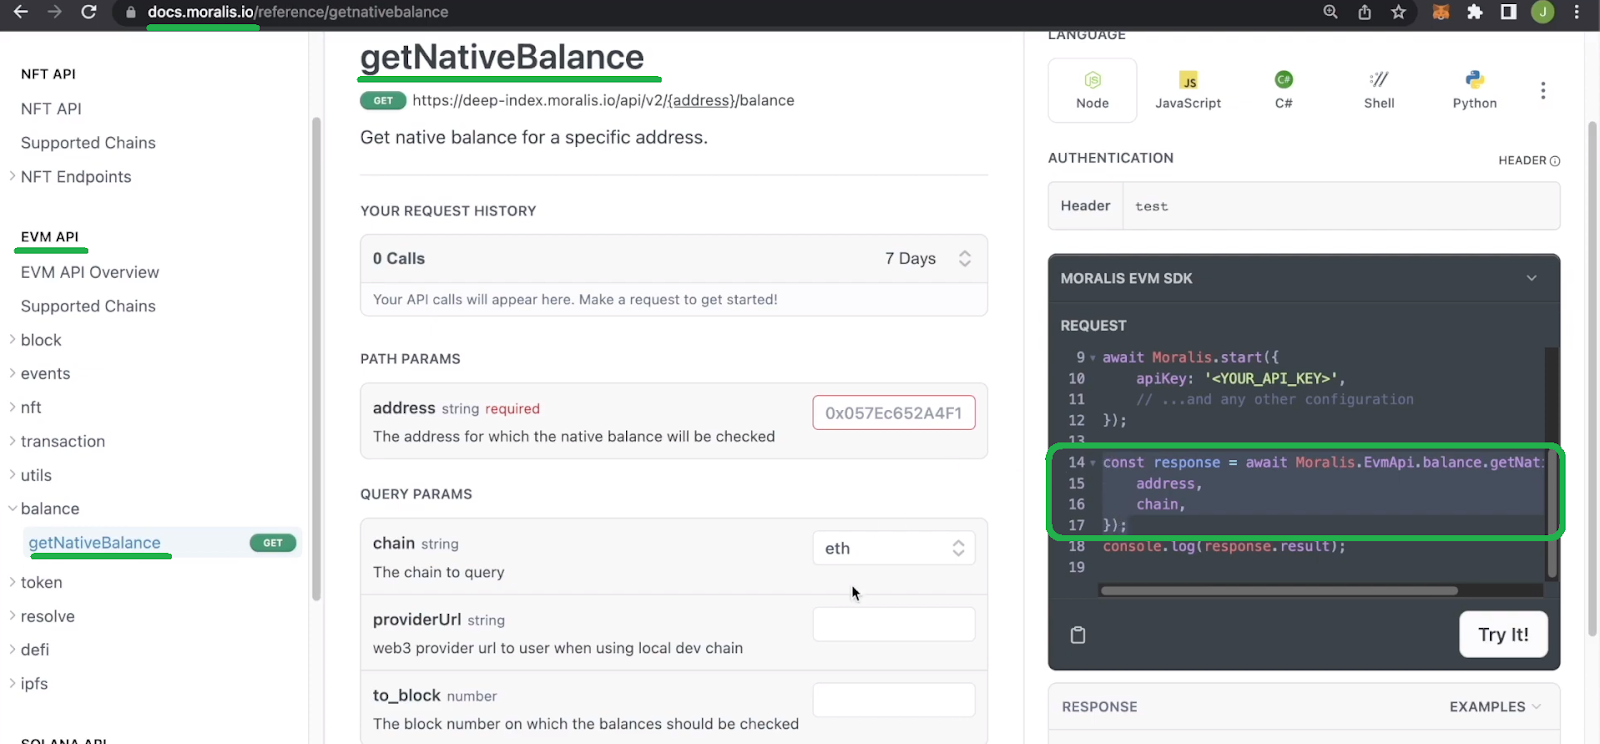
To clone Zapper performance, you need to add the related EVM API calls contained in the “index.js” file. Listed here are the traces of code to implement the “getNativeBalance” endpoint:

If you wish to see the above endpoint in motion, be sure to make use of the video on the backside of this text (14:24). Subsequent, beginning at 15:45, you’ll discover ways to get the USD worth of the native stability. That is the place the “getTokenPrice” endpoint will make issues fairly simple. After all, you’ll additionally want to make use of an “if” assertion to find out which is the at present chosen chain:

Now that your backend is ready to fetch the native stability and the worth of the native foreign money in USD, you’ll want to cross that to your frontend (19:04).
Clone Zapper – Going the Distance
On this part, you’ll get to implement ERC-20 balances, whole portfolio USD worth, pockets switch historical past, and displaying NFTs. As such, you’ll get so as to add the remainder of the functionalities to your Zapper clone. Beginning at 27:50 of the video under, our in-house skilled will present you how one can fetch and show ERC-20 balances. For this half, you’ll concentrate on the “getWalletTokenBalances” endpoint. Furthermore, you’ll additionally get to discover ways to filter out the tokens with extraordinarily low values (31:26). After all, additionally, you will use your frontend to show ERC-20 token balances (33:58).
Shifting ahead, you’ll discover ways to create a element displaying the portfolio’s whole USD worth. So far as the backend goes for this half, you have already got all the info you want. Therefore, this can be a fully frontend-focused process (40:45).
Subsequent, you’ll fetch a pockets’s switch historical past (44:57). Once more, you will have to maintain this side on the backend following the earlier two examples. Nonetheless, this time you’ll use the “getWalletTokenTransfers” endpoint. Furthermore, beginning at 56:27, you’ll discover ways to fetch NFTs with the “getWalletNFTs” endpoint. Then, at 1:06:27, you’ll get to implement NFT filtering options as offered within the demo above.
Final however not least, our in-house skilled will take you thru the frontend styling (1:14:21). That is the place you’ll get to clone the Zapper dashboard. By finishing this last stage, you’ll get acquainted with Moralis’ web3uikit. The latter allows you to implement varied frontend components with out breaking a sweat.
The way to Clone Zapper in Much less Than 1 Hour – Abstract
For those who went via all of the sections above and used the linked video tutorial, you now know how one can clone Zapper. Alongside the best way, you realized how one can arrange backend and frontend purposes and join the 2. You additionally realized how one can receive your Moralis Web3 API key. The latter is your gateway to utilizing the final word EVM API. Then, you used the “getNativeBalance”, “getTokenPrice”, “getWalletTokenBalances”, “getWalletTokenTransfers”, and “getWalletNFTs” endpoints to clone Zapper options. Lastly, you tweaked the styling of your instance dapp utilizing CSS and web3uikit.
With the ability to clone Zapper is sort of a helpful talent. It requires working with a few of the hottest Moralis Web3 API endpoints. So, you should use the abilities and information obtained herein to create other forms of DeFi dapps. Nonetheless, you might discover the Moralis YouTube channel and the Moralis weblog in case you want extra improvement follow. Other than varied DeFi dapp concepts, these are the locations to study extra about Web3 improvement. As an illustration, you can too concentrate on creating Web3 video games by combining the facility of Moralis with Unity or Firebase.
However, you might need to go full-time crypto sooner quite than later. In that case, turning into blockchain licensed could make a world of distinction. Therefore, be sure to think about enrolling in Moralis Academy. This on-line blockchain improvement schooling platform additionally gives you with a private examine path. Furthermore, that is additionally the place to get skilled mentorship and develop into a member of some of the advancing crypto communities.


