
Are you on the lookout for essentially the most environment friendly and efficient method to construct Polygon dapps? In that case, you may have come to the precise place! This text demonstrates the quickest method to construct Web3 apps utilizing Moralis’ Polygon boilerplate. This boilerplate acts as a Web3 web site template and permits a extra accessible growth course of permitting you to create Polygon dapps very quickly! To show the facility of Moralis and the Polygon boilerplate, we illustrate learn how to create a dapp the place customers can sign up and look at on-chain information concerning their Web3 pockets. Furthermore, if you wish to skip the tutorial and examine the undertaking’s code instantly, click on on the hyperlink beneath:
Full Polygon Boilerplate Documentation – https://github.com/ethereum-boilerplate/ethereum-boilerplate
When you click on on the hyperlink above, you’ll discover that the repository known as” ethereum-boilerplate”, which may be considerably complicated. Nevertheless, this template is cross-chain suitable, suggesting you need to use this to construct Polygon dapps alike. All you want is to make some configurations to the code, which we’ll cowl on this information.
However, the Polygon boilerplate supplies a extra accessible Web3 growth course of, enabling you to launch Polygon dapps extra effectively. Together with different Moralis instruments – resembling numerous Web3 APIs – you need to use this template to create dapps faster than the competitors and beat them to market! Irrespective of in case you are trying to create Polygon dapps with Moralis’ Polygon boilerplate – or another Web3 undertaking – take into account signing up with Moralis. With an account, you’ll obtain speedy entry to the varied Moralis instruments. What’s extra, you possibly can create your account freed from cost, which solely takes a few seconds!
Polygon Defined – What’s Polygon?
Ethereum is essentially the most distinguished blockchain for Web3 growth; nevertheless, the community has skilled points with congestion, which is the place the Polygon community enters the equation. Polygon is a decentralized scaling platform for the Ethereum community with the potential to resolve the congestion situation that Ethereum experiences.
Polygon supplies a extra economically viable and sustainable growth. Because of this, builders can create dapps at a decrease value. Furthermore, Polygon’s focus is on scalability and conserving transaction charges low. As Polygon is an Ethereum scaling platform, the community can obtain this with out sacrificing safety because it leverages the Ethereum chain. So, how precisely is Polygon in a position to accomplish this? To clarify, we’ll current a few of Polygon’s important options:
- Scalability – One of many important problems with Ethereum was scalability. Polygon can resolve this by offering a extra scalable consensus mechanism.
- Modularity – Polygon is modular. This implies the community is vulnerable to larger extensibility, upgradeability, and customizability.
- Consumer Expertise – Polygon seen an adoption situation: that the person expertise inside Web2 and Web3 differs. As such, Polygon delivers a person expertise much like that of Web2.
Furthermore, as Polygon and Ethereum are carefully interrelated, the networks have many similarities. One clear instance is token requirements. Polygon, similar to Ethereum, implements acquainted requirements resembling ERC-20 and ERC-721. In truth, MATIC – which is the native token of Polygon – implements the ERC-20 commonplace.
Now that you simply may be considerably extra conversant in the Polygon community, it s time to dive into the central a part of the article. Accordingly, the next sections will cowl your entire course of of making Polygon dapps with Moralis’ Polygon boilerplate!
How you can Construct Dapps with Moralis’ Polygon Boilerplate
With a greater understanding of Polygon, we’ll now take the next sections to showcase how simple it’s to construct Polygon dapps with Moralis’ Polygon boilerplate. In doing so, we’ll create a easy dapp the place customers can authenticate with their Web3 wallets. As soon as authenticated, they’ll be capable to entry info concerning their wallets. This consists of their transaction historical past, transfers of explicit tokens, balances, and so forth.

To make the tutorial extra complete, we’ll divide the information into 4 sections. First, we’ll present you learn how to clone the undertaking to your native listing. Following this, we’ll check out some vital configurations for the surroundings variables. Lastly, we’ll present you learn how to begin and check the dapp.
Furthermore, earlier than we get going with the tutorial, you will have to rapidly cope with a prerequisite, which is a Moralis account. You have to a Moralis account when configuring the surroundings variables. Nevertheless, making a Moralis account is simple and solely takes seconds. All that you must do is click on on the “Begin for Free” button on the high proper of the Moralis web site:

From there, enter an e mail, create a password, verify the “I settle for…” field, and hit the “Signal Up” button. What’s extra, that is solely free! Now, with a Moralis account at your disposal, we are able to transfer on and take a more in-depth have a look at cloning the Moralis Polygon boilerplate!
Cloning Moralis’ Polygon Boilerplate
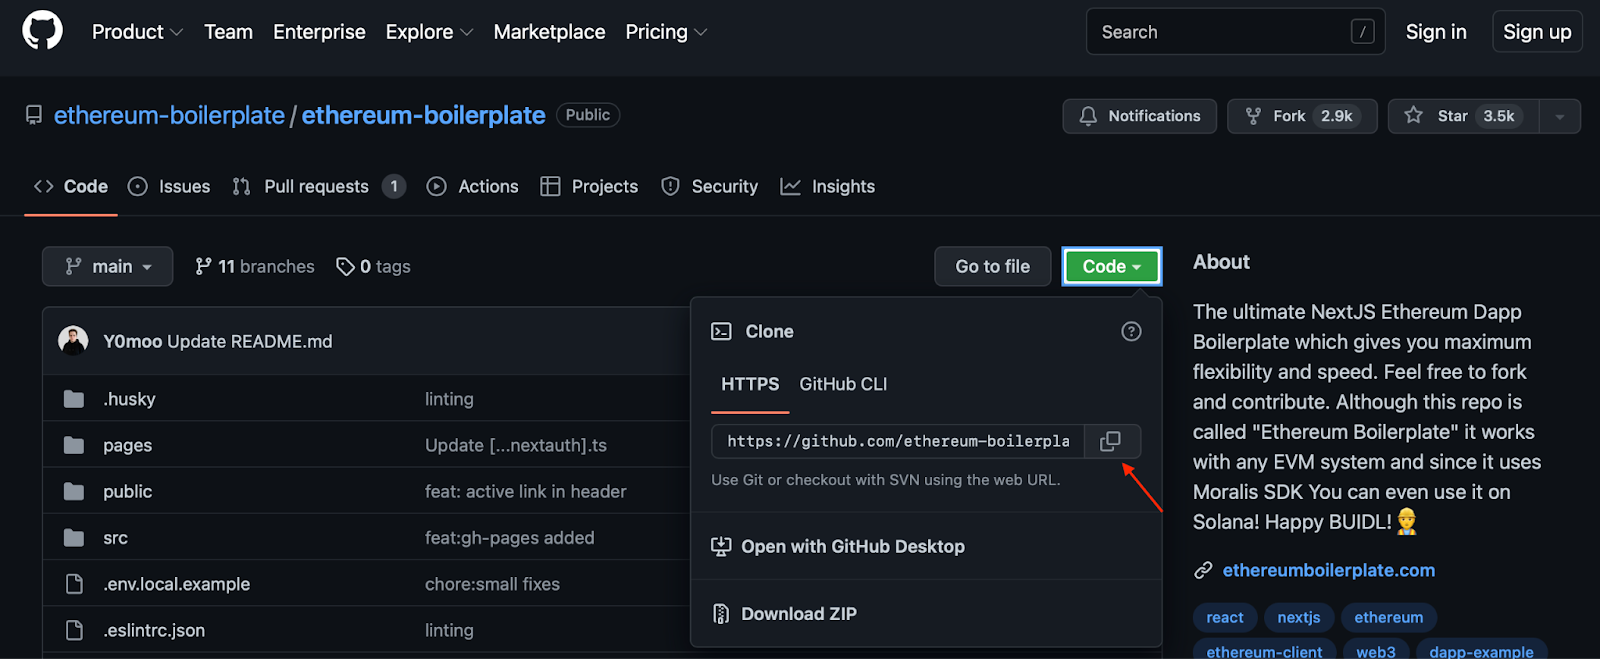
The primary a part of this information revolves round cloning Moralis’ Polygon boilerplate. As such, begin by navigating to the GitHub repository utilizing the hyperlink within the introduction. When you open the repository, you will have to repeat the repo URL by clicking on “Code” and the copy button:
Subsequent up, open your IDE (built-in growth surroundings) of selection and create a brand new folder for the undertaking. For this walkthrough, we’ll use VSC (Visible Studio Code). Please do not forget that in case you use any different IDE, some steps would possibly differ barely.
From there, open a brand new terminal. If you’re utilizing VSC like us, you are able to do so by clicking on the ”Terminal” tab after which ”New Terminal”:

Now, to clone the undertaking to your native listing, all that continues to be is to run the next command within the location similar to the undertaking’s folder and utilizing the repo URL:
git clone “BOILERPLATE_URL”
Working the command above will clone the Polygon boilerplate to your native listing. From there, you possibly can transfer into the right folder as soon as once more by inputting the next into the terminal:
cd ethereum-boilerplate
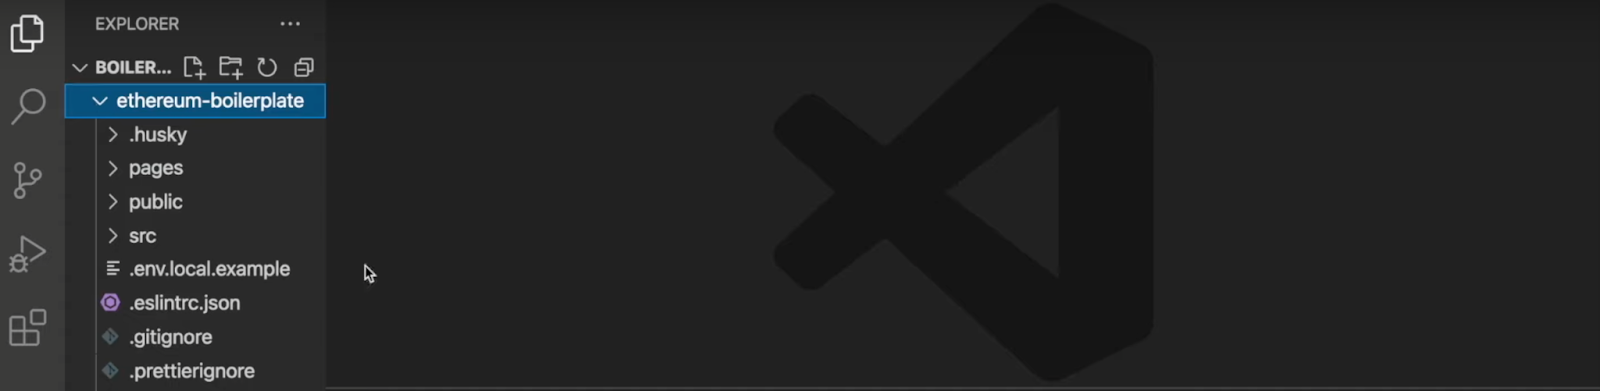
When you adopted the steps on this preliminary part, it ought to end in a construction much like this in your IDE:
Configuring Surroundings Variables
This part will cowl all of the configurations that you must make to the surroundings variables. So, you possibly can proceed by opening the ”.env.native.instance” file and renaming it to ”.env.native”. Furthermore, that is initially what the file seems to be like:
APP_CHAIN_ID=0x1
APP_DOMAIN=ethereum.boilerplate
MORALIS_API_KEY= # Get your KEY https://admin.moralis.io/account/profile
NEXTAUTH_SECRET= # Linux: `openssl rand -hex 32` or go to https://generate-secret.now.sh/64
NEXTAUTH_URL=http://localhost:3000 # change for manufacturing
As you possibly can see from the snippet above, there are 5 surroundings variables. Nevertheless, on this occasion, you’ll solely want to think about the primary, third, and fourth variables. Let’s begin with the primary one known as ”APP_CHAIN_ID” with the worth ”0x1”. You will need to change this worth as ”0x1” corresponds to the Ethereum blockchain. As such, change ”0x1” with ”0x89”, the chain ID for the Polygon community.
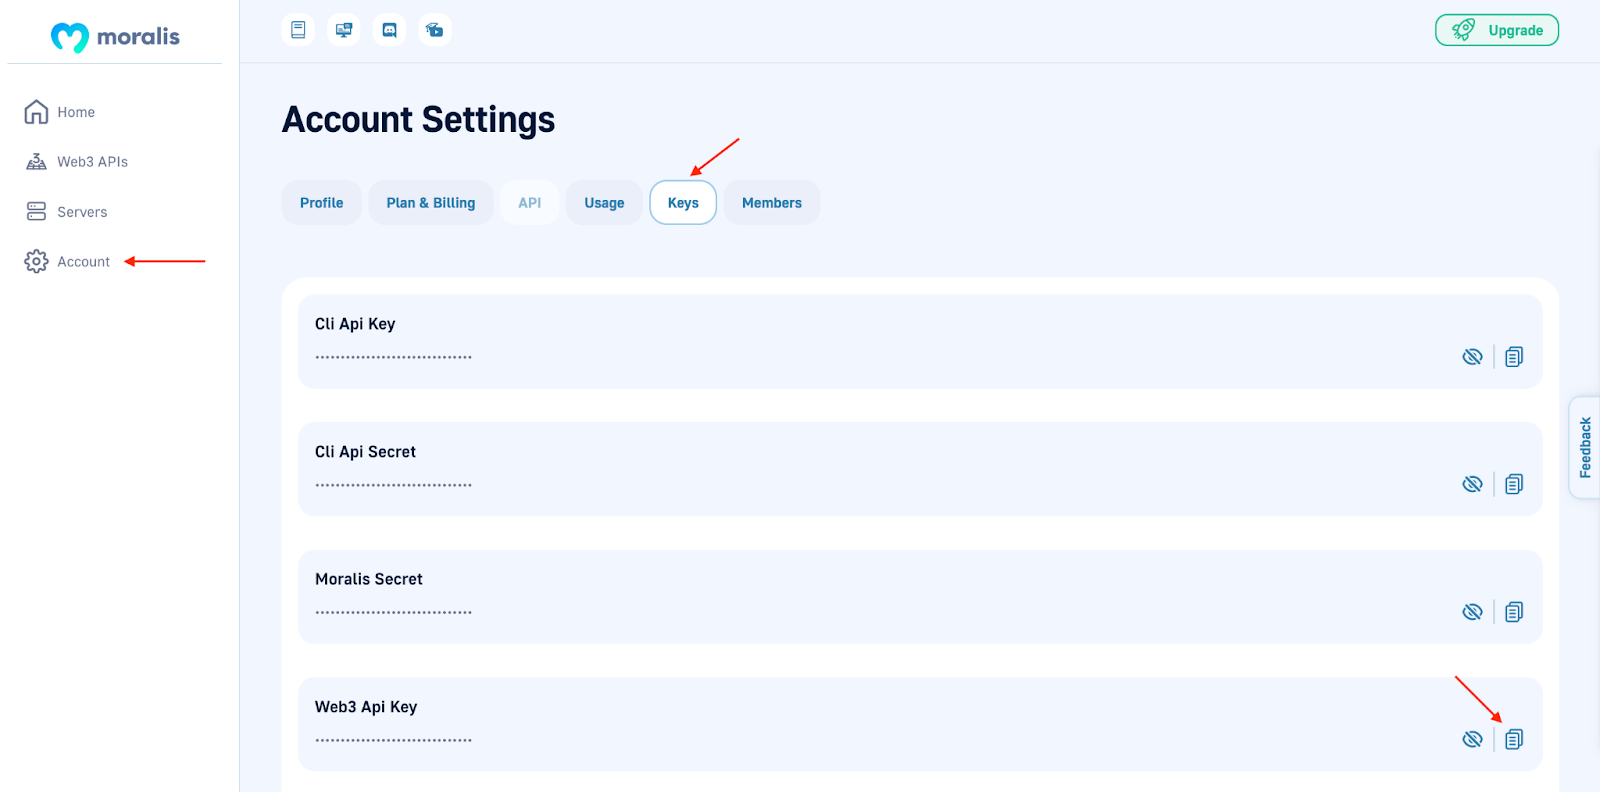
To the third ”MORALIS_API_KEY” variable, you should add your API key, which is the place your Moralis account comes into the image. As such, progress by logging in, clicking on the ”Account” tab, then ”Keys”, and copying the Web3 API key:
From there, merely paste your API key into the code. The ultimate variable that you must configure is ”NEXTAUTH_SECRET”. It’s essential add a secret key to this variable, and you need to use this hyperlink to generate a worth: “https://generate-secret.now.sh/32“. With a secret key at hand, enter the important thing into the code in order that the ”NEXTAUTH_SECRET” equals this worth.
The final variable, ”NEXTAUTH_URL”, is about to ”http://localhost:3000”. This can means that you can run the Polygon dapp on a neighborhood host. That is nice through the growth phases; nevertheless, as quickly as you launch the dapp, that you must change this worth to equal your dapp’s URL.
However, beneath, you’ll discover an instance of what the code for the ”.env.native” file would possibly seem like:
APP_CHAIN_ID=0x89
APP_DOMAIN=ethereum.boilerplate
MORALIS_API_KEY= “YOUR_API_KEY”
NEXTAUTH_SECRET= b8e786967d7bcbc0f920d35bcc3f891c
NEXTAUTH_URL=http://localhost:3000
Beginning the Dapp
Now, the Polygon dapp is actually finalized! Due to Moralis and the Polygon boilerplate, it doesn’t need to be tougher than that. All that continues to be now could be so that you can begin and check the appliance. As such, we’ll briefly take this part to point out you learn how to launch the appliance.
Nevertheless, earlier than beginning the Polygon dapp, you should set up numerous dependencies. As such, run one of many following instructions in a terminal (relying in case you are utilizing “npm” or “yarn“):
npm i
yarn
Subsequent up, you possibly can run the dapp on a neighborhood host with both of the next inputs:
npm run dev
yarn run dev
With the dapp up and operating, you possibly can launch it utilizing the URL you specified earlier: “http://localhost:3000“. Within the subsequent part, we’ll be sure that every thing works and canopy a few of the important options of Moralis’ Polygon boilerplate!
Testing the Dapp – Exploring Moralis’ Polygon Boilerplate
When you begin the Polygon dapp, you’ll arrive on the following touchdown web page:

Because the picture above illustrates, there are a number of tabs and buttons on the high so that you can discover. Nevertheless, earlier than exploring the varied choices, you’ll initially have to authenticate your Web3 id by clicking on the ”Join Pockets” button:

This can begin your MetaMask pockets and will let you signal a message. Nevertheless, MetaMask is just the default Web3 authentication mechanism of the Polygon boilerplate. With Moralis, it’s attainable to combine different choices simply. If this pursuits you, discover ways to, for instance, add an indication in with RainbowKit.
As soon as authenticated, the dapp will populate with all types of data concerning your Web3 pockets. As such, in case you, as an example, click on on the ”Transactions” tab on the high, you’ll discover a desk displaying your transaction historical past:

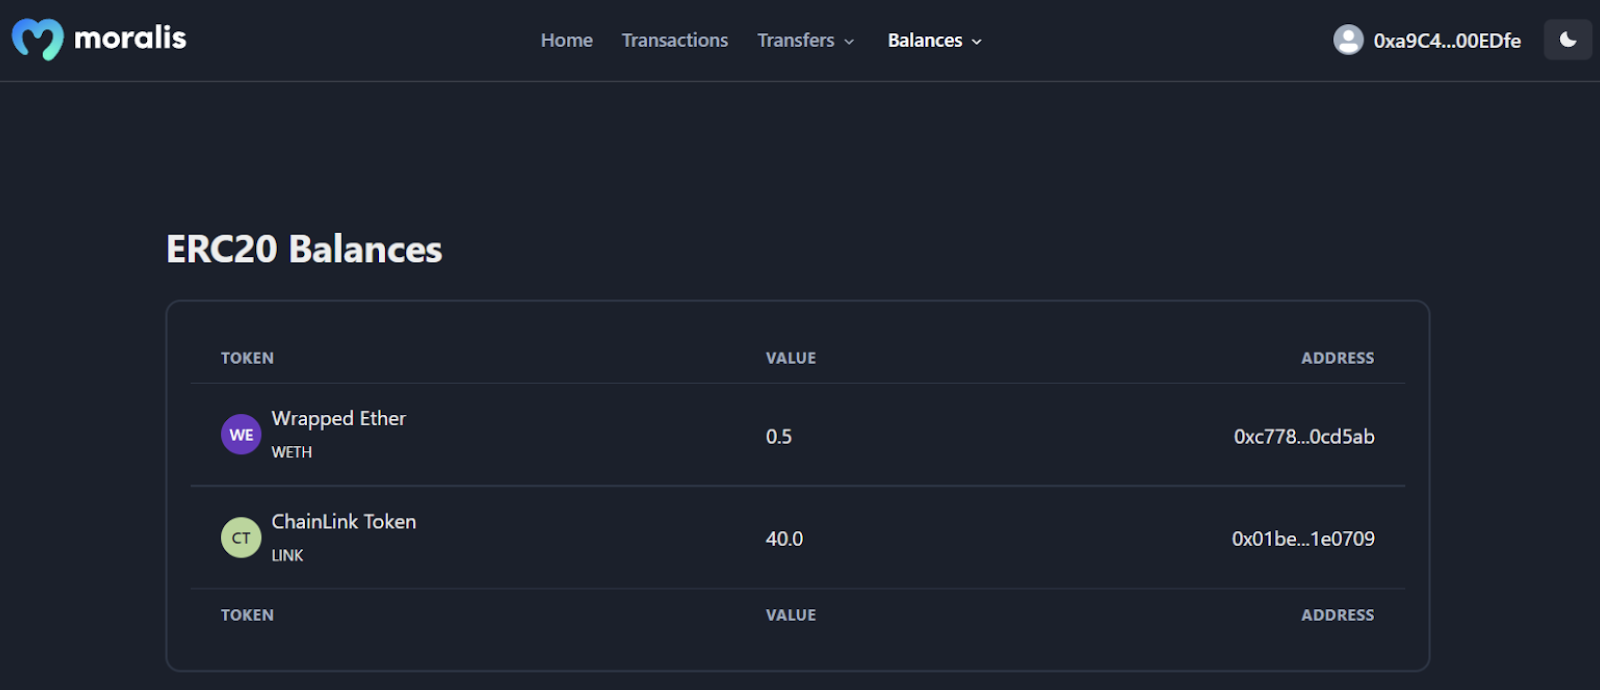
It’s also possible to discover the opposite tabs resembling ”Transfers” and ”Balances”. These characteristic a small menu that means that you can filter between NFTs and ERC-20 tokens. When you have been to click on on ”Balances”, it might look one thing like this:

From there, you possibly can select both token kind. For instance, if the ”ERC-20” possibility is chosen, the dapp will show all of the tokens within the pockets:
This principally covers the important options of the Polygon boilerplate. If every thing labored as meant, it’s now as much as you so as to add or take away options! Furthermore, in case you want inspiration, try Moralis’ Web3 weblog. The weblog options recent and thrilling Web3 growth content material. For instance, discover ways to construct a Web3 FIFA clone or create an NFT gated web site.
Nevertheless, if questions concerning the method stay, try the next clip from Moralis’ YouTube channel explaining every thing we’ve examined on this article in additional element:
Abstract – Construct Dapps with Moralis’ Polygon Boilerplate
On this article, we confirmed you learn how to construct a Web3 app utilizing Moralis’ Polygon boilerplate. The template means that you can simply create Polygon dapps in minutes! In truth, all that you must do is clone the Polygon boilerplate, configure some surroundings variables, and begin the Polygon dapp.
Doing so ends in a simple utility the place customers can sign up with their Web3 wallets. As soon as signed in, they’ll view info concerning their wallets, together with transaction historical past, transfers for sure tokens, balances, and so forth. As such, it supplies an amazing basis for any dapp, and all you will have to do is tailor the template by including/eradicating options!
When you discovered this text useful and wish guides for different networks, try both of the next articles on learn how to construct an Ethereum dapp or construct a Cronos dapp. These guides leverage the implausible instruments of Moralis, facilitating a extra accessible growth expertise. In case you have additional curiosity and need to be taught extra about Moralis’ instruments, we suggest that you simply, for instance, try Moralis’ Web3 Streams API or the Solana API.
Moreover, if you wish to begin your Web3 growth journey and construct your personal initiatives, take into account Moralis Academy. By enrolling, you possibly can grow to be blockchain licensed and begin constructing your first dapps very quickly! For instance, in case you are new to the house, try the next course protecting the basics: ”Blockchain & Bitcoin 101”.
However, it doesn’t matter if you wish to construct utilizing Moralis’ Polygon boilerplate or another undertaking; join with Moralis and entry the varied growth instruments as they’ll help in any growth course of!


