Predicting the longer term is one thing none of us can accomplish. Nonetheless, with a crypto sentiment dapp, customers can vote and, in flip, give their enter relating to the place the value of an asset is heading, for instance. Should you’d wish to construct such a dapp (decentralized utility), learn on! By following our lead, we are able to create a crypto sentiment dapp in lower than 70 minutes. As well as, you’ll discover ways to write, compile, deploy, and confirm Solidity good contracts utilizing Hardhat. We are going to use React to construct a easy single-page internet utility for a neat frontend. Additionally, we’ll use web3uikit – the main Web3 UI library for Web3 apps. Though, probably the most valuable takeaway from our tutorial is studying about Moralis!
With Moralis – the final word Web3 backend platform – you get to avoid wasting a median of 87% in your growth time. Additional, with this “Firebase for crypto” platform, you’ll be able to change into a Web3 developer utilizing your present frontend abilities. That’s how JavaScript and Unity-proficient devs have been deploying killer dapps for some time now. Sure, that’s proper, you not must cope with all the restrictions of RPC nodes. As an alternative, you utilize Moralis’ single workflow and, thus, take advantage of out of the present Web3 tech stack. Upon getting the Moralis SDK linked to your utility, you’ll be able to simply cowl blockchain-related backend programming with quick snippets of code. That is the place Moralis’ documentation makes issues as easy because it will get. Furthermore, Moralis permits you to get began at no cost. Therefore, create your free Moralis account and be a part of us as we create a crypto sentiment dapp!

Our Crypto Sentiment Dapp – Demo
Transferring ahead, we need to ensure you know what to anticipate from our Web3 app. Therefore, we’re about to have a look at a demo of our completed crypto sentiment dapp. As such, it is possible for you to to resolve if you wish to commit your worthwhile time to this instance mission.
So, right here’s our single-page dapp:
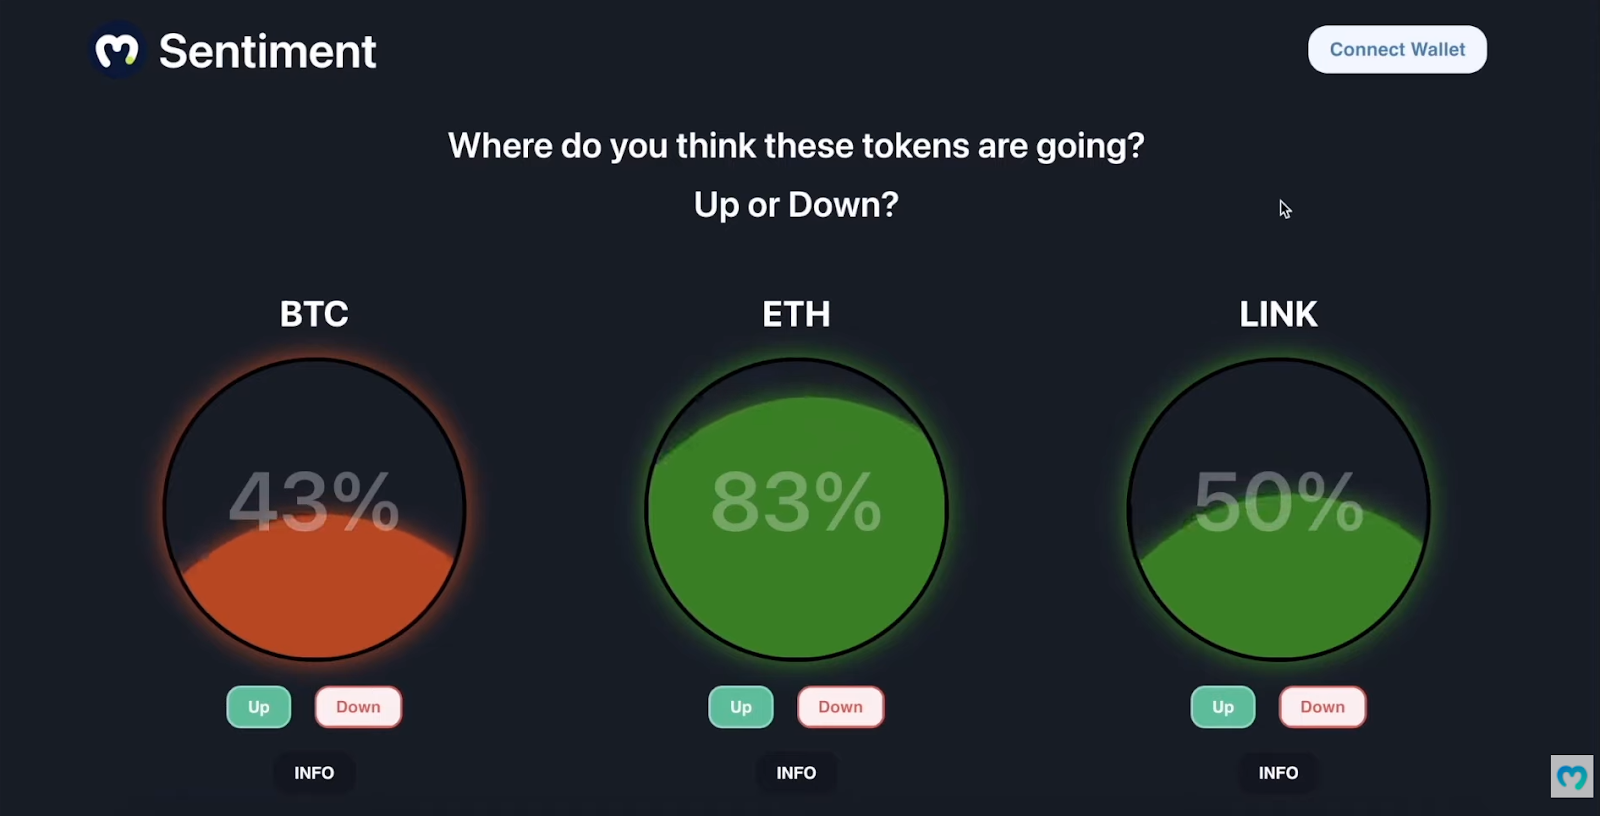
As you’ll be able to see from the screenshot above, our crypto sentiment dapp provides a clear design, and its UI is sort of intuitive. Nonetheless, what you’ll be able to’t see within the picture above, is that the bubble’s “liquid” for every cryptocurrency is animated. As such, you would possibly need to take a look at the video on the finish of this text (0:19). Apart from the three cryptocurrencies displayed above (BTC, ETH, and LINK), our dapp covers different main cash and tokens. They’re displayed as customers scroll additional down the web page:
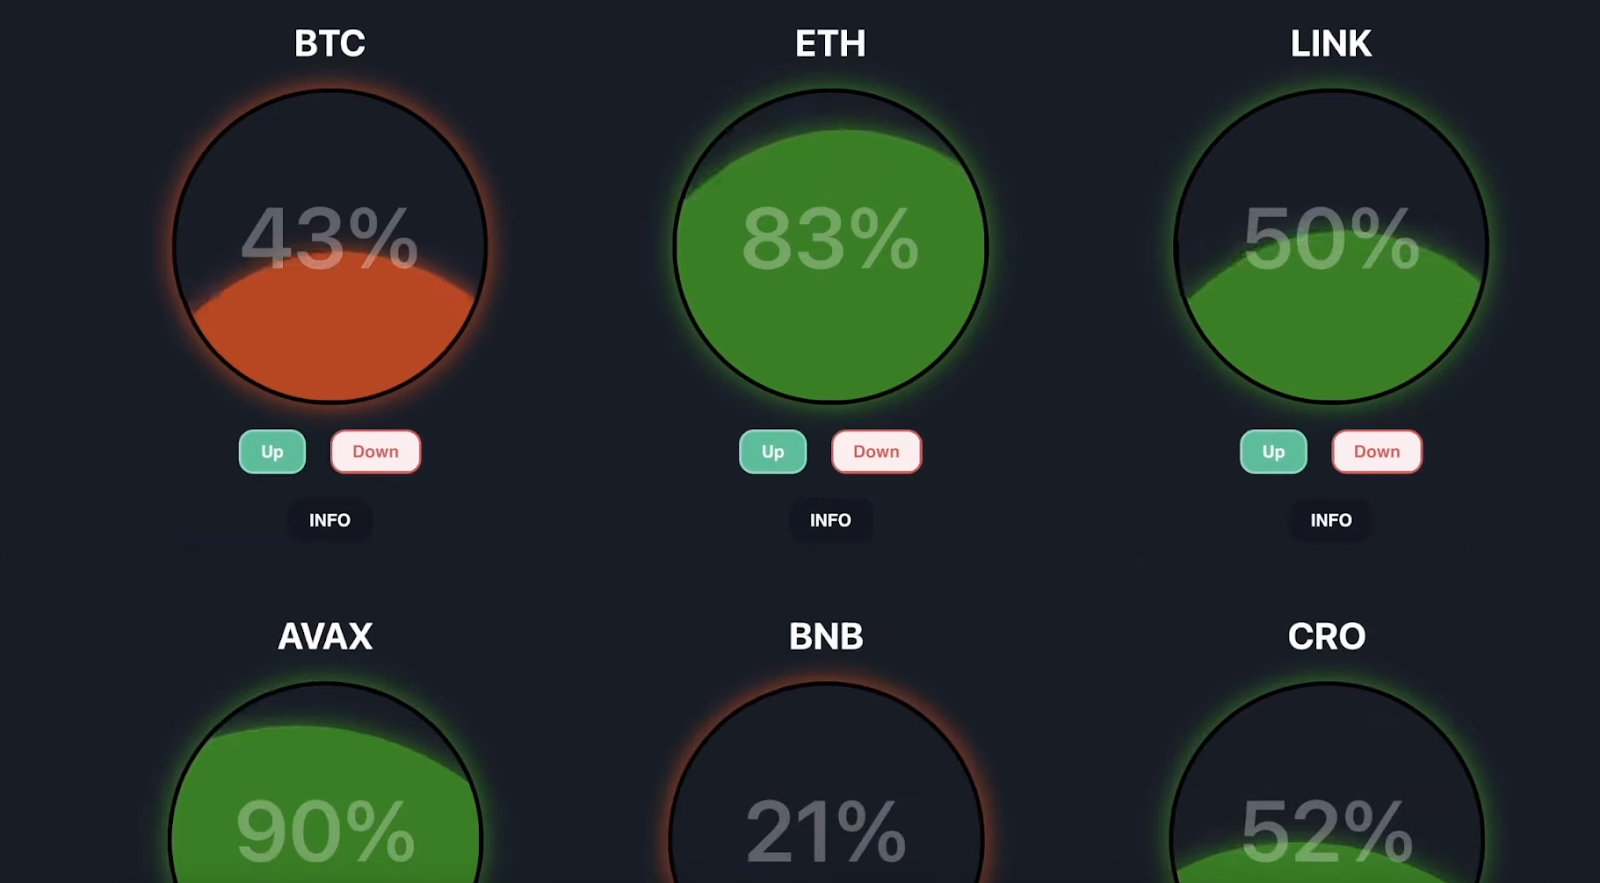
We are able to simply add different cash. Moreover, the odds contained in the bubbles point out voters’ opinions. The upper numbers (inexperienced “liquids”) point out that almost all of voters imagine the coin’s worth will go up. Then again, the decrease percentages (purple “liquids”) signify that the majority voters imagine the value will decline. As well as, there are a number of buttons inside our dapp. Within the top-right nook, we now have the “Join Pockets” button, which takes care of Web3 authentication. Then, there are three buttons for every coin: “Up”, “Down”, and “INFO”. If customers click on on the data button, they get to see the present worth of that coin and its description:
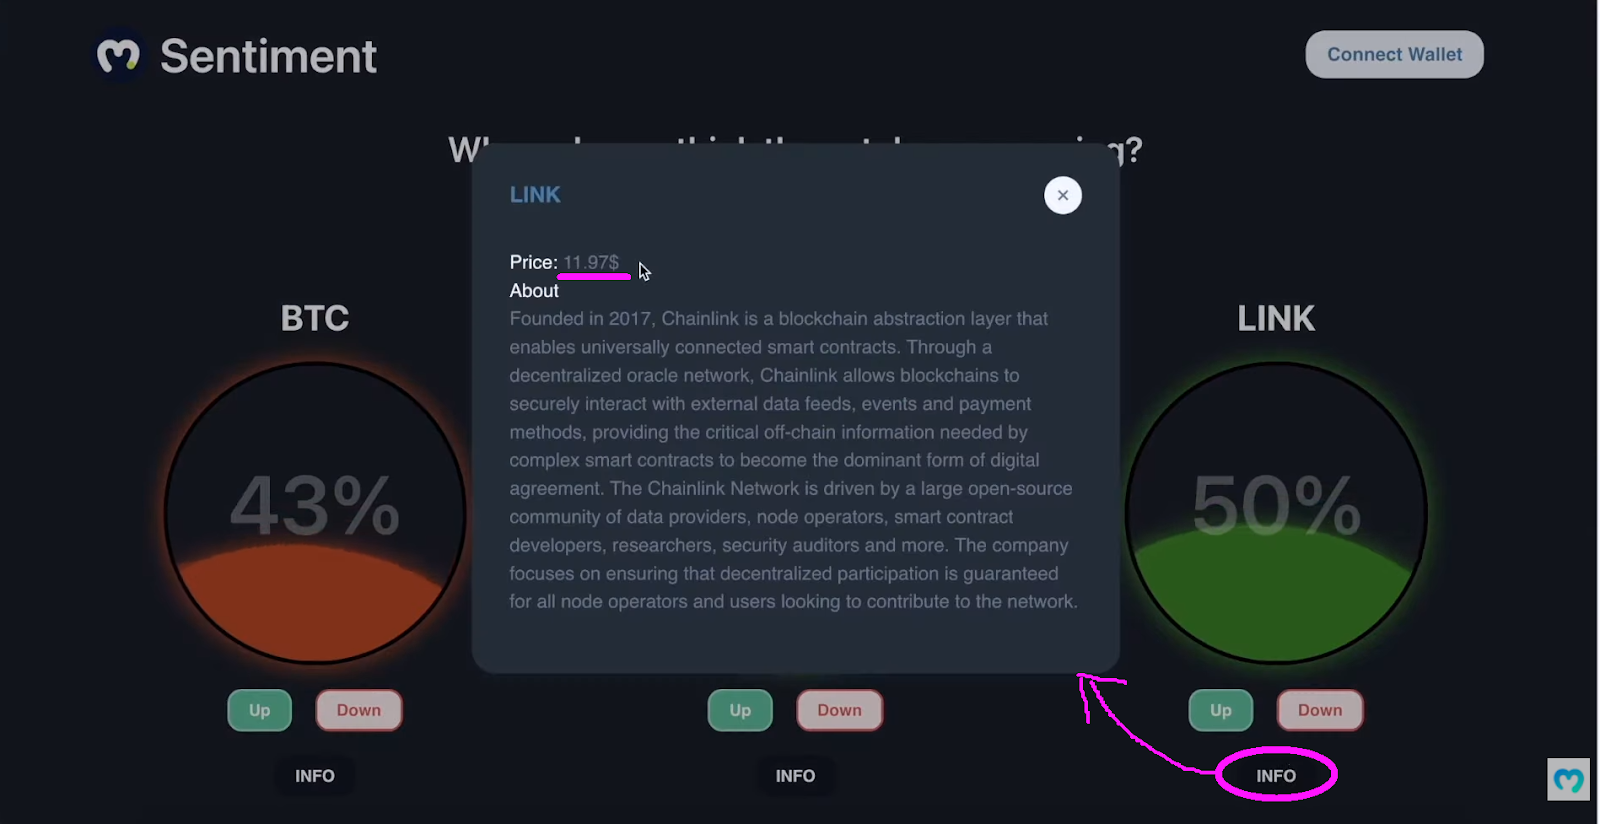
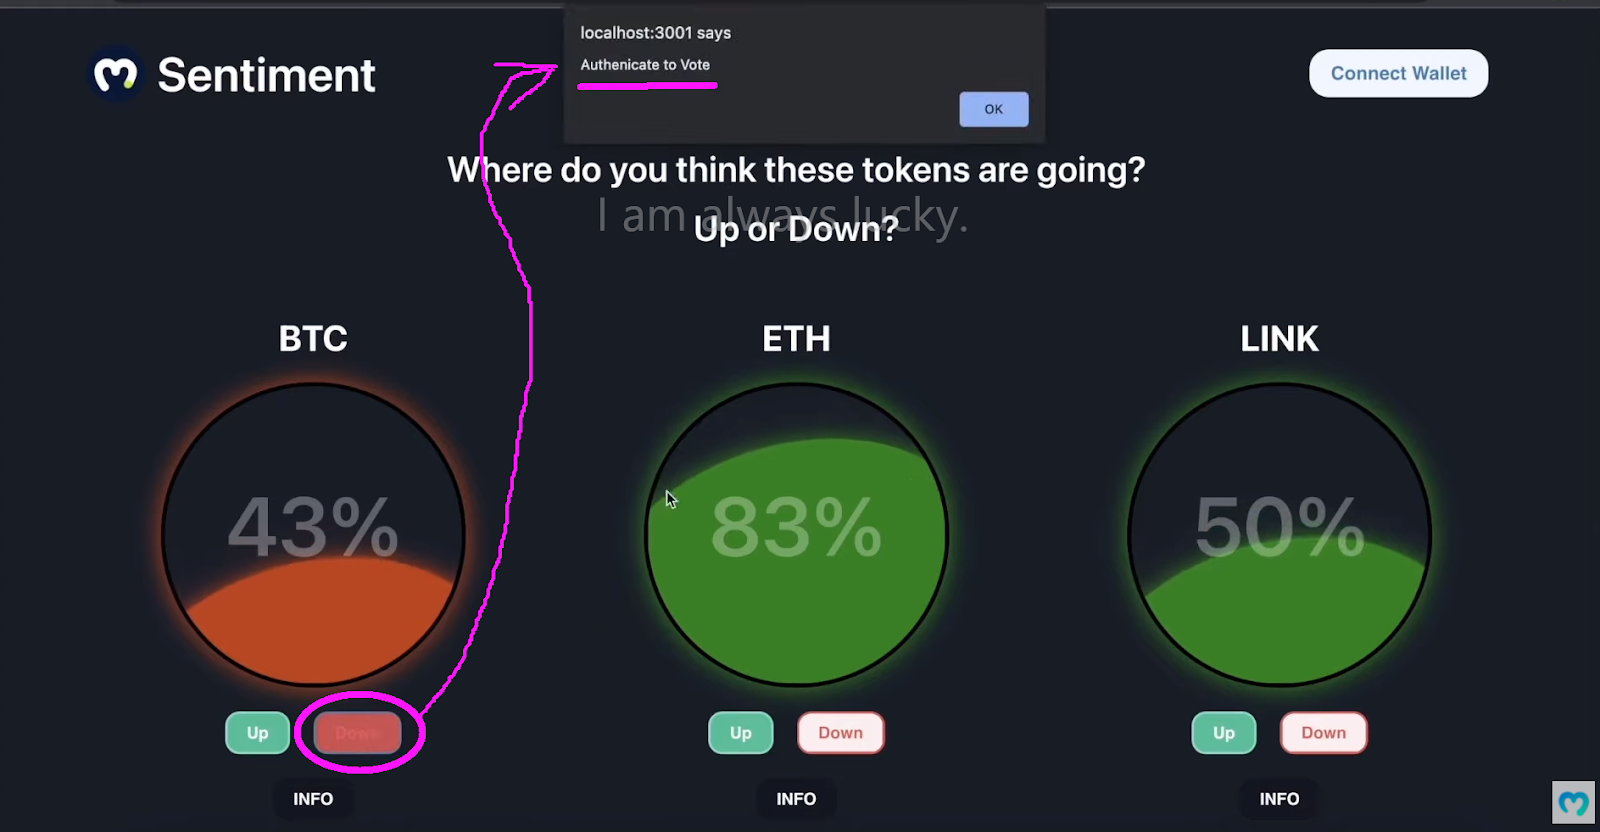
We get to show the costs effortlessly, because of the Moralis Web3 API. Whereas “data” is out there to all customers, voting is restricted to those that full Web3 login:
Web3 Authentication and Voting Inside Our Crypto Sentiment Dapp
Customers should log in to put their votes utilizing our good contract as demonstrated above. Therefore, they should use the “Join Pockets” button first:
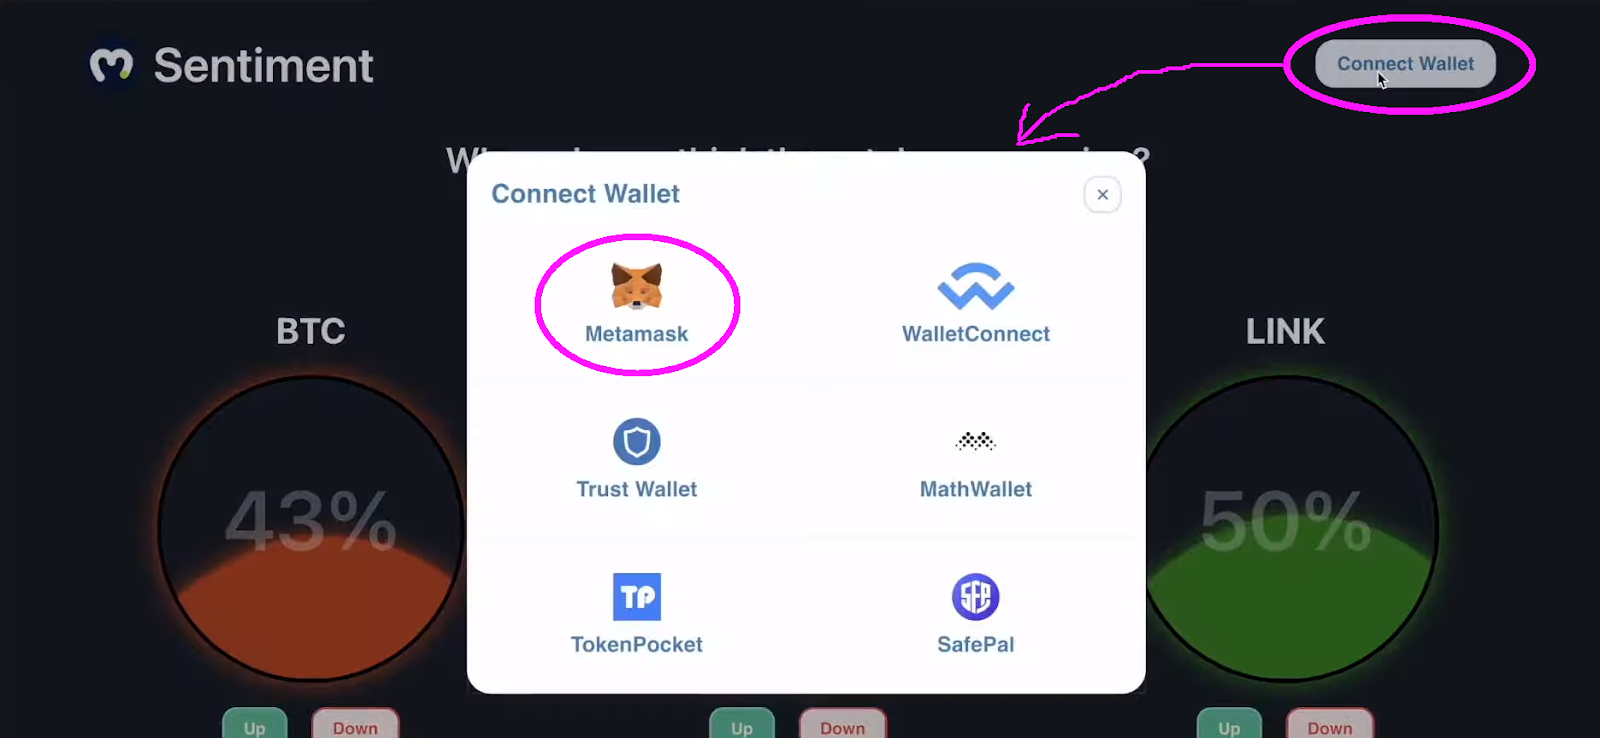
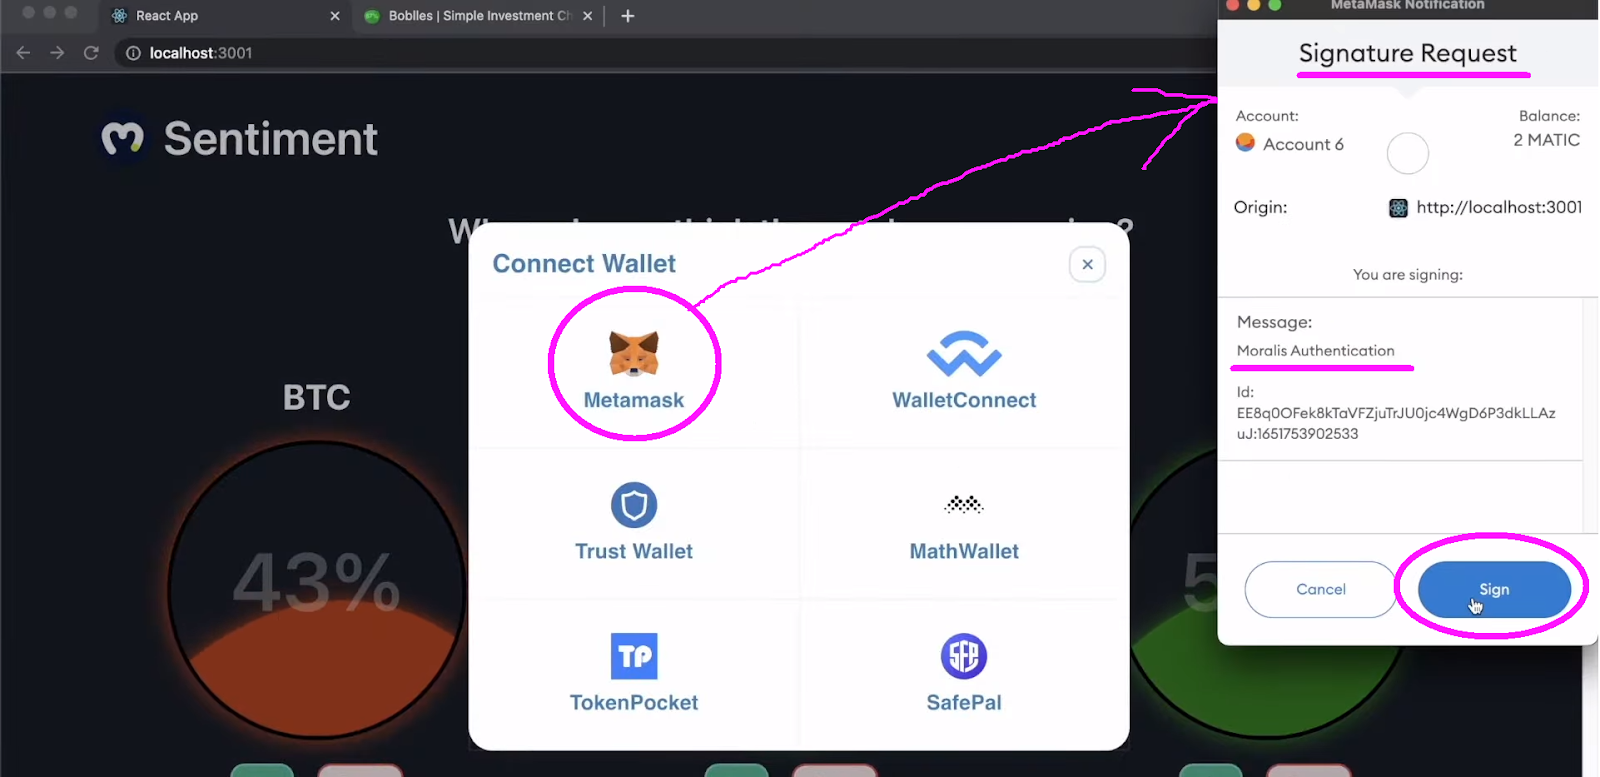
You possibly can see within the above screenshot that the instance person determined to make use of the MetaMask Web3 pockets. Thus, his MetaMask extension prompts him with a signature request. So, the person must click on on the “Signal” button to authenticate with MetaMask efficiently:
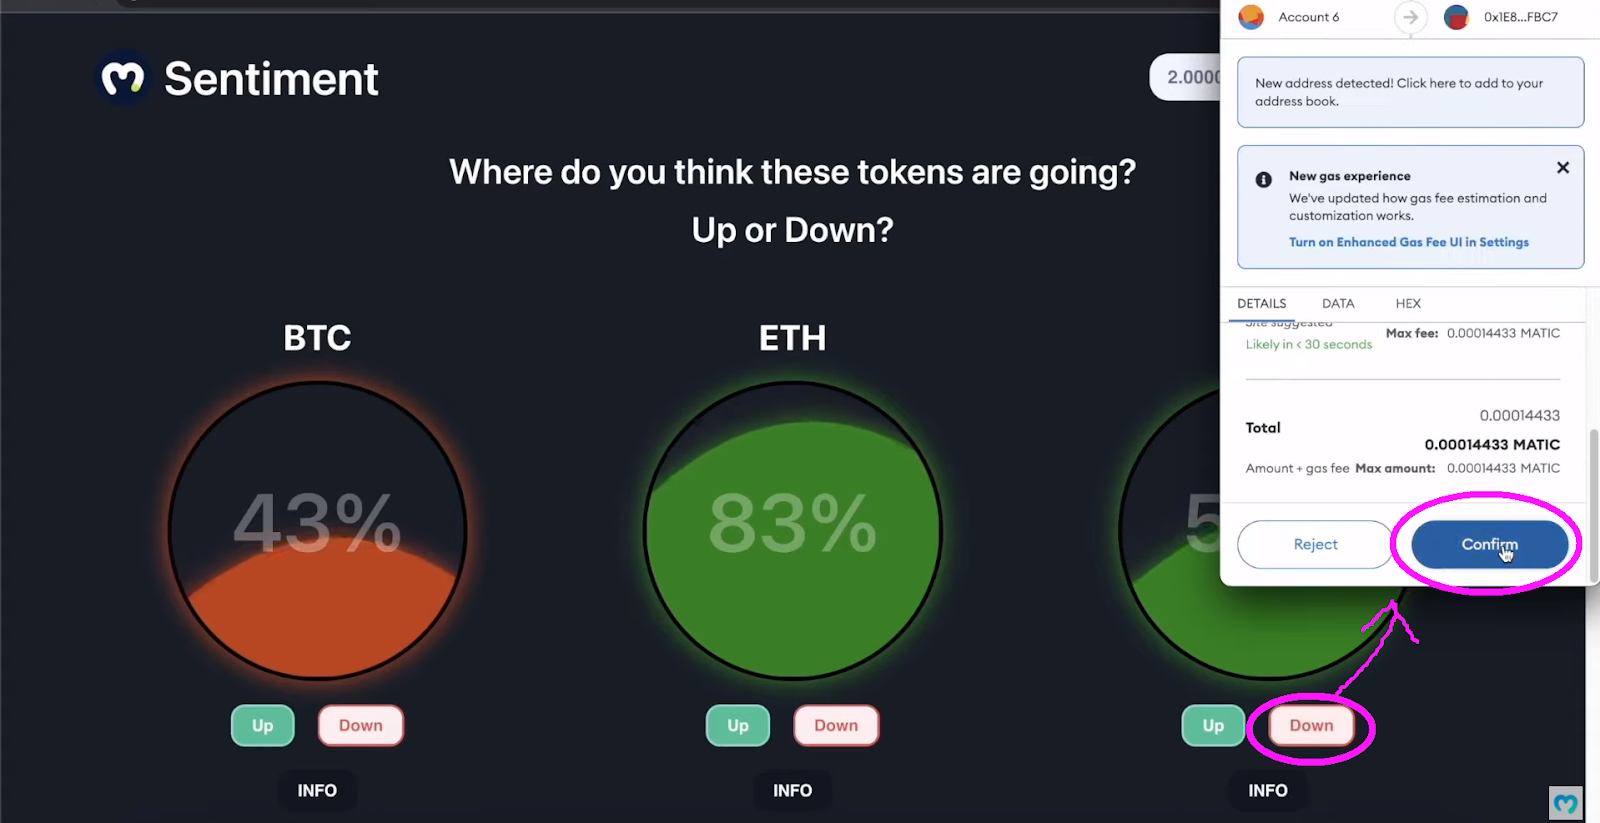
Now that the instance person is signed in, he can use the “Up” and “Down” buttons to submit his votes. So, if, for instance, the person decides to down-vote LINK, he must click on on the “Down” button. Since that is on-chain voting, his vote must be confirmed by an on-chain transaction. Accordingly, his MetaMask extension involves play once more:
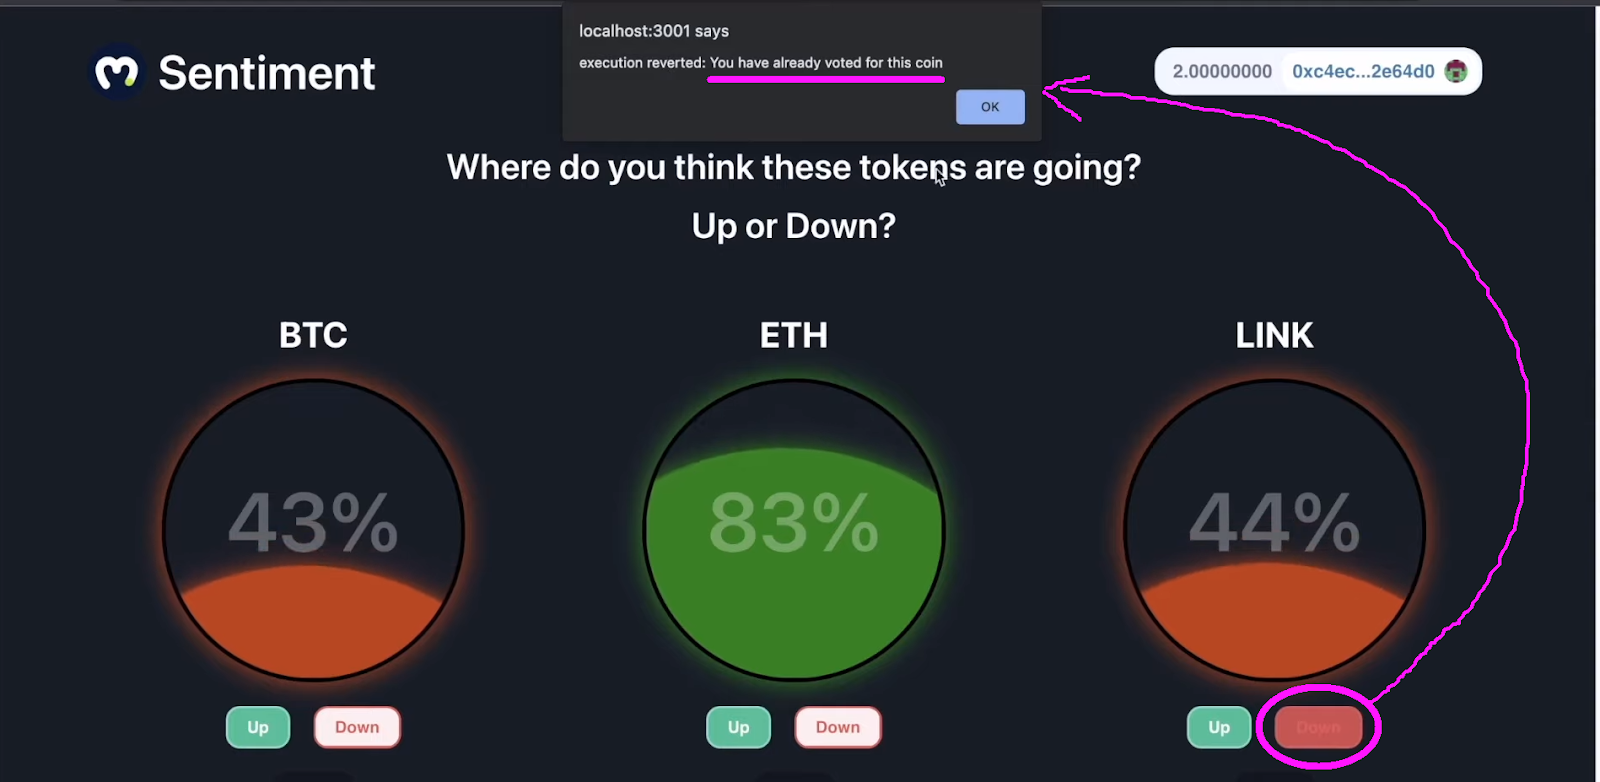
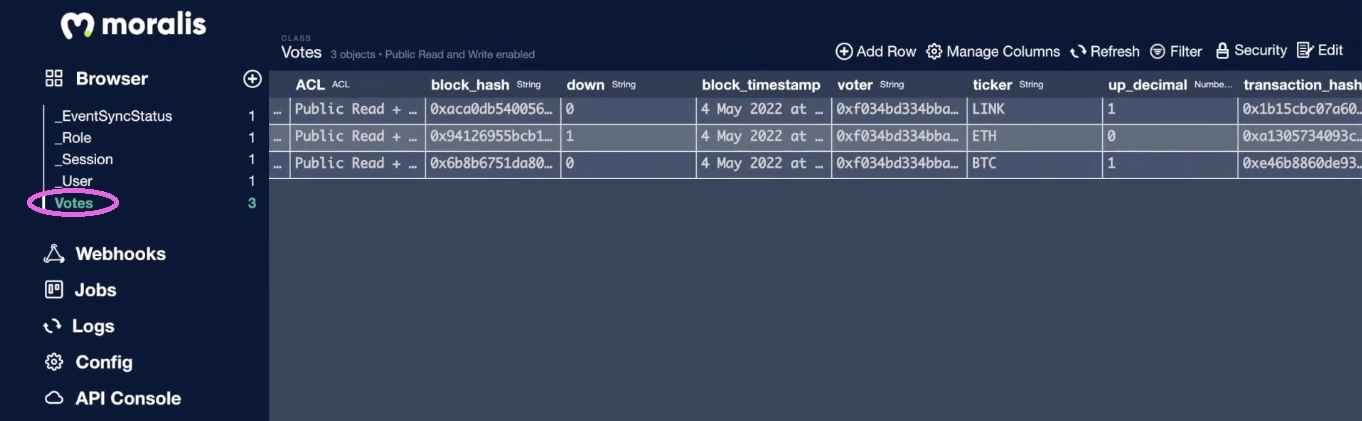
As quickly because the person confirms the above transaction, his vote is accounted for. That is the place the Moralis dashboard comes into the image, because it permits us to index the blockchain simply. Furthermore, we’ve set correct guidelines in place to permit customers to vote solely as soon as per cryptocurrency. As such, if the identical person tries to vote for LINK once more, he will get the next notification:
So far as the UI demonstration of our instance crypto sentiment dapp goes, the above wraps it up. Nonetheless, to point out you that the above transactions are precise on-chain occasions, let’s use PolygonScan (testnet).
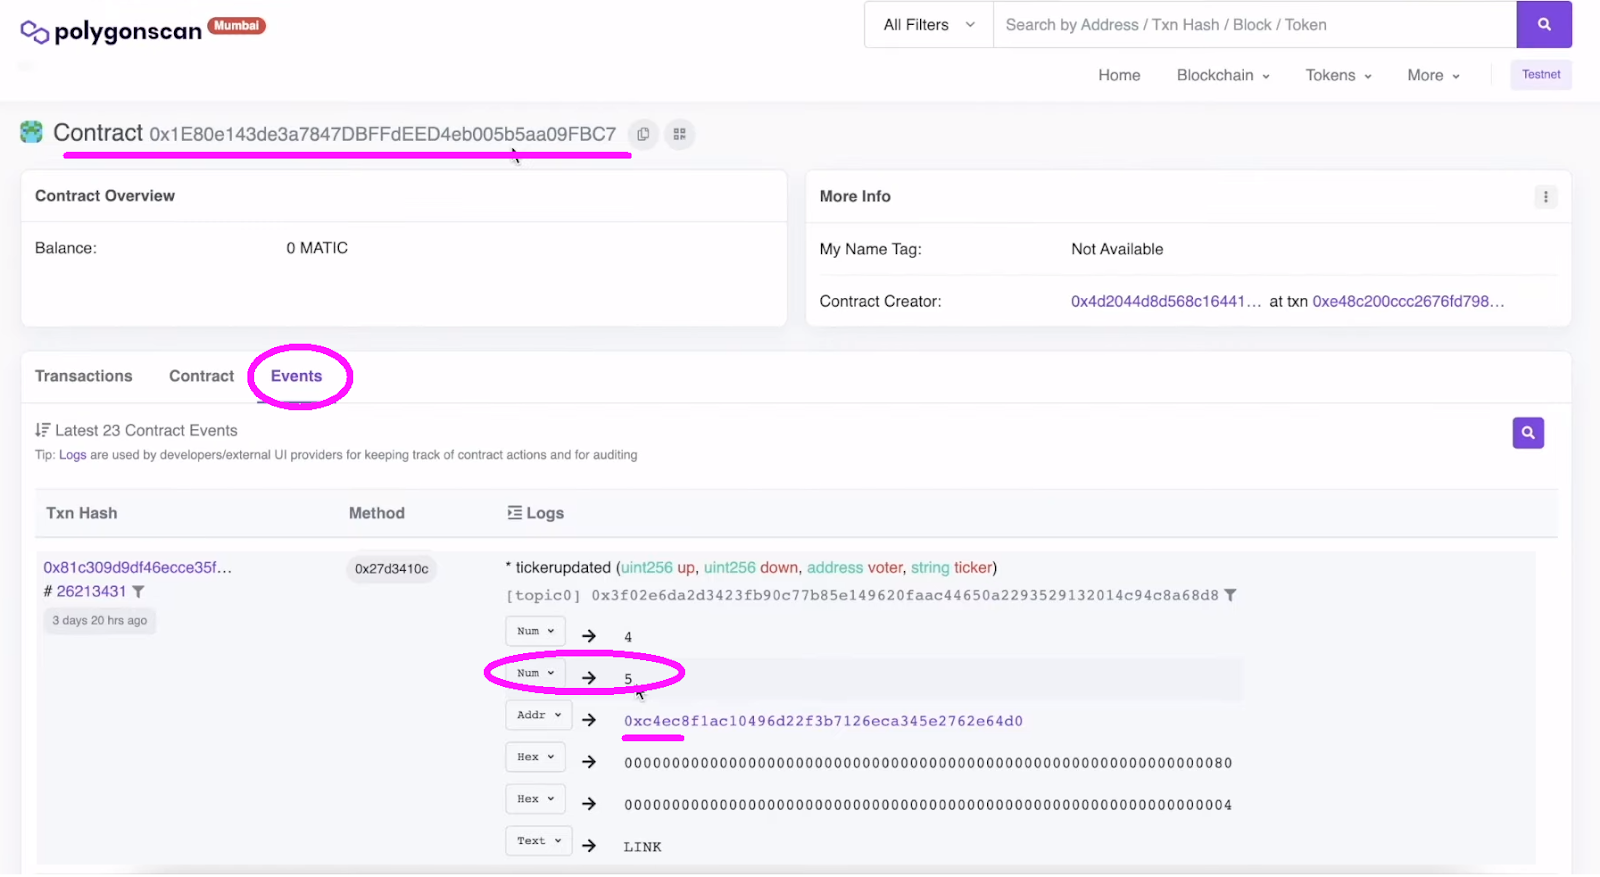
The above screenshot clearly reveals our good contract’s occasion associated to the LINK downvote. Since these occasions play an important position in our dapp, transferring ahead, you’ll discover ways to sync and index good contract occasions.
Create a Crypto Sentiment Dapp with Hardhat, React, and Moralis
Now that you simply’ve seen what an unimaginable dapp we’re about to construct, you should be wanting to get your arms soiled. With out additional ado, let’s get began and create a crypto sentiment dapp!
Notice: The next directions, together with the video under that we’ll be referencing transferring ahead, presume that you simply begin with our starter code. Nonetheless, use our remaining code in case you are in a rush and wish to create your personal occasion of the above-presented crypto sentiment dapp in minutes.
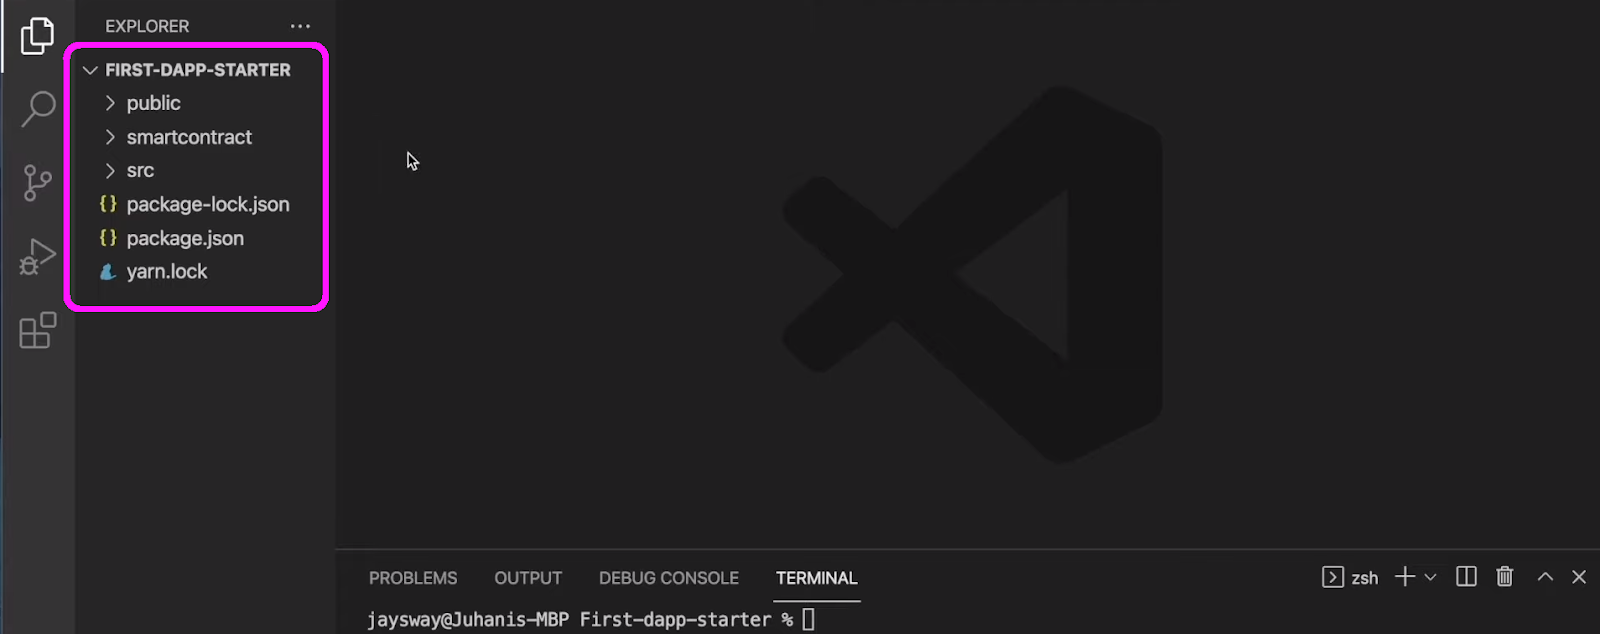
When you clone our starter code, you’ll be wanting on the following mission structure:
Furthermore, you already know that we’ll use Hardhat to handle our good contract. Thus, we have to cowl some Hardhat-related preliminary setups. We begin by navigating to the “smartcontract” folder utilizing the “cd smartcontract” command. Subsequent, we set up Hardhat with “npm i -D hardhat”:

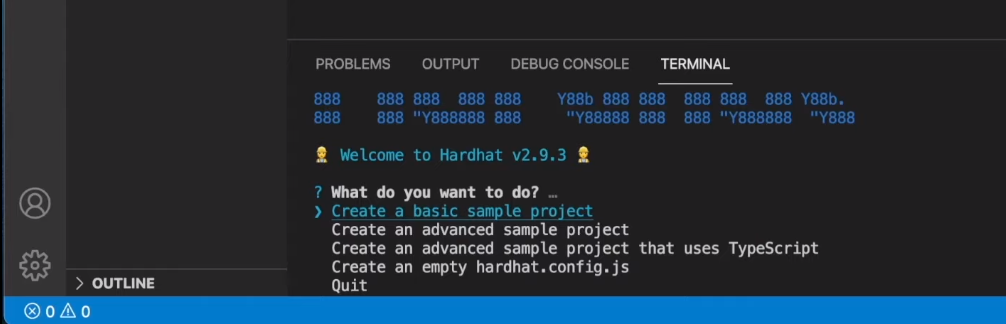
Then, we provoke a brand new Hardhat mission utilizing the “npx hardhat” command. Following this command, we have to choose “Create a primary pattern mission” and hit “enter” a few instances:
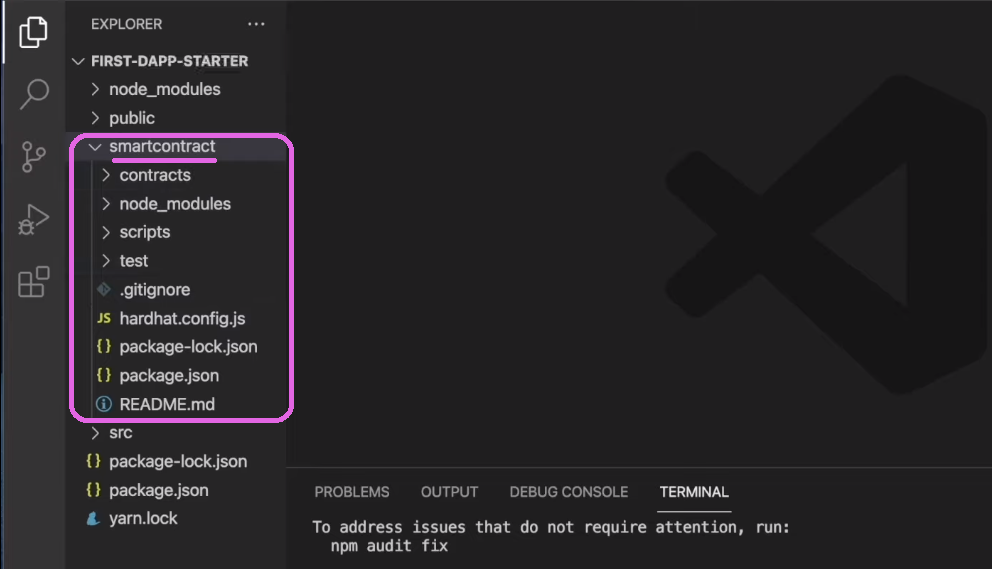
As soon as we create a brand new Hardhat mission, we are able to additionally see that the “smartcontract” folder now incorporates new components:
Nonetheless, there are another dependencies we have to set up. Therefore, we use the terminal to enter “npm i -D dotenv” and “npm i -D @nomiclabs/hardhat-etherscan“. With the preliminary setup accomplished, we are able to deal with the good contract that can energy our dapp.
Sensible Contract Behind Our Crypto Sentiment Dapp
First, we should open the “Greeter.sol” file, delete its content material, and rename it to “MarketSentiment.sol”. If this isn’t your first rodeo with Solidity, you recognize that we should begin with the “pragma” line.
Following this, we now have “contract”, which marks the precise starting of the good contract (6:12). In case you need to write the contract your self and really perceive its elements, use the video tutorial under. Nonetheless, you may as well copy your entire code from GitHub (“MarketSentiment.sol“).
Whereas every a part of the code is significant, the “ticker” struct, the “tickerupdated” occasion, and the “vote” operate will play the primary position in our voting system. Amongst different particulars, that is the place we decide that customers can vote for every coin solely as soon as. The “addTicker” operate will allow the proprietor of the good contract so as to add tickers (so as to add cash or tokens to our crypto sentiment dapp). Nonetheless, we additionally add the “getVotes” operate, enabling anybody to get the variety of up and down votes for any specific ticker.
Subsequent, we have to use Hardhat to compile our good contract after which deploy it to a community of our selection. As indicated above, we’ll deal with Polygon’s testnet (Mumbai).

Compile and Deploy Sensible Contract
Contained in the “scripts” folder, we now have the “sample-script.js” file, which we have to rename to “deployMarketSentiment.js” (16:58). Subsequent, we should substitute all “Greeter” and “greeter” with “MarketSentiment” and “marketsentiment”. All that’s left is to take away the “Hi there, Hardhat!” parameter from “MarketSentiment.deploy”.
Our subsequent cease is the “hardhar.config.js” file (18:05). For starters, we add the “require(“@nomiclabs/hardhat-etherscan”);”, “const dotenv=require(“dotenv”);”, and “dotenv.config();” traces. That is additionally our cue to go and create the “.env” file, the place we’ll create a few setting variables. Amongst others, we’ll use PolygonScan’s API key, which can permit us to confirm our good contract. Use the video beginning at 19:08 for particulars.
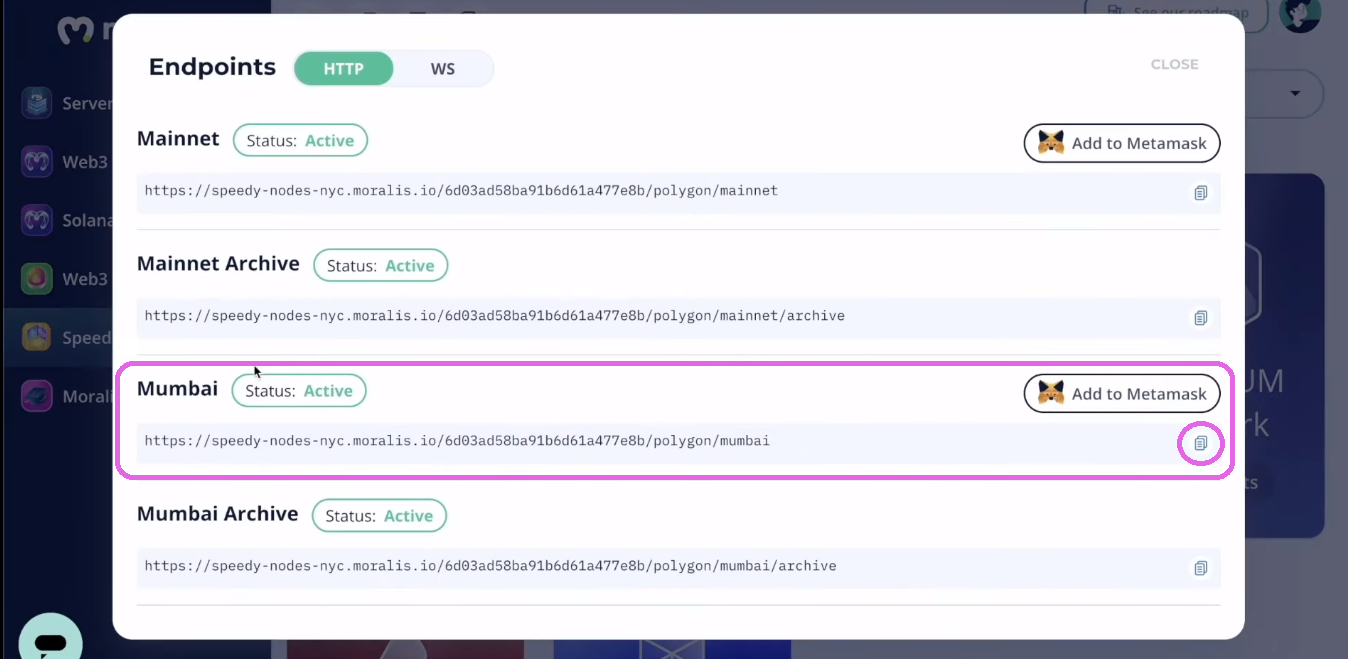
Subsequent, we’ll want the Mumbai testnet’s endpoint. Thankfully, Moralis Speedy Nodes cowl this (19:54). So, in case you haven’t completed so but, create your free Moralis account to entry this function:
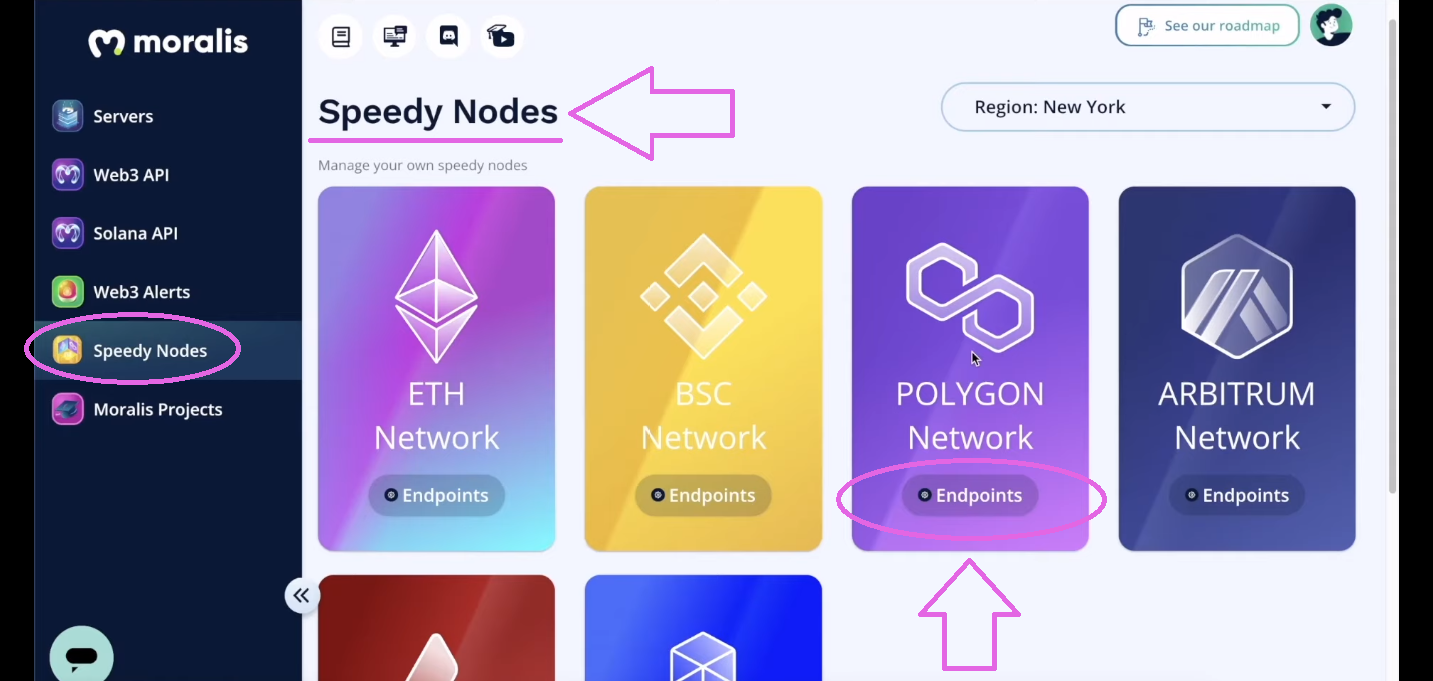
That is the place we copy the Mumbai testnet’s endpoint:
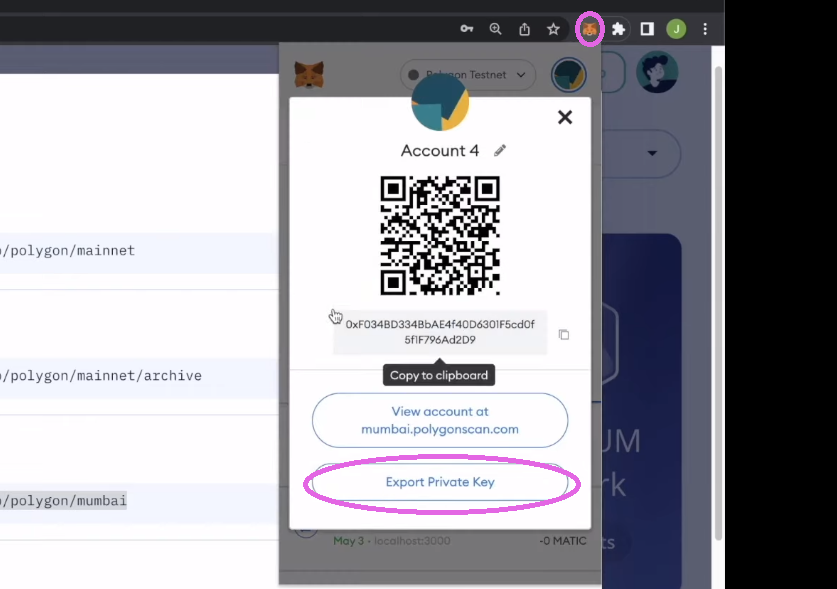
Lastly, we additionally must enter our crypto pockets’s non-public key, which we are able to get utilizing our MetaMask extension (20:40). We go to our MetaMask browser extension, click on on the three vertical dots, adopted by “Account particulars”, and eventually “Export Non-public Key”:
Lastly, we now have all of the environment variables in our “.env” file:

Now, we return to the “hardhat.config.js” file (21:10), the place we first ensure to right the Solidity model to “0.8.7”. Then, we create one other object inside “module.exports” known as “networks”, which we use to outline our community:
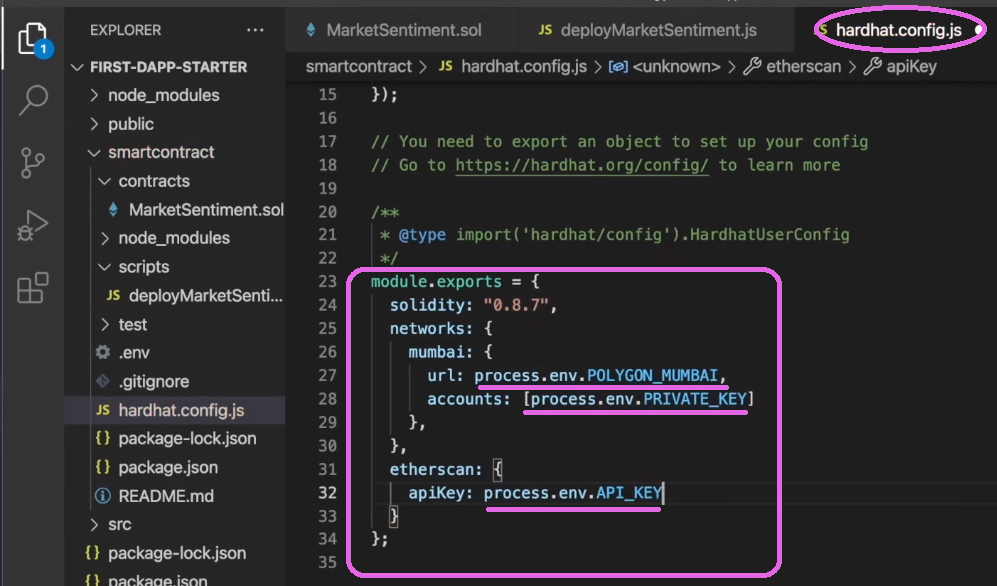
As you’ll be able to see within the picture above, that is additionally the place we use our surroundings variables. That means, we full the final piece of the puzzle. Therefore, we now have every thing in place to compile, deploy and confirm our good contract (22:38).
Utilizing PolygonScan to Learn and Write Contract
As soon as we now have efficiently compiled, deployed, and verified our good contract, we are able to use PolygonScan to work together with it. The latter additionally permits us to entry our contract’s learn and write performance:
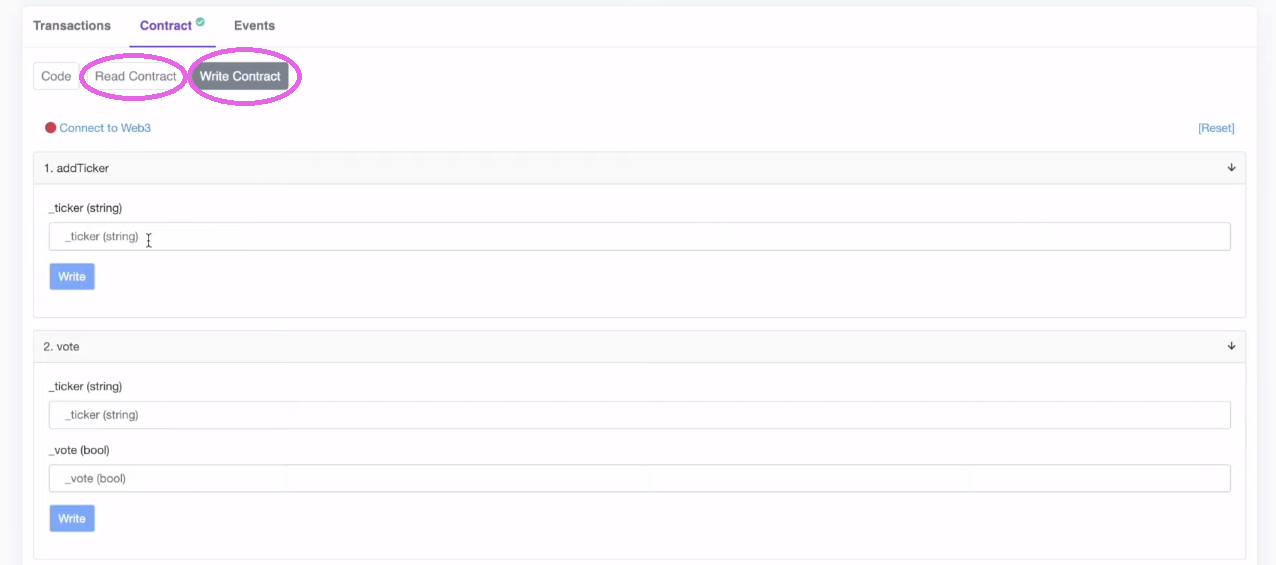
We are able to use the write performance so as to add tickers to our dapp. Furthermore, we are able to additionally verify if the write performance is definitely restricted to the contract’s proprietor. As such, we change to a different account and attempt to add a brand new ticker. As you’ll be able to see within the following screenshot – because the tackle isn’t the proprietor, it might probably’t be used to write down:
Crypto Sentiment Dapp – Frontend
Now that you simply’ve set the core of our instance dapp in place, it’s time to create our crypto sentiment dapp. Nonetheless, since lots of you aren’t new to frontend growth, we’re handing you over to the succesful arms of a Moralis professional. At 29:01 of the video under, you’ll begin by initializing the React app. Then, you’ll get to create your crypto sentiment dapp’s header (30:03), the coin part (32:26), and the vote buttons (38:23).
Nonetheless, with a purpose to make the buttons and your entire utility interactive, you have to create a Moralis server (40:12). Subsequent, you’ll implement the data modal (41:26). Lastly, beginning at 47:27, you’ll discover ways to use the Moralis Web3 API to simply embrace tokens’ costs contained in the “data” modal. Because of the facility of Moralis, you need to use the “getTokenPrice” snippet of code to get real-time costs.
Crypto Sentiment Dapp – Backend
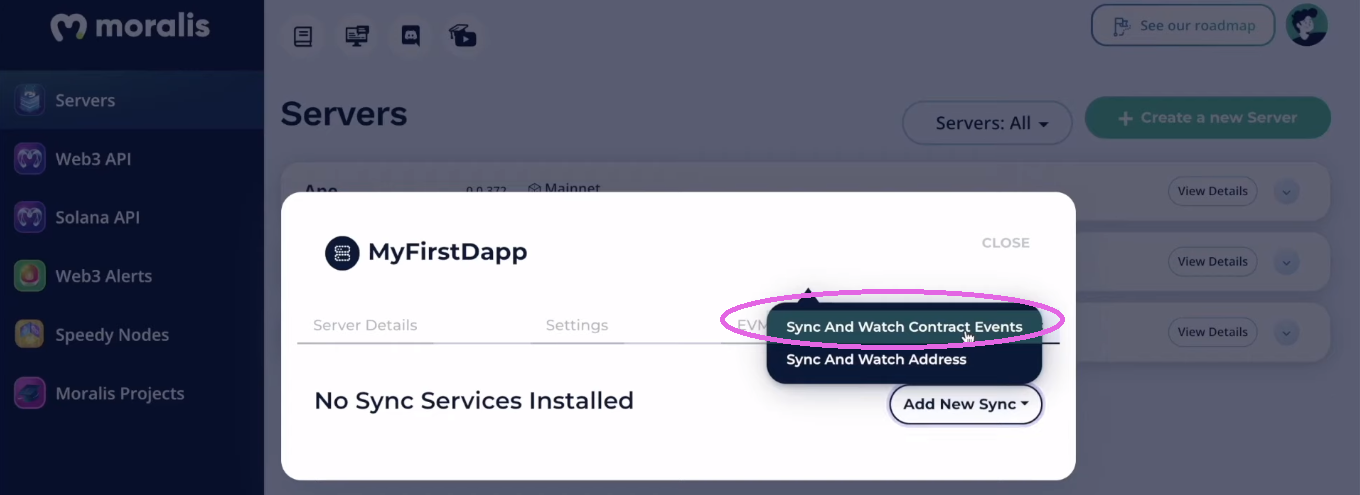
Beginning at 50:30, you’ll get to attach your good contract and your React app. That is the place the Moralis dashboard will simplify issues. It should allow you to simply take heed to and index your good contract occasions. As such, you’ll begin by creating a brand new sync occasion utilizing Moralis’ “Sync” function (50:45):
Together with your new “sync” in place, your Moralis dashboard will mechanically index the votes. It is going to be simple to calculate the ratio to show the proportion values contained in the bubbles for every ticker. Additional, that is the way you entry your Moralis dashboard:
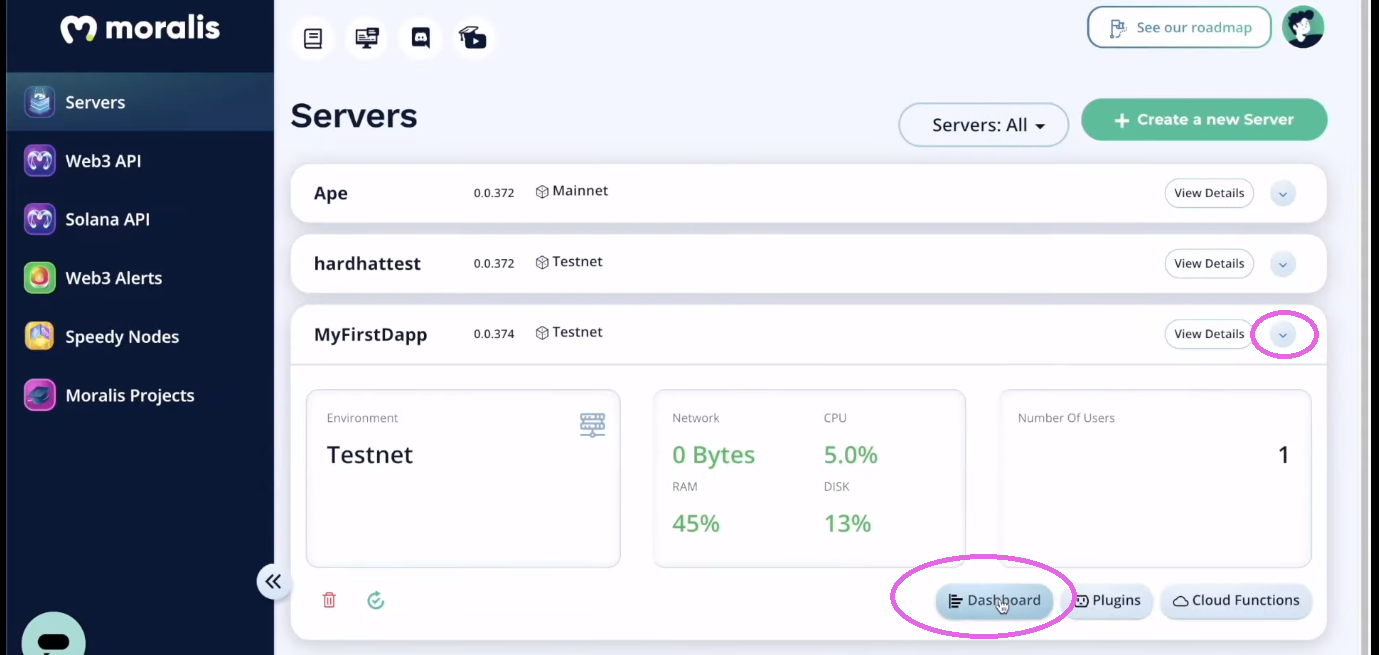
Right here’s additionally a sneak peek into the Moralis dashboard:
Lastly, right here’s the video we’ve been referencing all through the article:
Tips on how to Create a Crypto Sentiment Dapp – Abstract
We lined numerous floor on this tutorial. Following our detailed steering, you had an opportunity to create your personal crypto sentiment dapp in lower than 70 minutes. Should you adopted our suggestion and began with the starter code, you realized a lot about blockchain growth. First, you now know the way to use Hardhat to work with good contracts. Second, you’ve had an opportunity to refresh your React abilities and create a neat frontend. As well as, you had been launched to web3uikit and the Moralis SDK. Consequently, you now have an opportunity to change into a blockchain developer utilizing these instruments.
Since “observe makes good”, we encourage you to tackle extra instance initiatives. Yow will discover them on the Moralis YouTube channel and the Moralis weblog. A few of the newest subjects illustrate the way to authenticate Solana customers with the Phantom pockets, the way to create an NFT on-chain stock system, the way to construct a decentralized Twitter, and the way to construct a market to purchase NFTs in-game. Additionally, subjects educate you about Solidity good contracts, an EIP 1559 instance, decentralized finance (DeFi), and many others. As well as, ensure to join weekly Moralis Initiatives. Nonetheless, a few of us progress most effectively after we take skilled approaches. If that applies to you, enrolling in Moralis Academy is perhaps the suitable path for you.